If a collar, choke, harness and other options do not help control your dog, do not despair. There is an exit. The famous dog behaviorist Antoine Najarian came up with the “Controller” leash-collar. To understand what it is and how to use it, it is worth understanding the features of the device. By the way, you can make such a leash yourself.
Leash controller for dogs invented by Antoine Najarian
What is a harness?
The first accessories, similar to a harness, were used in ancient times in dog sleds.
Currently, dog harnesses are attributes in the form of two straps that pass through the chest along the body. They connect on the pet's spine, as well as between the front legs. According to experts, this accessory is more acceptable than a collar. A dog harness allows you to evenly and correctly distribute the load across the animal’s skeleton. In this accessory the animal feels more comfortable and calm. Moreover, the pet owner has the opportunity to fix the dog in the required position.
But if previously hand-made leather dog harnesses were used exclusively in sledding, today their scope of application has expanded. Most breeders choose these attributes because they allow for reliable control of the animal without affecting its throat. But if the dog is not trained, then he can also show his temperament in a harness. That is, you should not hope that he will stop struggling while wearing a harness during a walk.
Advantages and disadvantages
Let's start with the advantages:
- You can control your pet well without letting it run away.
- The breeder will have the opportunity to adjust the distance between him and the animal.
- A dog harness is an excellent option for teaching your pet to use a leash, which is why it is often used by dog owners while the puppy is at an early age.
- Special cargo attributes, which can be made with your own hands, are perfect for training.
- The attribute can be sewn with your own hands at home.
The accessory also has disadvantages:
- If the dog is very active and does not allow you to put a harness on him (which is often the case with puppies), the process may take some time.
- If at least one fastener is not securely fastened, this may lead to the dog simply breaking loose during a walk and running away.
- Materials that are too soft will tear quickly, especially if your pet is a large breed.
- If you don't switch to it in time, it will quickly get used to it. Accordingly, it will be more difficult to translate it.
Own or homeless
Let's separate the flies from the cutlets and figure it out: what kind of dog are we catching and why? If one of your own runs away - one conversation. If you have to help old ladies like this, like in the introduction, it’s completely different. It would be more appropriate to remain silent about the stray dog, because why catch him? But life situations are simply fantastic. For example, a neighbor always remembered her dog. He ran away a couple of years ago. And imagine the situation: you ran into this neighbor in the store, and you are returning home together. And she is suddenly surprised to recognize her dog in a stray dog running past. The same one who ran away many years ago.
The dog is shy because it is homeless. And the neighbor asks for help with catching the animal. How are we going to catch it?
Methods for pet dogs:
- Team.
- Imitation of the owner leaving.
- Delicacy.
- Dog whistle.
Let's talk about each method more specifically.
Leash for a rabbit: how to put it on, how to make it yourself
It can be difficult to choose a leash for a rabbit in pet stores: they are rarely in stock, sell out quickly and often do not match the size of your pet. In this case, it is quite easy to make a rabbit harness with your own hands. The materials for it are quite affordable and simple.
We will explain step by step how to make a leash for a rabbit. First you need to measure the circumference of the pet's neck, chest and the distance between the chest and neck. Any soft fabric, long braid or thick threads are suitable for a harness. Cover the inside of the harness with fabric so that nothing rubs the animal. Connect the straps with a carabiner (4 cm long), you will also need several small rings for this.
Cut the braid into two strips. One strip is calculated as the distance between the neck and chest is 10 cm. The second: chest circumference, neck circumference 20 cm. Cover the second strip with soft lining fabric from the inside and make a double loop on one side into which the ring is threaded. Where there is a bend, a second seam is made - a buckle is attached to it.
Then all the parts are connected and the leash is secured. Your DIY rabbit harness is ready. All that remains is to accustom your pet to it and start walking. You will soon see that your animal is more active and healthy.
Materials and tools:
- a piece of thick fabric, it is better to take ready-made nylon braid;
- soft lining material;
- centimeter;
- scissors;
- needle and strong thread or sewing machine;
- buckles – 2 pieces;
- awl.
Rabbit leash
Step-by-step instructions for making a leash for a rabbit:
- We take measurements. It is necessary to measure the circumference of the animal’s neck and chest, as well as the distance between these parts of the body. We record the data on paper.
- Cut 3 pieces of braid. The first is 10 cm larger than the circumference of the animal’s neck. The second piece is 10 cm longer than the chest circumference. The third (connecting jumper) is 8-10 cm greater than the distance from the neck to the chest of the animal. The extra fabric will be used for seams.
- We cover all 3 fragments from the inside with soft fabric.
- On the first two fragments of the braid, we make a loop at one end and thread a buckle clasp into it. We make holes at opposite ends of the fabric using an awl. It is advisable to treat the perforation areas with threads or use special metal rivets so that the fabric does not fray.
- In the center of the jumper that connects the two straps, we make a loop and thread a ring into it. Subsequently, it is to this that the leash carabiner will be attached.
- We connect the three parts together so that the jumper is on the back of the animal.
Attention! The finished product should be tried on to ensure that the fasteners are adjusted correctly. If necessary, make 1-2 more holes on the straps if the harness does not sit tightly. To make it you will need the following materials and tools:
To make it you will need the following materials and tools:
- centimeter for taking measurements;
- sewing machine;
- scissors;
- awl; braid;
- soft fabric for lining (for example, flannel);
- small diameter ring;
- sewing threads;
- buckle.
You can make a harness with your own hands by following the following instructions:
- We measure the ears with a centimeter. To do this, we take measurements of the circumference of the neck, chest, and the gap between them;
- then we measure and cut two strips from the braid. We calculate the length of one strip by summing the girth in the chest and waist area, and adding 20 cm to the resulting amount as a seam allowance. We calculate the second strip as the size of the gap from the animal’s neck to the chest plus 10 cm;
- we sew the lining to the first strip from the inside;
- make a loop at one end and place a ring in it;
- at the break point we lay another seam and attach a buckle to it;
- cut the other end of the braid into a bias;
- we pierce several holes one centimeter from the end of the cut using an awl;
- we hem the strip from the inside out and at the ends with lining fabric;
- then we connect all the parts and attach the leash.
There are now different types of harnesses for walking rabbits; you can even sew one yourself. The most convenient and reliable is considered to be a harness with a body in the form of a vest. A walk in the fresh air can be enjoyable for your pet, or it can be stressful for him. Be attentive to your little ear and the choice of place for walking.
How to make a harness for a rabbit: video
Use of weave
The pattern that will be woven into this collar is quite well-known, that is, it is very often found, for example, in various bracelets. For weaving you will need the following:
- two skeins of rope 2.5 mm wide (preferably in different colors) or one skein 5 mm wide;
- plastic fastener;
- metal ring for attaching a leash.
Creating the perfect bouquet: 7 golden rules of floristry
The skeins are unwound and the rope of each color is folded in half, after which it is threaded through one part of the clasp and tightened through a loop. Next you need to immediately outline and attach the second part of the lock along with the ring for the leash. To do this, first measure the length of the collar by eye and fold it into a loop. Then all four ropes are threaded first into the ring and then into the clasp. The free end is not cut off; it is useful for weaving.
Next, take a ready-made collar for the dog, if there is one, and use it to measure the exact length of the collar. When the clasps are at the desired distance from each other, you can tighten the loop at the other end (where the ring is attached). Now the weaving stage begins. For convenience, it is better to secure the locks on both sides by gluing them to the table with tape.
Braid order
The first (left) strand is passed under the warp and a large loop is formed. The second (right) strand is placed under the left one, i.e. the first strand goes under the base and above the second strand. After this, the end of the right strand is pulled into the loop of the first one formed at the beginning and tightened tightly on the base. The same thing is done on the other side. The right strand is pulled under the base and over the left strand. The end of the left strand is pulled into a loop and tightened on the base. In this way, the entire distance between the latches is braided.
DIY cocktail straw bracelets and necklaces
Completion of work
When the weaving is completed, the ends of the ropes are tied together as follows: one of the strands is threaded through the fastener so that all four ropes are on the same side, after which both ropes are tied into a knot (closer to the weaving). The remaining tails are woven into the pattern using a hook, and the ends are trimmed.
General recommendations
The regulations of modern exhibitions prohibit the display of dogs without a special noose. Any harnesses, muzzles, strict or casual collars are unacceptable. The further assessment of the pet and its victory in the ring depends on the correct choice of the ring. However, simply buying an accessory is not enough. The handler needs to know how to use it.
Currently, the list of exhibition rings is very extensive. On sale you can find products from the most manufacturers with different appearance and equipment.
- As already mentioned, ideally the noose should remain almost invisible and blend in with the color of the dog’s hair. In addition, the thinner the ring, the better it will be to control the pet. If you are the owner of a young and inexperienced dog, especially one of small breeds, it is better to start accustoming it to soft, wide rings with a flat or round cross-section.
- You can use a thin ring in cases where the dog will behave intelligently with different accessories.
- Give preference to those nooses whose color perfectly “disguises” the dog, complementing it, rather than indicating defects. Contrasting models divide the neck, violating the impression of integrity, so it is better to avoid them.
- In turn, black models are especially effective when displaying dark, gray or blue pets, and white models are especially effective when displaying light-colored and spotted dogs.
There are no special rules for choosing a ring shoe, but in order to avoid possible troubles, it is advisable to follow at least the basic recommendations. In this case, both your pet and you will be happy with the purchase.
Useful materials:
- Cestal reviews for dogs AnaloguesCestal for dogs is a popular remedy that can be found in any veterinary pharmacy, but...
- Decaris for dogs Dosage regimen Animal owners who are wondering whether the medicine can be used in veterinary medicine should know…
- Fiprist for dogs instructions Composition and release form Fiprist is available in the form of drops and spray, and the drops are produced in two…
- Herding dog breeds Herding dog breeds Herding dog breeds have helped humans herd herds of goats and sheep since ancient times,…
Collar jerk controller. The principle of its operation
Before considering the basic principles of the operation of such a product as a half-choke collar for active dogs, it is worth noting that this item was created by Antoine Najarian. Thus, the inventor of the training tool combined two main functions in one item:
- the effect of an object like a strict collar;
- the ability to use the dog protective element as a simple collar.
In order to properly raise a pet, it is necessary to resort to such a technique as training with the help of a special tool, and here a special half-choke chain collar comes to the rescue.
If we talk about the inventor’s attitude towards four-legged friends, then when creating such a product as a fixative, he in no way expected that the product could somehow harm the pet. However, the basic operating principle of the item is that dog breeds such as Doberman, Shepherd, Spitz, Husky, mixed breed and others must understand that the owner is the dominant one, and the dog must obey him. Thus, a harness is necessary so that the dog clearly understands this and does not put itself above the person. However, it is necessary to correct the animal’s behavior with extreme caution, since this process should not differ from what can happen between dogs in a herd.
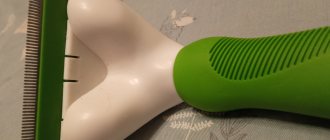
The external description of the bridle states that the item resembles a tight nylon cord. The length of such a noose collar does not exceed three meters. Both edges of the educational device contain two rings with the help of which the tension of the harness is adjusted. To understand how durable the impact muzzle is, it is worth saying that it is designed for five hundred kilograms. Therefore, even a large puppy will be effectively restrained by it.
Materials and tools for making a dog collar
How to make a collar for your beloved dog with your own hands at home? First of all, you need to acquire the necessary tools and decide on the materials from which the collar will be made.
Nylon Ribbon Collar
A collar made from nylon tape is very easy to make. To do this you will need:
- nylon tape;
- textile tape or neoprene strip;
- plastic carabiner;
- buckle with two holes;
- ring in the shape of the Latin letter D;
- sewing machine.
Algorithm of actions:
- The first step is to measure the volume of your pet's neck. The result obtained should be multiplied by 1.7.
- Cut the nylon and textile tape to the required length.
- Using a sewing machine, sew both ribbons into one. The stitching should be done in such a way that the line being laid is as close to the edge as possible.
- The next step is to attach the plastic carabiner. To do this, you need to pull about 4 cm of tape through the carabiner and secure it with machine stitching as close as possible to the plastic jumper.
- Next, you need to insert the D-ring and finally secure the piece of tape.
- The free end must be pulled through the second part of the carabiner.
- To adjust the volume of the collar, you need to use a mobile buckle with two holes. To do this, you need to push the tape through the holes and securely secure it with double or triple stitching.
It’s not at all difficult to make a leash from nylon tape with your own hands.
Leather collar
As practice shows, a leather collar is the most practical option for a dog accessory. To make it you will need:
- leather belt;
- buckle with rod;
- ring in the shape of the Latin letter D;
- rivets;
- special glue for leather.
The algorithm of actions is as follows:
- First you need to measure the volume of the dog's neck. To the resulting figure you need to add 24 cm.
- You need to cut a piece from the belt equal to the result obtained during measurement.
- Next, you should round off the ends and treat the edges of the belt with leather glue. This must be done to ensure that the future product does not rub the pet’s skin.
- The next step is to mark the rivets and holes for the buckle shank. Once the markings are applied, you need to make holes with an awl. To make your work easier, the awl can be heated.
- The last step is to install the buckle. To do this, you need to thread the edge of the belt through it and secure it with rivets.
A paracord collar can highlight your pet’s individuality
Paracord collar
Paracord is a cord that is commonly used to make parachute lines. In addition to its direct purpose, it is widely used for a wide variety of purposes. You can try making a braided collar for your dog from it. You should have on hand:
- paracord rope;
- ring in the shape of the Latin letter D;
- fastex - carabiner for fastening;
- lighter;
- stick for pushing the cord.
Step-by-step master class:
- The work begins with measuring the dog's neck. The result should be multiplied by 3. The resulting figure will indicate the length of the cord that will be required to make a braided collar.
- Cut the cord into 3 parts. The ends of the cut cord must be scorched with a lighter to avoid destruction of the structure.
- The clasp of the future collar should be unfastened and the cords should be secured so that the outer ones are several centimeters longer than the one in the middle.
- Next, weaving is done using the macrame technique.
- Having reached the end, you need to weave a D-ring to attach the leash.
- The last stage is securing the cords to the second part of the fastex. To prevent the ends of the cords from sticking out, they should be soldered to the inside of the collar using a lighter.
A collar is an accessory on which not only the pet’s cute appearance, but also its safety depends. Whether purchased at a pet store or homemade, it must fully meet this main criterion.
Interesting option
A leash made from paracord makes a great leash option - it's a very strong and durable braided leash that works well for any breed of dog, no matter their size.
Article on the topic: Tying the neckline with knitting needles: master class and schemes for working on the edges of the product with photos and videos
To make a leash from the classic Cobra knot, you need about thirty centimeters of lace to get a piece of leash of two and a half centimeters, not counting the middle. Thirty centimeters of leash will require fourteen times more cord. Based on this, approximately four hundred and twenty centimeters of lace are required, of which three hundred and sixty centimeters for weaving and sixty centimeters for the middle.
If you choose “king cobra”, then the lace consumption will be 45 centimeters per 2.5 centimeters of leash. Sometimes the exact amount of material is not possible, so it is better to take a lace with a reserve. In this master class, a leash of 180 centimeters was created, and approximately 480 centimeters of cord were used, including 45 centimeters for the handle. A total of 525 centimeters of cord were used.
Now let's look at the node in detail. First you need to find the center, it will affect the length of the leash, the knot and the distance to the carabiner. Now take one of the ends of the lace and place it above the center, leaving a loop. Now we take the second end and pass it over the 1st, but this time under the center and pull the lace up through the loop. We continue to do the same, while directing the cord in different directions, and when using the “king cobra” method, we do the usual one twice, and use it as the center - this will give more strength and volume.
To create a leash you will need:
- scissors;
- tape measure or measuring tape;
- paracord;
- lighter;
- clamp;
- rubber;
- carbine;
- a small piece of old lace;
- time, effort and job description.
We make the correct knot on the carabiner.
Related article: DIY satin ribbon crown: master class with video
The clip is wide, so you need to wrap the loop several times, and only then pull the lace through it. We make the main knot by winding and pulling once. But if necessary, we can expand it further. In this case, you will get a strong non-slip connection. To keep the carabiner in place, take an old cord and tie it using a Prusik knot:
And now it’s time for the most interesting part of weaving - creating a handle. If you understand the method of its manufacture, everything else will immediately become very simple. After we have attached the cord to the carabiner and measured the required length, we need to make a loop from the paracord cord - this will be the handle. Then we do the “Jump to the Middle”, for this we take 2 intertwined cords and begin to weave them through the lower part, where the loop connects to the leash. This is where the handle will be attached.
Behind the “Jump” we tie the handle using the “Cobra”. And we finish using the “King Cobra”. To make it more comfortable, we make a skein of lace and secure it with elastic bands. Thus, it will be more convenient to pull it into the knots without stretching the entire length of the leash, and will also save a lot of effort and time.
When the braiding of the handle is completed, you will need to go around the original center. Once again we “Jump” along the long piece and make a continuous loop.
Now you need to braid the entire lace from top to bottom. A neat appearance is important here. It will be good if you weave as close to the clamp as possible, this way the leash will become wider. The point is to perform the reverse “king cobra”.
When we braid as wide as possible at the clamp, you need to turn everything and make “Cobra” as the middle. In this case, it is necessary to stay close to the clamp so that the leash does not twist or turn in the future. We remember that around the bend you need to weave in the opposite direction.
Related article: DIY paper gun: diagrams with photos and videos
Having reached the starting point of the handle, we braid it in a circle.
When we reach the beginning of the long part, we cut and melt the lace, now we pull it tighter and cut off what is unnecessary, after making sure that the edge of the lace is firmly fixed. And now an excellent and interesting leash is ready and can delight both the owner and the pet.
This version of the leash will be more strict; it is created from a belt tape, approximately two and a half meters long. To do this, we melt the edges with a lighter, then thread the end into a metal ring, creating a handle and attaching it with a strong seam. Now you just need to put the carabiner on the ring, and the leash is ready.
DIY dog leash
You can buy a leash for your pet in a store or make it yourself.
The first step to making an accessory is selecting accessories. Branded factory-produced models are usually equipped with high-quality fittings. Metal carabiners, half rings or rings must be of high quality.
The carbine is selected according to the size and temperament of the dog. They use special fittings and do not use parts for the production of bags, as they will not withstand the jerk of an animal. Carbines are sold in pet stores and retail outlets selling hunting and fishing gear.
Carabiners for leash
Rings and half-rings must be welded.
Sometimes rivets are placed on the product, but you can get by with stitching with strong threads.
The next stage is the choice of material for the leash. They also don’t skimp on quality. The product should be strong and elastic. The accessory is made from ribbons and cords of various materials. Cords can be purchased at a sewing accessories store, equipment for mountaineers, or braided yourself. A homemade cord can be made of synthetic or leather.
Cord for making a leash
One of the most popular materials for making your own ammunition is nylon sling. But it is not the best option. This tape glides in your hands. The dog's jerking on it causes pain to the owner, especially if the sling has a sharp edge.
A canvas leash is very durable, but can also damage the owner's hand. This material is used in the manufacture of leashes for trained and balanced large dogs. The accessory is not very aesthetically pleasing, but it can be decorated.
Canvas dog leash
The leather leash is soft and comfortable. Calfskin leather makes the most comfortable products. To avoid the negative effects of moisture, the leash is treated with a special compound.
Leather leash for dog
Step-by-step instructions for making a leash with your own hands
Most dog owners have a question: how to make a leash for their pet at home? The cost of such a leash is minimal, so this option is suitable for dog owners with a small budget.
To make your own leash, you will need:
- Durable linen or canvas tape
- Carabiner and connecting ring
- Sewing machine
- Scissors
- Lighter
Items needed to make a leash
It is advisable to buy carabiners used in the production of bags.
On average, the length of the leash should be 2.5 m. One side of the product needs to be adapted for a carabiner, and the other will serve as a handle for the owner.
Such carabiners are used in the production of bags
Before making the leash, you need to treat the ends of the ribbon with a lighter so that it does not unravel.
One end of the nylon strip is threaded into a carabiner, folded in about 30 mm and folded inward. The resulting three layers of tape are stitched in several directions.
It is necessary to wrap the edge of the resulting tape so that you get a loop for the carabiner
Attaching the strap to the carabiner
After installing the carabiner in the loop, you need to stitch it several times on a sewing machine for strength.
It is necessary to sew the tape on a sewing machine for strength
On the opposite side of the tape a handle is made in the form of a loop. The size is determined as follows: wrap the material around the arm and add an extra 4-5 cm. Make a three-layer hem and stitch it.
Hand loop on leash
Handle manufacturing diagram
Your product is ready.
DIY leash for your pet
But do not forget the fact that the carbine and ring must be of high quality, because not only the strength of the product, but also the safety of others and your dog will depend on this.
In the same way, you can independently make not only a leash for walking your pet, but also a leash-driver.
Determining the length
First, you need to measure your tailed friend's neck. Determine the place on your neck where the collar will hang and take the size. Add 3-4 cm so that the dog feels comfortable in the collar. To calculate the required amount of paracord for our work, multiply the measured size by 4. The girth of the dog’s neck in this example is 45 cm. Hence, two skeins of paracord were needed, each 1.8 m long. (45×4=180).
Let's start weaving
Fold the cords in half and thread each through the single-slot end of the buckle. Now take the ring and pass both cords through it, move it close to the buckle. Next, thread each pair of loose paracord ends through its loop and pull tight.
Clamp the buckle
Clamp the buckle in a vice on a stable surface, this will make it much more convenient to weave the collar with your own hands, because... The buckle will stay in place and you will be able to keep the cords taut.
Making a knot
Take the left pair of cords and make a loop around the right pair as shown in the photo. We take the right pair of cords and carry out similar actions. We received a full cycle of our node.
We continue to weave
We continue to weave the collar until we reach a point that is 5 cm from the end. Pull the loose ends into the second part of the buckle and leave a couple of centimeters between the slot in the buckle and the knot.
Hiding the ends
Take two ends of different colors, wrap them around the free area that we left in the previous step and pass them from above into the loop that was formed. All that remains is to properly hide the ends, trim off the excess and cauterize it.
A DIY collar is an excellent and inexpensive alternative to a store-bought one. We offer you several step-by-step lessons on how to create one from nylon sling, leather and woven cord.
Types of leashes
There are absolutely many different types of leashes, but they can be easily divided by type.
Leashes for dogs exist:
- decorated with decorations;
- from tarpaulin;
- for large breed dogs;
- for small dogs;
- from genuine leather and other natural fabrics.
Each of them can be intended for different purposes. Below you can see photos of dogs with these accessories.
For walks
For walking your pet, leashes are made of classic material: tarpaulin or leather, because thanks to the fabric composition, the accessory is quite strong and elastic
With his conservative appearance, he can attract the attention of other dog lovers
When purchasing a leather accessory, you should take into account the fact that if it accidentally gets wet, the product will lose its flexibility and may crack, so to avoid troubles it is necessary to treat it with special liquids. It is ideal for small dogs, who will not be able to deform it if, for example, they fall out of place. Large dogs are suitable for tarpaulin devices because the fabric composition is more elastic and can be subject to greater loads.
It doesn't look all that attractive, but it can last quite a long time. Among other things, it can be easily folded and stored in a bag.
Large dogs are suitable for tarpaulin devices because the composition of the fabric is more elastic and can be subject to greater loads. It doesn't look all that attractive, but it can last quite a long time. Among other things, it can be easily folded and stored in a bag.
Ringovka
This name characterizes a special accessory that is designed to highlight the animal at the exhibition
It is at the same time catchy, but at the same time does not distract attention from the dog. There are also different rings and they often don’t have a carabiner. A pet dressed in such decoration looks very attractive
It is very easy to use and consists of a carabiner that connects two loops, one of which goes around the dog’s neck, and the other on the owner’s wrist. It is very comfortable to wear
A pet dressed in such decoration looks very attractive. It is very easy to use and consists of a carabiner that connects two loops, one of which goes around the dog’s neck, and the other on the owner’s wrist. It is very comfortable to put on.
Driver
The leash received such a funny name due to its short length. It is used for a short time and is well suited for medium and large animals. A driver is an elongated loop that is placed on a person’s wrist.
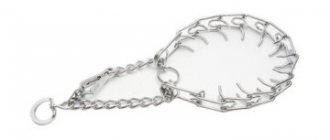
Chain
This device is quite popular because the owner would prefer to choose an elegant and beautiful chain that will make the pet stand out from others, rather than a regular walking accessory.
But this option also has disadvantages:
- Wool may become clogged in the chain links;
- the chain that holds the animal is quite voluminous and heavy;
- When loaded, such a leash, made of weak links, can break.
Sparka
This leash option is very convenient if the owner is an avid dog walker and wants to walk several pets at once. You cannot use this accessory all the time, because even 2 dogs in a pack is a huge burden, because the accessory hinders the movements of the pets, as if they were stuck to each other.
When choosing a leash, you need to be guided by the purpose and size of the animal. You can learn how to choose a leash for a dog and how to put it on from the video from the All About Cats and Dogs channel.
https://youtube.com/watch?v=gdGolNr6_JA
Operating principle
Externally, the leash-controller is a three-meter cord made of nylon, on both sides of which there are two soldered rings of different sizes. There are also two clamps that allow you to control the tension of the leash. The product combines the functions of regular and strict (used for training) collars.
Using a controller allows you to teach a dog to obey its owner
The principle of operation of a dog leash is as follows: after the device is put on the animal, you can start moving. At this time, the dog should walk nearby. If the pet does not want to walk correctly and is constantly distracted by people, animals, and various objects, it is enough to simply raise the leash up quite sharply. As a result, the dog will feel a painful squeeze that does not last long. However, this will be enough for the pet to understand that he is doing something wrong.
The effect is due to the impact on the dog's senses. Such methods of training give more results than simple and regular verbal training.
Attention! During training, it is important to pronounce the necessary commands in time so that the dog understands what is wanted from it.
Leash, harness and collar for a rabbit: how to put it on and make it yourself
Decorative rabbits are popular today. They are kept indoors and walked just like dogs or cats. For convenience when walking, you will need a rabbit leash. It's better to attach it to a harness.
Why does a rabbit need a leash?
The animals are active and curious. To feel normal, they need movement, walks, preferably outside, in the fresh air.
Letting a rabbit go unattended is dangerous. This is a shy animal, and there are many enemies around, such as dogs. You can walk together, but no matter how much the animal loves its owner, it will most likely run away. Especially if he is afraid of a car or something else.
A safe option is supervised walking. That's what a leash is for. It is more common to see it on dogs. It is essentially a rope that is attached to a collar or harness. Sometimes a roulette leash is used for rabbits. This gives greater freedom of maneuver.
The leash usually comes with a rabbit harness. A collar, on the contrary, is usually not used for the following reasons:
- Leads to injury. With a strong, sudden pull, you can strangle your pet or cause injury, since the neck muscles of rabbits are poorly developed.
- It is easier for the animal to escape. When in danger, he can dodge in the most unimaginable ways.
Instead of a collar, they take a harness - a special device made from belts. It secures the chest, part of the back, and neck. The leash is usually attached near the withers. The load falls on this area and is evenly distributed over the front of the body. The neck does not suffer.
How to put a harness on a rabbit
The products are easy to put on. However, without habit there are difficulties. Plus the rabbit puts up resistance. To make it easier, study the design in advance.
If you look at the rabbit from the side, the harness on resembles the letter “n”. For rope models, the order of putting on is as follows:
- Inspect the straps.
- The smaller one is placed around the neck and fastened. The index finger should pass between it and the body. Do not tighten the strap loosely, otherwise the animal will free itself. You don't need too much either. This causes discomfort.
- The larger strap of the harness is placed over the stomach. Fasten it up. Check that the fastenings do not pinch the skin or fur.
For products with a body, the procedure is even simpler:
- Apply to the rabbit's back.
- Wrap the body.
- Fastened with Velcro and fasteners.
- Check that the vest fits well: does not dangle or pinch.
How to train a rabbit to wear a harness
It is advisable to practice before your first walk on a leash. Rabbits are shy animals. Exercising will relieve you of unnecessary stress. It takes several days, sometimes a week, to get used to the harness and leash. They do the following:
They collect the rabbit “for the road”. At first, use only a harness without a leash. The animal runs around the house for several minutes. Trying. The “load” time is gradually increased. Attach a leash. They are still walking around the house. They wait for the animal to get used to the harness and leash. They go outside. Choose good weather and a quiet place
It is better to use a carrier and then release the animal. They walk carefully. They do not make sudden movements or pull on the leash. They provide psychological support to the rabbit: they encourage them with their voices, they pet them. Gradually the pet becomes bolder
Sometimes they give him the illusion of freedom: they tie him to a peg or attach a roulette leash.
They provide psychological support to the rabbit: they encourage them with their voices, they pet them. Gradually the pet becomes bolder. Sometimes they give him the illusion of freedom: they tie him to a peg or attach a roulette leash.
While walking, do not forget a few more rules:
The harness does not guarantee complete safety. It does not protect against injuries 100%, especially rope. In case of stress or attempts to escape, sometimes pinching, damage to internal organs, and fractures occur.
Be careful.
They don’t necessarily walk near the house. Carrying helps you go outdoors.
Rabbits are active animals
If an animal does not run, but only sits or lies down for a walk, this is not normal. Most likely, the animal is stressed. The pet is calmed down and returned home.
Before the walking season begins, the rabbit is vaccinated. There are a lot of germs and parasites outside, including in the grass.
Cold, wet or hot weather is detrimental to a rabbit's health. Colds, heat strokes and other problems are possible.
Rabbits require movement and fresh air to live a normal life. Even in the city you can give them useful and interesting walks. All you need is a harness and leash.
Training a puppy using a choke collar
When training a puppy, you need to use a noose very carefully, but in some cases you cannot do without it. With the help of a device, the animal can be distracted from various factors that interfere with learning. When used correctly, a choke collar cannot harm your pet. But its use will allow you to cope with the puppy’s disobedience and educate him.
For young dogs, the use of a choke is very similar to the training methods used by an adult mother dog. She will lightly choke the puppy until he yelps and feels discomfort.
For your information! Walking in a dog's noose follows approximately the following scenario: with any movement to the side, the dog will experience unpleasant sensations when the noose is tightened.
Description
HOW IS THE “CONTROLLER” DIFFERENT FROM OTHER LEASES, COLLARS AND WHAT ARE ITS ADVANTAGES?
- Does not injure the dog, unlike strict.
- A slight tug is enough, and the dog understands what you want from it (watch the video - everything is clearly shown there) and walks next to you - at your foot.
- Allows you to gently and painlessly correct your pet’s unwanted behavior.
- Performs the function of both a leash and a collar. By purchasing a controller, you get both, two in one.
- It has a durable metal clamp that allows you to keep the collar in the most sensitive area of your dog's neck, so you don't have to constantly adjust it. No matter what the dog does, the controller does not slip - the unique lock has a high degree of fastening, thanks to which the collar always remains in the place in which you secured it.
- Equipped with two locks. The first helps keep the collar in the right place on the dog's neck. The second allows you to attach the controller to your belt, bike, etc. This way, you can lead your dog with both your hands free. Or, using one leash, you can lead two dogs at the same time. Moderately thin and light, making it very comfortable to use and hold in your hands. Made of: durable 8 mm nylon cord, which can withstand loads of more than 500 kg of weight, 3 meters long; two steel, soldered rings of different diameters; two metal clips. The Controller collar leash is suitable for dogs of all breeds and sizes.
Delivery and payment [email protected]
_________________How to Place an Order
The colors of the materials on the website may differ slightly from the actual ones due to the color rendering characteristics of the monitor.
By clicking the “ADD TO CART” button you proceed to the direct processing of your order. Fill out all the fields, check the details (full address, zip code) of the order and click “Proceed to payment”. Within three working days you will receive a response to your email with a letter confirming the shipment of the parcel! We send the parcel with the order within three working days. Tracking the parcel —————————– After the parcel has been sent, your order will be assigned a postal ID number. Within a few days after sending, we will definitely send the postal ID of the shipment (to be able to track the location of the parcel on the Russian Post website).Order via email ————————————————- If you find it difficult to place an order on the site yourself, or you need preliminary consultation, write to us by email
Or write to WhatsApp +79654597872 manager Christina
To order by email: you must write in the letter the postal code, exact address, full name of the recipient, mobile phone number. Specify color and quantity. We'll send you the payment details!
———————-Colors of materials on the site may differ slightly from actual ones due to the color rendering characteristics of the monitor
———————In which cities and countries can it be purchased? ————————-MOSCOW ST. KRYLATSKIE HILLS HOUSE 26 BUILDING 2. VETERINARY CLINIC "VELVET" CONTACT TEL. 84955051851
—SAINT PETERSBURG St. Petersburg, tel. —EKATERINBURG DogPride Ekaterinburg – Cynological Center +7(343)3613638 +79221813638
—ASTRAKHAN Ilyas Ibadulaev +79170920360 Osipnoy hillock, Astrakhanskaya 55 —-
KAZAN +79274309378 Mansur
—UKRAINE metro station Kyiv, Radishcheva lane 8 (Office) 093-831-99-86 067-727-50-51 Alexander Viber —
UKRAINE Krivoy Rog Tel.. (066) 183-07-07 Orlyonok Valery Viber, Whatsap, Telegram
– other cities and countries by mail
Why choose a controller?
The leash controller is a device made of a nylon cord approximately 3 meters long. The product was created by dog handler Antoine Najarian in order to make the animal understand who exactly is in charge. The controller allows you to adjust the pet's behavior so that it clearly understands what is required of it and does not try to dominate its owner.
A leash controller is a great accessory for dog training.
The positive aspects of such a device include the following:
Types of leashes
As you will understand after seeing the photo, there are quite a lot of types of leashes. On sale you can find accessories designed for large species, small breeds, decorative or natural. They can be made of canvas or genuine leather. But the most important thing is that all dog leashes differ in purpose.
For walks
As the selection shows, traditional leashes for dogs of all breeds intended for walking are made of leather or canvas. In practice, these attributes are very durable and practical. For example, leather accessories are characterized not only by durability, but also by an interesting appearance. However, frequent walks in rain or wet weather can lead to deformation of the leather attribute and loss of elasticity, which means the accessory may crack.
When it comes to canvas options, if you are wondering how to choose a dog leash, there are several factors to consider. Unlike leather accessories, canvas accessories are not as attractive in appearance, but they have a longer service life. In practice, they hardly crack and, in general, are almost resistant to negative environmental influences. In addition, they are able to withstand maximum loads.
This option will be optimal for large breed animals, although leather ones are suitable for dogs of different sizes and breeds, it all depends on the thickness. Leather attributes should be constantly impregnated with special products, but canvas ones do not require maintenance.
Ringovka
The show ring is suitable for both large and small breeds. This accessory will be the best way to present your dog at an exhibition without distracting him. Showing allows the pet to acquire bearing and become. This type consists of two loops. One of the two is put on the pet’s neck, the other on the person’s hand, and they are connected to each other using a carabiner.
In addition to metal rings, there are also fabric or leather ones, which can be with or without a lock.
Driver
You can put a walker on large or medium-sized animals of any breed if the walk is short. Essentially, a driver is an enlarged loop that a person puts on his hand. For representatives of small species, the carrier will be too large, so it is optimal for medium and large dogs.
Chain
When walking, you can also use a chain. This option looks more interesting compared to worn leather leashes. But, unlike leather chains, chains have many disadvantages. For example, such an attribute is quite heavy, the fur of a pet can cling to the links. Additionally, if the links are not welded properly, the chain can easily break.
Sparka
If you are the owner of two pets, then in your case the best solution would be a pair. Sparka, or as it is also called - a dog, is designed for walking two dogs. That is, you can control two of your animals at the same time while walking.
But it should be noted that a pair for two animals can only be used for short walks or exhibition events. Over time, mating for two dogs can hinder the pets' movements. And just walking for a long time side by side with another dog can cause discomfort.
What parameters must it meet?
The main parameters of the leash are determined by the following characteristics of the fishing line:
Breaking load. The breaking load of the leader should always be lower than that of the main line.
Color. Most anglers use clear line to make leaders because it is the most versatile.
But there are those who pay special attention to the color of the fishing line. In such a case, there are the following recommendations:
- very clear water - blue line;
- fishing in the grass - green line;
- fishing on a sandy bottom - yellow line;
- fishing on a pebble bottom - brown line;
- fishing in snags - black line.
- Length. The length of the leash is a very important parameter, which depends on the type of equipment and the fish that is the intended prey.
Depending on the type of equipment, the length of the leash varies within the following limits:
for a fly fishing rod – 15-20 centimeters; for a plug fishing rod – 10-15 centimeters; for match and Bologna rigs - 25-30 centimeters.
Depending on the type of fish, the length of the leash is:
- For bleak. A leash 10-15 cm long is quite sufficient, since fishing is carried out in the middle or surface layers of water.
- For roach. Depending on the type of equipment, the length of the leash varies from 15 to 30 centimeters.
- For bream. Bream need a long leader. If you have to fish in the bottom layer, the leash should be 25-30 centimeters long. Bream are often caught using bait lying motionless on the bottom. In such cases, a small pellet is installed in front of the hook at a distance of 5-10 centimeters, performing the function of a feeder. Having taken the bait in its mouth, the bream does not feel resistance, while the float rises and lies on its side, giving the angler a signal of a bite.
Expert opinion
Knipovich Nikolai Mikhailovich
Zoologist, hydrobiologist. I am interested in fishing at a professional level.
Attention! Monofilament fishing lines can be soft or hard. Rigid fishing line is more suitable for making leashes because it tangles less
Separately, it is worth mentioning leashes for catching predatory fish using float rigs. To catch perch with fry, fluorocarbon leashes with a single hook are used. To catch pike with live bait, use metal leashes made of soft leash material or thick fluorocarbon leashes. Hooks can be single, double or triple, depending on the fishing conditions.
Hooks for leashes should also be given close attention. Depending on the type of bait, hooks can be of different sizes, made of wire of different thicknesses, have a short or long shank, etc.
You can also find hooks of a specific shape, for example, carp hooks and red hooks. Hooks are produced with notches on the shank, designed to prevent the worm from slipping off the hook when casting and during fishing.