A dog's ears are one of the important elements of appearance. Each breed has its own standard or, as it is also called, exterior, a harmonious combination of characteristic external features. And a frequent discrepancy with the officially established breed standards is the irregular shape of the ears. Therefore, you should pay attention to their shape and do this at an early age for your pet.
Which ones should be ideal?
Nature has endowed this breed with small triangular semi-erect ears. There are three types of ear shapes for pugs:
- Ears “button” or as it is also called “button”. The dog's triangular ear hangs well in the bend of the cartilage, as if on an arc, and completely covers the auditory opening.
- Rose shape. Unlike the first option, there is a small break in the cartilage, from which the ear is slightly raised and slightly opens the ear canal.
- False rose ear. The auditory canal is completely open: due to a fracture of the ear cartilage, the ear hangs high.
Sometimes puppies have different ears : the ears have different shapes and differ from each other. By standards, the first two options are considered correct. At the same time, greater preference is given to “button ears”: such ears will score a lot of points at exhibitions.
The third option and difference in hearing is undesirable; it is recommended to carry out correction in a timely manner, otherwise the pet will forever remain with incorrect ears.
Home first aid kit for pets
To avoid problems and find an answer to the question of how to treat inflammation of dog ears, you need to keep a first aid kit at home just for your pet. Of course, each owner selects his own medications. But most experienced dog breeders recommend using the following list:
- cotton pads and sticks;
- camphor oil;
- otipax (to eliminate inflammation inside the ears);
- gauze napkins;
- ear lotion;
- alcohol;
- drops for dogs "Dexamethasone";
- moisturizing wipes for children;
- powder with an antipruritic effect if the dog’s ear is red inside and smells.
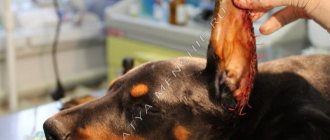
If a dog's ears smell, the ears are inflamed, and the owner does not know how to treat it, he needs to urgently bring the pet to the veterinarian. Only a qualified doctor can correctly diagnose and prescribe the necessary treatment.
What is it for?
The reasons why it is recommended to think about setting the correct form are very simple:
- Firstly , to participate in exhibitions. If you plan to participate in exhibitions and breed elite and purebred puppies , pet owners should think about this. For show dogs, the exterior appearance is very important: a harmonious appearance and compliance with all proportions. The “button” shape favorably highlights the beauty of the pug’s muzzle and makes it aesthetically beautiful: the ears emphasize the outline of the head and give it visual volume.
- Secondly , “ear” cosmetic surgery has a practical side . “Button ears” fit snugly to the ear canal, covering it completely, and do not fly apart when running or playing vigorously. This is especially important in rainy and cold weather: water, dirt and cold wind will not get into the ear. Your dog will get sick and catch colds less, and the risk of catching otitis media is reduced to zero.
Hygiene
In general, Chihuahuas are divided into two types: long-haired and smooth-haired. Regardless of the type of your pet, caring for its coat is quite simple. If the dog is smooth-haired, you should purchase a special comb and brush the dog twice a week. If the dog has long fur, then you need to brush it every other day. During the shedding period, brush more often and preferably with a special brush that removes excess fluff.
In addition to the fur, other parts of the dog’s body also need care. For example teeth. It's worth knowing how to brush your Chihuahua's teeth. To do this, you need to purchase a special brush and dog toothpaste. You need to brush your teeth daily.
It is necessary to keep the ears clean. Clean them with a cotton swab as they become dirty.
It is also important to know how to care for your Chihuahua's eyes. To avoid souring and infections, the dog’s eyes should be washed with chamomile solution every two weeks.
The solution should be warm.
As for bathing, it should occur no more than three times a year, and only if a special shampoo is used. This is absolutely enough for the dog. In emergency cases, you can use dry shampoo. If necessary, you can wipe the paws with a damp cloth after walks.
Separately, we would like to talk about how to trim Chihuahua’s claws
It is important to do this correctly so as not to injure the dog. Puppies need nail trimming every two weeks, adult dogs less often - once a month.
To do this, you need to purchase special tongs or guillotines. This procedure should absolutely not be done with ordinary scissors.
To start cutting, choose the moment when the dog is running and has had enough of playing. Take her in your arms, reward her with a treat and be sure to talk in a calm intonation. Lightly press the pad and insert the claw into the guillotine. Trim nails at a 45-degree angle. Trim towards the blackhead. If the puppy reacts calmly and does not break out, proceed to the next claw. You should not rush, do not worry and do everything very carefully.
Suitable age
In very small puppies it is difficult to say what shape the ears will be. This is due to the fact that an important characteristic of the breed is the “breaking” of the ear cartilage. This happens individually for each dog.
Typically, adjustments should be made within two to three months. At this moment, teeth change and the baby grows rapidly. If the “breaking” of the ear cartilage does not begin, then the procedure can be postponed. The formation of ear cartilage completely stops by 1 - 1.5 years of a dog’s life; before this moment it is advisable to have time to give it the desired shape.
Some dogs do not need such corrective surgery at all; for other representatives of this breed, gluing the ears may not bring any results at all.
How to get the desired canvas shape
Before gluing the ears, you need to remove excess sebum. This is done with a gauze swab soaked in chlorhexidine or dog grooming liquid. Then you need to wait an hour for the canvas to dry completely, otherwise there will be irritation. The process itself is quite simple:
- the canvas is straightened parallel to the head;
- bend lengthwise exactly in half, outward. That is, the edges are folded towards themselves;
- above the middle, that is, closer to the base, wrap it across.
The canvas should hang forward freely. You cannot squeeze the cartilage too much, as this will lead to swelling. The winding is changed weekly, allowing the dog to rest for a day without gluing. If the tape holds too tightly, it is soaked in oil or rich cream.
After a year, there is no point in trying to wrap the ears - if they still don’t lie down correctly, they won’t.
There are differing opinions regarding the age at which to start gluing pug ears. Some breeders believe that there is no need to do this before changing teeth, because after half of the puppies they themselves will take on the desired appearance. Others glue everything starting from 2-3 months.
Doing it right
Many owners are worried that this procedure will cause pain for their pet. But these are false concerns and fears. The dogs feel quite comfortable. Sometimes irritation or allergies may occur. The main thing is to correctly and consistently perform all the steps of a pet’s simple cosmetic surgery.
The procedure for correcting the shape of the ears is as follows:
- First, it is necessary to realign the ear, paying special attention to the place where the cartilage breaks incorrectly.
- Next, fold the side edges of the ear so that they touch and point upward.
- Secure it with adhesive tape across it close to the cartilage, high enough to accurately fix the cartilage. The 10 centimeter long patch should hold the ear tightly. The main rule is not to overdo it with the force of fastening: you can disrupt blood circulation and cause pain and discomfort to the dog.
At first, you need to keep an eye on the puppy and his reaction to the new ear “accessory”. In case of obvious attempts to rip it off or remove it, the owner is obliged to divert the baby’s attention, distracting him with games or other fun.
Ear care
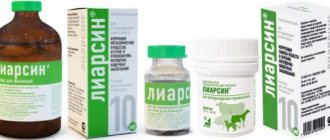
You need to take care of your pug's ears regularly. To do this, use various cleansers that need to be used to wipe the ear or regular wet wipes. To eliminate bacteria or severe contamination, you can use ear drops (“Bars”).
In practice, this procedure looks like this:
- Initially, you need to remove the wax with a cotton pad or swab. Do not push the stick deep into the ear to avoid damage.
- Gently clean out all the inner folds with a new ear stick.
- If there is a lot of sulfur, wipe the surface with Vaseline oil and repeat cleaning after 10-20 minutes.
- If purulent discharge or an unpleasant odor is noticeable from the ear, go to the vet immediately.
You can watch the video on how to clean your ears and what proper care should be.
Video - About the pug breed
Necessary materials
What you will need to perform ear surgery at home:
- A thin medical fabric plaster with a width of 10 mm to 1 cm. An adhesive plaster with bactericidal impregnation is not recommended, since the skin near the ears is very sensitive, and pugs often experience irritation and redness from them. It is advisable to opt for a “breathable” and hypoallergenic option: they are easily tolerated by dogs and do not irritate the skin;
- Caring for your pet, accuracy when performing actions and patience. Everything may take longer than originally planned.
It is recommended to carry out the first gluing of the ear cartilage under the supervision of a veterinarian or entrust the complete cosmetic procedure to a professional.
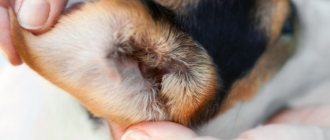
Signs and symptoms of allergic reactions
The most visible symptom of an allergy in pugs is the fact that the dog feels very itchy skin. The animal is constantly itching and constantly appears restless. And although itchy skin can indicate various problems, in order to accurately diagnose an allergy, it is worth paying attention to other symptoms: affected areas on the dog’s skin, which also manifest as red rashes and hair loss.
In such affected areas, a crust begins to form on the skin. This often manifests itself on the animal’s face; the folds begin to increase in size and become swollen. The allergy can also affect areas near the tail and hind legs. Owners may experience redness and purulent pimples.
Peeling skin
The second common symptom is dandruff on the animal's fur. Copious dandruff, reddish pimples, sometimes pustules - all this occurs very suddenly and can provoke an inflammatory process in the outer ear.
Other possible signs of an allergic reaction:
- Slight redness of the eyes.
- Exudate from the mucous membranes of the nose and eyes.
- Vomiting and possible stomach upset.
- Wool has an unpleasant odor.
These can be called common signs of an allergic reaction in Pugs. There may also be individual symptoms, possibly associated with other diseases of the animal. As soon as any of the symptoms appear, you should contact a veterinarian for diagnosis and examination. Only in this way can the animal owner avoid complications and further reactions of his pet’s body. You can watch the video for more information about allergic reactions in pugs.
Video - Diseases of pugs
Duration by time
The ear cartilage will have to be fixed properly for two weeks until the patch stops holding. Repeated adjustments are made as soon as the ears no longer hold the desired shape, and the ear “breaks”.
Usually, the ear cartilage finally becomes of the correct shape by the age of one year. But there are also exceptions. The process for some dogs lasts up to two years, or after 6 months, the owners stop gluing their ears.
In order for the ears to quickly take the correct shape, during the development process you should pay attention to the baby’s nutrition.
If a dog receives protein and calcium through feeding, then breaking of the ear cartilage will occur quickly. But if there is a deficiency of them, all the necessary microelements will go towards skeletal growth and muscle mass gain. We must remember that the puppy is growing. In this case, vitamins for joints and cartilage are used. For example, Polidex Gelabon Plus, etc.
Unplanned removal of the patch occurs in two cases:
- Allergy, redness or other irritation has occurred. The owner temporarily removes the patch, rests the ears and eliminates redness. Next, choosing an adhesive plaster from another company, repeat the procedure from the beginning.
- If you plan to participate in the exhibition. It is recommended not to remove the patch on the road, but to do it 10 - 15 minutes before entering the ring. This will avoid losing the ideal shape of the ears along the way and causing unnecessary creases.
Often, pet owners use a rich cream to soften the patch when removing it. After smearing its edges with cream, you should wait half an hour and carefully remove it. Remove the remaining cream.
What you need to glue your ears
To “glue” dog ears you will need to buy:
- The patch is no more than one centimeter wide. We recommend using a regular patch. Bactericidal varieties may cause allergic reactions. If a particular animal is particularly sensitive to the skin of the ears, it is better to buy a patch approved for the treatment of small children. It has a hypoallergenic base and is much easier to remove after use.
- Since the formation of cartilage tissue is greatly influenced by the content of macroelements in the food (especially calcium), we recommend using multivitamin preparations during the period of gluing the ears (of course, after prior consultation with a veterinarian). Such means can significantly speed up obtaining the desired result.
- In addition, the owner needs to be patient, since the formation of the desired shape of the auricle is not a very fast process.
Glue for fixing ears for dogs or textile glue "Bison" unexpected use
Quite often, owners are faced with the problem of fitting their pets' ears. Prick ears are a standard requirement for many dog breeds. Not all dog breeds need this, but there are breeds that undergo this procedure: German shepherd, chow chow, husky, boxer, Doberman, Chinese crested dogs, Yorkshire terrier and others. It should be remembered that an unprofessional procedure can lead not only to incorrect ear placement, but also to serious problems with the puppy’s health. The rules for cropping and setting ears without harm to dogs are simple. A puppy at the age of 4 months can undergo the procedure independently. We add calcium and gelatin to the dog’s diet; do not stroke the head for a while; We make sure that the dog does not scratch its ears; massage the ears; glue the ears. Bison Textile glue, transparent and elastic, has been recommended by dog breeders as a means of effectively helping to correctly position the ears without causing allergic reactions on the pet’s skin. Other scarce and expensive brands of special adhesives are also known: “Cherry Knoll Ear Fix” and “Tear Mender”.
So let's begin. We cut our heads. Places of future contact with glue are shaved with a clipper in the direction of hair growth, in order to avoid microtrauma to the skin, so that the length of the hair is about 3-4mm. We decide on the type of ears (small, large; thick, thin; high or low set). We choose the place of gluing: we fold the ear the way we would like to see it in the future, choose the place of gluing. Glue one ear and the second one symmetrically. Symmetry is very important if you don't want to end up with a dog with different ears. If the ears are small and high, the rise of the cartilage should be minimal (5mm). For larger ones, it can be 2 cm (but not more than 1/4 of the length of the ear). Small ears are re-glued after 3-4 weeks. Large ones - after 4-5. Carefully trim off the overgrown hair and cut off any remaining glue. We cut the head and ears. We clean the accumulated wax from the ears (with a cotton swab moistened with alcohol and wrung out thoroughly). Don't let your puppy shake his head or scratch his ears. This can lead to injury to the skin, and can lead to inflammation after gluing. We glue the ears again, adjusting the achieved result if necessary. If the ears turn out great at 5 months, don’t stop and glue them on again! And if these are large and thick ears, glue them on for up to 8 months!
This article was collected based on materials from the Internet, as well as on dog breeder forums, and is not a direct instruction. All actions you independently perform with your pets using Bison Textile glue remain your responsibility.
Source
History of the origin of the breed
Pugs are incredibly charming dogs with a cheerful disposition.
The pug breed comes from Ancient China. Dogs that are very similar to modern pugs were first mentioned in the 2nd century BC. e. In the 16th century, the breed began to conquer Europe, starting from Holland, where it arrived on merchant ships and from where it quickly spread to other countries.
In 1882, the English Pug Club was founded, where painstaking selection work was carried out and the best qualities of the breed were cultivated. In the 19th century, the fashion for cute animals began to gradually fade away. In the 20th century, a boom in pugs began again; they were especially popular at exhibitions.
Additional Information! In China, the breed was highly valued and was treated with great honor and respect. The first images of pugs, slightly different from modern representatives of the breed, are found in the “Imperial Book of Dogs”.
Why do you need to glue the ears of all pugs?
So, we indicated above that taping the ears is an event, the need for which arises only in the case of show animals. But in fact, almost all pugs need to glue their ears, regardless of their “publicity”:
- Push-button ears provide excellent protection for the ear canal. The auditory canal is protected from dust, cold air, and any debris. As evidenced by long-term veterinary statistics, in animals with this form of the auricle, otitis is observed several times less often.
- Even if the dog owner does not plan to engage in “industrial” breeding, the pet still needs to give birth. And puppies whose ears were glued in advance will be purchased immediately and at full price.
In puppies
Pug puppies need hygiene procedures just as much as adult animals. It is best to carry out preventive treatment using a gauze swab and ordinary boiled water.
Do not place the tampon far into the ear. It is enough to wipe the visible part and be sure to wipe the surface dry. In puppies, the formation of exudate is much less than in an adult dog, however, due to the increased activity of puppies, the ears more often become dirty for external reasons.
Useful video
Video on how to glue the ears of a Jack Russell Terrier:
- Copyright for the text and photos of this site belongs to the site administrator.
- When I purchased Businka, a friend for my Chinese crested Lyalechka, the puppy’s owners recommended that I continue to give her ears. They say it’s nothing complicated, just put some matches and stick it with a band-aid, and that’s it. I, of course, didn’t like this method and I plunged into the endless expanses of the Internet to look for the answer to the question - how to properly glue the ears
of a small puppy. - Little Gina
- I remembered how my friend and I once tried to put ears on her German shepherd Gina. Gina grew, gradually matured, but one ear dangled and did not want to get up. We resorted to the most makeshift method - we stuck a plaster to an already existing ear, and even tried to fasten it with a clothespin. We did everything in vain and wrong. My friend worried and worried in vain, the time has come and the ears stood up without any additional means or clothespins.
- Gina
- On the Internet I found a complete master class on how to properly glue
a dog’s ears and applied it to my little one, Businka. - What if someone comes to my site and such useful advice will be useful to you too. This simple task is done very easily and simply, but first you need to run to the pharmacy and buy a hypoallergenic patch and a disinfecting antiseptic - chlorhexidine. All. The rest can be found at hand, in the house. So, we need the following:
- 1. A piece of plastic (I cut such a piece from a plastic water bottle),
- 2. Scissors,
- 3.Patch,
- 4.Chlorhexidine,
- 5.Your favorite dog.
- Let's start our lesson:
- You can, at a glance (if the “eye is a diamond”), or better yet, use a tape measure or a centimeter to measure your pet’s ears and cut off two pieces of plaster slightly smaller than the ears themselves.
- 2 pieces of patch
- We cut a piece of plastic in half and make two frames.
- 2 pieces of plastic
- We round the corners.
- We round the corners
- For example, I cut it out and constantly tried it on for my Bead. Ready? Let's keep working.
- We glue our frames onto each piece of plaster. We got two blanks.
- We glue the frames to the plaster
- We glue another piece of plaster to our blanks, with the non-sticky side. As a result, we ended up with two frames with one sticky side.
- Cover the frames with a second plaster
- Agree, if you put our creation on the ears, it doesn’t turn out very beautiful, so for aesthetics and for the convenience of your dog, we cut our blanks to the shape of the ears.
- We cut the blanks according to the shape of the ear
- Now, it’s a completely different matter, it’s not a shame to show up for a walk and go out in front of people.
- The next step would be this procedure:
- Take a cotton pad, thoroughly moisten it with an antiseptic and wipe the dog’s ears. Chlorhexidine acts as a degreaser and does not dry out the ear skin. Then you need to dry the ears with a paper towel, after which we glue in our frames.
- Glue the blank
- Be sure to smooth the patch thoroughly. Our frames are in place, but in order to fix and give the correct position to the ear, we need to return to our plaster.
- We unwind the tape, 10 cm long and cut it in half.
- 10 cm of patch
- The result was two narrow ribbons.
- 2 stripes
- You need to start gluing the tape from the middle of the ear, where the frame is located.
- We start from the center of the frame and eyelet
- We carefully circle the ear with tape (in no case, without pulling it. The ribbed side of the patch should not be at the base of the ear, so as not to irritate the dog’s skin. We complete our task and leave a space of about 1 cm.
- We bend the ear with a bandage
- The ears will breathe through this space and you can easily clean them if necessary.
- The space through which the ear breathes
- At the end of this procedure, smooth the patch so that it does not come off and completely adheres to the ear.
- In the end, we got such a good picture, and you took note of useful advice - how to properly glue
your pet’s ears. - Bead
- Your pet will wear this design depending on its breed and heredity, but usually a week is enough for some, two for others, and sometimes up to a month.
- The main rule is that you can’t take breaks and give your ears a rest, otherwise all your efforts will be in vain.
- My Businka feels great and doesn’t notice any discomfort!
- The bead feels great
- See for yourself!
When to glue your ears and when it's useless
Ears need to be glued starting from puppyhood. More precisely, starting from three or four months, since it is at this time that the density and rigidity of the cartilage of the auricles begins to increase. This process (depending on the nutritional characteristics and characteristics of the animal) can last up to one and a half years (but usually ends at one year of age).
There is a sense in gluing, starting from the age of four months and up to one and a half years.
If the dog is much older, it is practically useless to glue his ears - it is a waste of time, they will probably never acquire the correct shape. Some dogs have the correct ear shape from the start, and in such cases there is no need to correct it. On the contrary, in other animals the ears are so “obstinate” that even long-term fixation of them does not help. However, it should be noted that in most cases gluing gives a positive result. You just need to be patient!