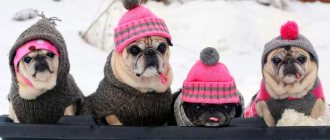
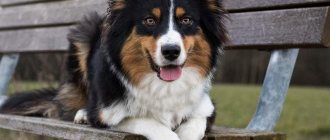
Some dog breeds simply need extra clothing to keep them warm in the winter. This especially applies to those breeds that have too short hair.
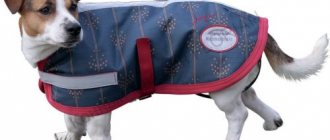
A blanket is best suited for a dog. It is quite spacious and does not affect the movement of the pet. This is a completely irreplaceable item that will be well suited for absolutely any time of year. The very idea of creating such a blanket and its general design was taken from horse breeders and was able to take root well with various dog handlers.
Domestic dogs of both large and smaller breeds are considered less adapted to the process of temperature changes than street dogs, which is why such clothing will become most relevant . Moreover, it will be easy and simple to sew or knit a cape for your pet with your own hands .
Rigid bandages to support or protect joints
Active pets often get injured while walking - an unsuccessful jump, playing too enthusiastically with their relatives, an untimely turn while running, or simply a bump on which the dog twists its paw. A sprained or torn tendon is a painful injury that requires the joint to be free of weight, meaning the dog must not be able to bend or straighten the limb.
For joint injuries, a rigid bandage is used, which is fixed around the injured area with Velcro. When an unsuccessful jump occurs, the joints on the front legs most often suffer. After examination by a veterinarian, a rigid belt is placed on the dog’s paw and tightened to a reasonable maximum. The owner needs to strictly monitor the limb; swelling or swelling are signs of circulatory problems, which can have serious consequences. If the hock joints are damaged, bandages are placed on the hind legs.
In addition to joint bandages, there are support belts, corsets and vests. Pets with a disproportionate body structure, especially dachshunds, are prone to joint dysplasia and various pathologies of the spinal region. A veterinary examination may reveal that the dog is experiencing back pain, although it may not be noticeable externally. A bandage for a dog with spinal problems is prescribed both when symptoms of the disease appear and for prevention.
Bandage as clothing for dogs
The product is made in the form of a cape or overalls. Depending on their purpose, clothing is divided into summer, winter and protective. Summer capes are made of light, light fabric or cooling fabric; the main function is protection against ticks and overheating. Winter clothing is not necessary for most breeds, even short-haired ones. Hairless and miniature dogs and pets suffering from impaired thermoregulation or regular colds need an “extra coat.” The most common type of clothing is a suit made of waterproof fabric that protects the pet from dirt in inclement weather.
Types of blankets
Capes vary in size, shape and function. Depending on the purpose they are:
- cooling for hot weather;
- for the winter period;
- for demi-season weather;
- postoperative.
Cooling
In summer, animals, like people, suffer from the heat. For pregnant, elderly or sick animals, and puppies, overheating can be fatal. A cooling blanket will be a real relief for them. Before a walk, the cape should be moistened with cold water, wrung out a little and put on the dog. The blanket will remain cool for about an hour.
You can buy such a product at a pet store or sew it yourself from cooling bedding.
Winter cape
The winter blanket is intended to protect the dog from hypothermia after active games in the winter. There are a number of requirements for such capes:
- It should be made of dense, wear-resistant material that protects from wind and rain (soft drape, artificial or natural fur, nylon, wool).
- The padding is a natural fabric (fleece, cotton, microfiber) that absorbs sweat well.
- It is advisable that another layer of padding polyester or fleece be used.
- Velcro is not suitable for winter models, since they do not work at sub-zero temperatures. Capes with buttons are recommended.
It is advisable that winter models have a hood.
If we compare a blanket with a winter overall, it has a number of advantages:
- It is more convenient to put on.
- It's easy to choose the right size. You just need to measure the length from neck to tail. The width can be adjusted using straps.
- The animal feels more free. The cape does not interfere with active games.
At the same time, you need to know that dogs that get cold quickly or have weak immunity are recommended to wear overalls. It will protect not only your back, but also your sides, chest, and paws from the cold.
Demi-season
A lightweight polyester cape is ideal for spring and autumn. It will protect the dog from rain and dirt, provided that the animal walks along paved paths and not through a forest or park. In this case, it is recommended to choose more protective overalls.
If your dog is sensitive to the cold, you can wear overalls and a blanket with water-repellent properties on top.
Postoperative
A cape for dogs after surgery is a necessity because it protects stitches or wounds from infection. The animal tries to lick the wound, which must be in a neutral environment for rapid healing.
It has special requirements:
- It is made from breathable natural fabric that will fit snugly, but will not put pressure on the seam or wound (cotton, chintz).
- The bandages are placed on the back so that the dog cannot untie them with his teeth or claws. Therefore they must be well sewn.
- Do not restrict movements.
To treat the wound, there is no need to completely remove the blanket; it is enough to untie only a few ties. But at the same time, a large number of ties can cling to various objects, so it is recommended to carefully monitor the dog. If the dog still tears the cape, then you can put a collar on it.
Medical blankets can be purchased ready-made, but you need to know that you will need several of them to change them (contaminated capes should be washed and ironed with a hot iron). Therefore, you can sew a postoperative blanket for dogs with your own hands.
Bandage to protect stitches and scars
Abdominal surgery is a rather difficult procedure, not only due to extensive anesthesia, but also in terms of postoperative rehabilitation. Dogs instinctively lick their wounds, which has a double effect. The animal's saliva contains an antiseptic and millions of pathogenic bacteria; in addition, the dog can lick the seam so intensely that it becomes deformed or completely separates. Particularly enterprising pets chew through surgical threads, which can result in the suture opening. The “safest” and at the same time, the most common damage to the scar is partial divergence due to the dog bending over for the purpose of licking.
General rules for caring for a dog after sterilization
Sterilization or castration is a routine procedure that is performed under general anesthesia. After surgery, the dog needs some time to recover. The duration and complexity of the rehabilitation period directly depends on the gender of the dog.
For successful and fastest rehabilitation, a number of conditions must be met:
- Planning – After surgery, your dog will need to be monitored for at least three days.
- Comfort – Immediately after surgery, the dog feels vulnerable, so it needs to be provided with a quiet and comfortable place to recover.
- Isolation – a recovering pet should be protected from dogs, cats, children, guests and other extraneous irritants in the house.
- Reducing the intensity of exercise - in the first three days, walks are taken only to relieve needs, no games, training, etc. The dog should not jump; it is advisable to avoid going up and down stairs.
- Dryness – stitches heal better when they are in contact with oxygen and are not moistened. It is best not to bathe your dog in the first few weeks after surgery.
- Protection from self-injury - to prevent the dog from licking the seam, an Elizabethan collar or veterinary blanket is used.
- Monitoring the healing of the suture - in normal condition, the suture remains dry, slight redness may be observed. Swelling, increased local temperature, and exudate are signs of infection.
Features of sterilization/castration of a male dog
Castration of a male dog involves cutting the scrotum and removing the testes. If the operation is successful and the anesthesia is calculated correctly, the dog will fully recover within 24 hours. In most cases, when castration is performed, the cut on the scrotum is not sutured. Larger dogs may require several stitches, but more often the edges are joined using surgical glue.
About a day after the operation, the incision site will begin to actively heal. The process is accompanied by mild itching, which may cause anxiety for the pet. To prevent the dog from licking the wound, it is enough to use an Elizabethan collar. If the suture heals normally, the dog should wear the collar for 1-3 days.
Features of sterilization/castration of a bitch
Castration of a female dog involves abdominal surgery on the abdominal cavity. The uterus and ovaries are removed through a small incision, which is closed with an intradermal suture.
According to generally accepted rules, sterilization is carried out along the white line (in the center of the abdomen); during a caesarean section, a lateral approach can be used. When operating along the white line, the suture heals faster, and the rehabilitation period is significantly reduced.
With normal healing of the suture, the scar begins to turn white 3–4 days after surgery. As in males, the healing of the suture in the female causes itching, so the belly must be protected from licking. An Elizabethan collar can be used as an alternative, but the dog will still make attempts to lick the belly - bending over.
The best option for rehabilitating a dog after castration is wearing a postoperative bandage. Please note that the seam does not need to be bandaged or lubricated with anything (unless the procedure is prescribed by a doctor). The bandage provides protection against mechanical stress.
Industrial bandages
Postoperative bandages sewn according to standard proportions differ only in size. Before purchasing, you need to measure the length of the back, from the base of the neck to the tail, and the circumference of the chest at the widest point. Carefully read the characteristics of the product; bandages used after surgery are disposable or made of fabric. Nuances worth paying attention to:
- Natural fabric - cotton, satin.
- The presence of edgings.
- Method of fixation - ties, zipper (zipper), Velcro, buttons, laces, plastic fasteners.
- Washing method: cold or hot water.
- Heat treatment method: ironing, steam treatment.
- Availability of disposable, undamaged packaging.
Important! The post-operative bandage should fit the dog perfectly. If your pet is out of proportion, overweight, or belongs to a rare breed, it is better to make the product yourself.
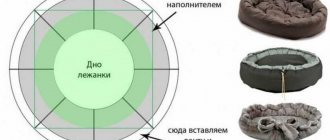
How to sew a blanket for a dog - step-by-step instructions
Well, all the materials are prepared, you can start. First of all, transfer both pattern pieces to the fabric.
First on the main one, and then in exactly the same way on the lining. Don't forget to add about 1 cm for seam allowances on each edge.
Important! Each pattern piece is half a piece. So when you start transferring the pattern onto the fabric, you will need to fold the fabric in half and place the part of the pattern that says “fold line” on the fold of the fabric.
After cutting all the parts, when unfolding, you should get these parts of the overalls.
You can cut the lining fabric so that it completely duplicates the details of the main fabric. Or you can do it a little differently, like I did.
As a rule, in the area of the upper body the impact of precipitation is more intense. And in order to provide additional protection from getting wet, I did not completely line the back parts with lining fabric, but in this upper part I used the same membrane fabric.
This is not at all necessary, but it seemed to me that the protection would be more reliable this way.
Next, we sew the parts from the wrong side. Don't forget to leave unstitched holes so you can turn the parts right side out later.
I sewed the back piece along the neckline, bottom and sides to the serifs, as shown in the photo.
We sew the tummy part completely, leaving a hole for turning inside out in the part where it will be sewn to the back.
Turn the parts right side out.
To prevent the lining fabric from sticking out from under the main fabric in the future, we additionally sew a seam from the front side.
We apply the facial seam in the same way:
- Back detail at neckline, bottom and sides to serifs.
- We sew the tummy part completely, without touching only the hole through which we turned it inside out.
Well, the blanket for the dog is almost ready. All that remains is to sew both parts of the blanket to each other.
Unfortunately, I didn’t take a photo of every step and didn’t show an important moment. Before sewing the parts, you need to take the “back”, and in the neck area, unfold the narrowest parts and sew them together from the wrong side. In the photo, the red dotted line shows the edges where the seam should be. Then, turn the neckline inside out and sew an additional stitch on top in the same way.
I will show this point in more detail in the video instructions.
Now let's sew the parts together. The photo below shows the whole process step by step, and the dotted lines indicate the places where the sutures are applied.
All that remains is to sew on an elastic band so that the blanket does not stick out on the belly.
And for the fastener, “punch” the buttons, or sew on Velcro.
Well, that’s all, the blanket for the dog is completely ready.
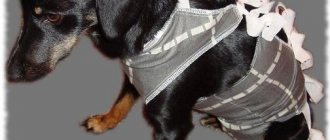
Even such a fastidious tailed squid like our Dzhekusik, who categorically does not like to dress, was quite pleased with his new clothes!We sew a postoperative bandage for a dog
The best option is to sew a bandage for your dog with your own hands. If you know how to sew up socks, then sewing blankets is up to you. To make a bandage you will need:
- Centimeter tape for measurements.
- A large piece of thin paper for a pattern.
- Material for sewing.
- A long ruler, chalk or a piece of soap.
- Needle and thread for basting.
- Tapes for edging the edges of the product.
- Laces, tape, Velcro or other fastenings of your choice.
Note! When selecting materials for blankets, keep in mind that the fabric should be easily breathable and washable. Also keep in mind that the blanket will have to be removed at least once a day.
When putting on the bandage, start fastening the ties from the neck and move towards the tail. The blanket should be firmly fixed, but not hinder the movement of the ward. Ties, ribbons or laces are cut off or hidden under the material. If the dog can reach the tie with its teeth or hook it with the claws of its hind paw, this can cause damage to the seam.
How to knit a cape yourself
If you know how to use knitting needles and crochet well, then it’s worth creating an insulated blanket for the autumn-winter season completely on your own. The easiest shapes in this case will be such shapes as a triangle or a rectangle with an already created hole for the pet’s tail.
If you know how to knit complex types of things , then you can create a blanket according to the following instructions.
Dimensions
- ОШ (neck circumference).
- DI (length of the entire product).
- The distance from the collar to the middle of the product itself.
- The total width of the jumper in the abdominal area (this value will depend on the breed and size of the dog).
- 2/3 OR.
- 2/3 OG (pet's chest circumference).
- 1/3 OG with the addition of a few centimeters.
- The total width of the collar (this value will be calculated by eye and will also directly depend on the size of the dog).
- Elements for fastening from two to four centimeters.
Knitting process
It should start with the collar. To begin with, the required number of loops is cast (the calculation should be made using a pre-prepared pattern), equal to the volume of the dog’s neck. We continue to knit the collar with a simple elastic band two by two or one by one, you can use another parameter that suits you best.
You should close about a third of the volume of the neck loops and start knitting the back area. If you want, you can knit it with a beautiful pattern, but if not, then you should knit it with simple knit stitches, after which you can decorate the back with special embroidery. Along the edges of the subsequent second rows, you should make one yarn over at a time, so that you ultimately end up with a trapezoid.
After the width of what is done reaches two-thirds of the chest circumference, you can continue knitting without making a yarn over. 10-12 cm before the end of the product, it is worth starting the process of decreasing the loops, tying them in two at the end of every second row. If you want the cape to become rectangular, then you don’t have to remove it.
In this case, the belt is knitted separately. It can be knitted with the same type of elastic as the collar itself, or it can be knitted with simple knit stitches. The belt, as well as the fastening element itself, should be sewn on the sides of the clothing itself. In order to secure the belt, you can purchase buttons or simple Velcro.