What is a halter
While walking, the dogs, sensing the will, are eager to run and frolic. Sometimes it is difficult to keep them on a leash, to prevent them from picking up garbage and foreign objects from the floor. This is where a structurally simple but functional device called a “halter” comes to the rescue. It was invented in the second half of the 20th century by R. Macford, a doctor, expert and dog lover.
A halter is a specially designed bridle for dogs. It helps to hold your pet during a walk, be it a small energetic dog or a large, strong dog.
Among dog lovers and dog handlers, the equipment is better known as “halti”. Not everyone knows that the name, which is so familiar to the ear, came from the first manufacturer of dog paraphernalia - the English company Halti Headcollar.
Video “Teaching a puppy to halti”
Don't know how to train your dog to eat halti? See how experienced dog handlers do it.
Sorry, there are no surveys available at this time.
Was this article helpful?
Thank you for your opinion!
The article was useful. Please share the information with your friends.
Yes (66.67%)
No (33.33%)
X
Please write what is wrong and leave recommendations on the article
Cancel reply
Rate the benefit of the article: Rate the author ( 10 votes, average: 4.80 out of 5)
Discuss the article:
Halter and collar - is it interchangeable?
A collar is a ring-shaped product that dog owners place around the pupil’s neck. A leash or chain is attached to it. This system serves to limit the movement of the animal.
A halter, unlike a collar, is placed directly on the dog's face.
The attribute does not hinder the movement of the jaws - the dog can grab something with its teeth. This is not a full-fledged, in the usual sense, muzzle. Important! A halti cannot replace a collar and muzzle. The accessory rather complements them.
On a walk
Can a muzzle be replaced?
Very often in stores you can find the wrong name for halters, such as “training muzzle”. It is worth understanding that halti works completely differently. The device only helps to control the dog.
In it, she can quite calmly pick up something from the ground or bite someone. Such equipment does not limit the dog in any actions, as a muzzle does.
If your dog is aggressive, then it is better to use a muzzle as an addition to avoid unpleasant and dangerous situations.
You should not try to turn the halti into this piece of ammunition by tightening the nose strap as tightly as possible. This may rub the animal's face or cause other injuries.
Check out the features of choosing a regular collar, leash, harness and muzzle for your pet. An alternative to a halter can be an electronic or collar collar.
How does the device work?
The effect of correcting the behavior of dogs lies precisely in attaching a leash to the nose strap under the lower jaw. When the animal begins to pull towards the object that interests it, the halter loop is tightened around the dog’s cheeks and nose. The pressure turns out to be so significant that the person being walked immediately stops trying to escape.
Pets have what is called a “resistance reflex.” The natural instinct of the animal is manifested in the fact that the harder the owner pulls on the strap, the more violent the dog’s desire to rush forward - the dogs are not afraid of pressure on the neck. But the design of the halti for dogs is such that the product is worn on the head. Then the ward, if pulled by the cord connected to the halti, is forced to turn his muzzle towards the owner. Thus, the animal redirects its attention from the desired object to its own sensations. When experiencing pressure and discomfort, he changes behavior.
What does the accessory look like?
Important! With this attribute, even inexperienced dog walkers will be able to walk a dog.
How to put it on a horse?
Once the issue of purchasing a bridle has been resolved, it must be correctly put on the horse. If this is done for the first time, then you should remain calm and avoid sudden movements, as they will frighten the animal. It is necessary to put on the device slowly; it is worth noting that horses perfectly sense human fear, so if their owner is not very confident in himself, it is better to postpone this event for another time.
Often nervous individuals do not want to put on the harness and begin to go on a rampage, in these cases they can cause injury to their owner. To prevent this from happening, it is recommended that bridles be put on a horse for the first time by a specialist who has experience in this matter. To quickly and easily put a bridle on an animal, you should use the following scheme.
At the first stage, the horse should be properly accustomed to wearing this device. To do this, the owner must pet the animal and talk to it calmly. In addition, you need to make sure that the bridles are in good condition by unfastening the noseband and picking strap. Then, being to the left of the horse, you need to put on the bridle, holding the nose of the pet and throwing the reins over the neck. In this case, the occipital fastener must be held by hand. After this, a bit is placed on the toothless edge of the jaw. If the animal is too restless, then it needs to be given treats. As soon as the bridle is raised up, the neck strap is put on and thrown behind the ears
During this procedure, it is important to ensure that the elements that make up the bridle do not twist. The final step is fastening the chin strap. It should be placed in such a way that there is a fist-sized distance between it and the head. There should be a gap of two fingers between the noseband and the horse's skin.
According to safety regulations, only halters with leather inserts on top are allowed. Otherwise, the animal will quickly tear them apart.
There should be a gap of two fingers between the noseband and the horse's skin. According to safety regulations, only halters with leather inserts on top are allowed. Otherwise, the animal will quickly tear them apart.
You cannot put a bridle on a horse when the animal is grazing, playing or resting in a stall. If you follow these simple rules, then the process of putting on a bridle will be simple, and you can handle it even the first time.
Experts tell you more about how to properly put a bridle on a horse in the video below.
Halter sizes and breeds suitable for these sizes
The equipment must be put on the pet correctly - the nose loop strap should be halfway between the animal's nose and eyes. A bridle collar for dogs is chosen depending on the breed.
Halti sizes and corresponding breeds:
- 0 size. Designed for miniature dogs. These are Yorkshire terriers, dwarf dachshunds. The list also includes toy poodles.
- 1 size. It is purchased for West Highland White Terriers, Basenjis and Jack Russells, as well as Border Terriers.
- size 2. Suitable for dogs such as border collies, cocker spaniels, and Staffordshire bull terriers.
- Size 3. Such equipment is worn by relatively large types of dogs - Dobermans, Labradors, Bull Terriers, German Shepherds and Setters.
- size 4. Sits neatly on Great Danes, Rottweilers, Ridgebacks.
- Size 5. Its owners are tall at the withers and heavy individuals such as mastiff, bloodhound, and St. Bernard.
How to make the right choice
When choosing a halter for dogs, you need to consider its material and size. A fastening that is too tight can damage the jaw, so be sure to measure all the necessary parameters before purchasing - or take your pet with you for a fitting right in the store.
Material and accessories
Focus on strength. The combination of massive fittings and too soft material will lead to rapid stretching of the fabric, so the equipment will have to be constantly tightened.
It is best to choose nylon, which retains its beneficial properties under any influence. But be sure to check the quality, as a suspiciously cheap model can stain the wool.
All fasteners are made of metal, so be careful during operation. They may rust if exposed to water. Careful care with a damp cloth will help to avoid premature damage to the product.
For greater comfort, it is recommended to choose a model with a neoprene lining. It will eliminate chafing in the area where the straps fit best.
Size chart with breed indications
The size is selected depending on the size of the animal. You will need to measure the circumference of the muzzle at its widest point and the length from the nose to the back of the head. Based on the data obtained, select one of the models presented in the table.
Source
Making your own equipment
To sew a halti halter for dogs with your own hands, a dog lover only needs to have basic tailoring skills.
Materials and tools
The attribute is made from leather, textiles, tarpaulin, artificial fabrics. The main condition is that the material must be strong.
To work you will need:
- durable belt tape (sling) – 2 meters;
- rings made of plastic or metal – 2 pcs.;
- adjustable clasp – 1 pc.;
- felt;
- carbines – 2 pcs.;
- tailor's meter or ruler;
- harsh thread.
A large, sharp needle will not penetrate dense material without an awl - that also needs to be prepared. But the product can also be stitched on a sewing machine - the manufacturing technology does not change depending on the sewing method. To make the product beautiful, the owners use decorative buttons, beads, and braid.
How to measure mouth coverage
Step-by-step instruction
First you need to take measurements of your pet: neck circumference, mouth circumference, distance from the point where the neck circumference line runs to the beginning of the mouth. The fourth measurement is from the leash to the middle of the nose.
The work looks like this step by step:
- Cut the tape equal to the circumference of the neck plus 12-15 cm.
- Sew a clasp to it.
- Attach the ring to another piece of strip - in the middle of the neck strap.
- Sew the nose loop, leaving a few centimeters for the seam for the rings.
- Cut the lining material according to the size of those parts that will come into contact with the muzzle.
- Sew on the lining.
- The final touch is to create a safety leash. First, cut a strip the length of which is equal to the distance from the nose loop rings to the collar. Leave an allowance along the edges to secure the carabiners.
Making a comfortable halter for your pet
According to statistics, not all dog owners know? what is a halter and why is it needed. Why is this piece of equipment so important and how to make it yourself?
What is a halter?
We make halti ourselves
Tools and materials
Video “Teaching a puppy to halti”
Comments and Reviews
How to train your dog to wear a halter
The procedure is not much different from training a dog to use a collar. First of all, the owner must be positive - dogs are sensitive to the owner’s mood.
What do we have to do:
- Let the animal get acquainted with the new thing - the dog should smell the object and study it.
- When the four-legged animal becomes indifferent to the item, an attempt should be made to put it on.
- To do this, take the nose loop in your right hand, make a ring out of it, and use a “yummy” in your left hand to encourage the student to stick his head into the ring and pick up the food.
- Repeat this several times. After some time, the pet will lower its head into the dog collar without encouragement and stimulation.
- When an attempt to put an accessory on the animal’s head is successful, you should immediately remove the equipment.
Gradually, the time the trainee spends in the new equipment should be increased, giving the dog the opportunity to get used to the sensations.
Beautiful accessory
At what age can you
You can teach your dog to wear halti from the first walks on the street, namely at 3-4 months. Essentially, it is an alternative or addition to a collar. But when using a halter with puppies, you need to understand that babies are very active and will try to chew the accessory and remove it.
If you want to let your pet play with other dogs, you should definitely remove the equipment. Without doing this, the puppy may be injured.
You also need to constantly adjust the size of the halter and check whether it is secured correctly. This is explained by the fact that puppies grow very quickly and require gradual replacement of the small halti with a larger one.
Why is it important to choose the right halter according to the shape of your dog’s head?
The physiology of the skull structure differs among representatives of different breeds of pets. So, there are species with very saggy lips. If they are put on a halter and the leash is pulled tightly, the animal may bite its lips as the nose ring tightens.
Other breeds (spaniels, huskies, malamutes) do not have a convex occipital bone. These individuals easily free themselves from ammunition by working with their paws. In such cases, the halter is fixed to the collar or a neck ribbon is pulled under it.
How to put on a bridle
- Equipment for a horse Equipment for a horse
- Saddles Saddles
- Dressage saddles
- Eventing/universal saddles
- Jumping saddles
- Travel saddles
- Western saddles
- Pony saddles
- Saddle Accessories
- Saddle collection
- Bridles, reins
- Bridle iron
- Saddle pads, ears
- Furs, gels, sweat pads
- Halters and chumburs
- Work on the line
- Auxiliary reins
- blankets
- Bandages, boots, bells
- Rider equipment
- Riding shoes
- Stable equipment
- Caring for your horse and equipment
- Horse care products
- Salts, fertilizers, lickites
- Books and souvenirs
Tips for using khalti
When putting on the product, you can use the advice of experienced dog handlers:
- Selecting an attribute by size - the division by breed is very arbitrary.
- Do not tie your charge by the halter.
- Do not use the item as punishment.
- Do not wear halti for a long time.
- Do not put a halter on puppies with immature skeletons.
- Consult your veterinarian before purchasing a halter.
Important! Do not tighten the straps too tightly on the neck and face of your four-legged friend.
Fully equipped
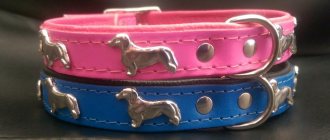
Halti design for dogs
The equipment consists of interconnecting straps that are secured to the neck, nose and cheeks. The ends of the nose strap are connected by a special ring located directly under the muzzle.
Please note that the cheek straps should not tighten the skin. It is enough to simply achieve a tight fit that does not interfere with the movement of the animal.
Benefits of using the product for the owner
A dog bridle is an effective and safe means of correcting animal behavior. It prevents the dog from turning its head sharply, jerking to the side, or pulling the owner wherever he wants.
The equipment is used in training and training dogs. Discomfort in the muzzle area accustoms pets to obedience and following the commands “Near” and “Toe”.
A well-thought-out system of straps, carabiners and clasps softens the efforts made by the dog and prevents it from being injured. It becomes easier for owners to manage an animal while walking, even if the dog is quite large and muscular.
Important! Collars, unlike bridles, are contraindicated for dogs with neck and spinal injuries.
The halter is a successful invention by Dr. R. McFord, which makes it much easier for owners to walk and train their pets. Halti for dogs creates discomfort for the animal in the muzzle area if the leash is pulled, but does not injure it.
Why is it needed and what is the use of it?
A halter (or halti) is an excellent addition to a regular collar. It's easy to use and extremely effective when you want your dog to stop pulling on the leash. With proper training, you can achieve high results with this thing in a short time.
The item helps the dog understand the owner faster and respond better to the commands “don’t pull” or “near”. In addition, the halter does not harm the dog and does not put pressure on the neck.
With the help of this acquisition, it is much easier to focus the dog’s attention on yourself, turning its head in the right direction if necessary. It’s quite simple to wean an animal from chasing cats, cyclists, and picking up food from the ground.
When using a halter, there is no need to pull the dog away when it pulls on the leash. These movements are very often traumatic for animals.
You can also eliminate the use of strict metal collars, which cause pain and discomfort to the animal. Even a very large dog is easier to control when walking in a halter.
Did you know? The first halter for dogs was invented by Roger McFord in 1979 while watching horses being trained. The man noticed how much easier it is to control large animals in such ammunition. By creating such a device for dogs, he solved the problem of many owners who could not train their pets to walk nearby.
Purpose
A halter is a bridle without iron and is a necessary item for stable use. It is put on horses to take the animal out of the stall, pick it up from the pen or put it on the junctions (leash). This necessary item is made using very thick braid or rawhide. Today, there are also decorative options that are widely used in shows.
To put a halter on a horse, it does not need to insert a bit into its mouth. To control the animal, a chombur is used in the form of a strong rope, which is attached to the halter with a carabiner. It is an indispensable tool for cleaning horses, especially those with an obstinate character or excessive ticklishness. To prevent the animal from accidentally injuring a person, a halter is put on it, then it is secured in the passage of the stable at the junctions, and only after that the necessary procedures are performed:
- cleaning;
- saddle;
- forging;
- veterinary activities.
DIY horse halter
A high-quality halter for a horse can be bought in a specialized store, but you can also make it yourself without any problems. The main thing is to strictly follow the step-by-step instructions and correctly calculate the dimensions.
Be sure to read: Horse hoof care: nutrition, cleaning, how to choose bedding
Halter sizes
The dimensions of the halter must correspond to the dimensions of the horse's head. Measurements should be taken as responsibly as possible.
It is necessary to measure the following parameters of future ammunition:
- The size of the head is from the withers and along the lateral line to the end.
- Headband volume. Measured from the lateral line of the muzzle across the forehead.
- Nose cap. Measured around the muzzle in the area where the noseband is located.
If you have doubts about the final dimensions, then it is better to make the halter a little larger, it will not be critical.
Tools and materials
To make a halter for a horse you will need:
- Durable synthetic or leather straps.
- Fleece material or soft velor.
- An awl with a needle.
- 5 rings for connecting the belts together.
- Strong threads.
- Sewing machine.
- Scissors.
In some cases, other tools may come in handy, but these are the basic tools you need to use to make a quality halter.
Step-by-step manufacturing process
Making a headband without a bit consists of the following steps:
- Measure the horse's head according to all the necessary parameters and, based on them, create a diagram of the future halter. There should be a total of seven belts in the drawing, taking into account seam allowances.
- Cut out all the belts and sew their edges. If the material is initially thin, then you can make double belts.
- A buckle or carabiner must be attached to the left side of the back strap for fastening. On the other side, we make holes accordingly so that the size can be adjusted.
- On the lower section of the belt, which connects to the fastener, be sure to attach a ring to which the chomp, leash, or release will subsequently be fastened.
- Connect all the belts using rings, which should be about 3 cm in diameter.
- Thin velor fabric must be sewn onto the inside of the neck guard and neck straps to avoid chafing.
A halter for a horse should be comfortable and not cause pain. If the accessory is small, it will quickly rub the most sensitive areas, and a large halter will easily fall off at the most inopportune moment.
Be sure to read:Horse harness: what is horse harness, what types are there?
Basic requirements and selection rules
The design of the blanket is simple, which allows you to purchase it without trying it on. You just need to find out the length of the dog’s body - from the neck (collar) to the base of the tail.
Please note that clothes should be taken off and put on without problems, without pressing, without getting in the way, or sliding down.
It will be useful for you to learn how to train your dog to go to the toilet outside and in the litter box
In spring and autumn, the dog may catch a cold after active activities or games. The blanket will also protect you from this, because it absorbs sweat, which prevents the dog from getting too cold. For such purposes, the most suitable woolen knitted blankets, microfiber, fleece, and cotton.
When purchasing, look at the reliability of fasteners - fastex, zippers, straps, buckles. They should not jam, creak, or unfasten on their own. Pay attention to how the seams look. You should be wary of protruding threads, crooked or rough seams, and unnecessary overlaps.
How to weave a rope halter for a horse with your own hands
In order to make a rope halter with your own hands, you should use the following materials and tools:
- yacht rope - 670 cm (this is the length for a medium-sized Cob-Large halter);
- a marker in a contrasting color to the color of the rope;
- scissors;
- lighter;
- ruler.
Did you know? Asians were the first to domesticate horses around the fifth millennium BC.
When weaving a halter, we perform the following steps:
- Cut the rope to the required length (670 cm). We singe the edges of the cut piece with a lighter so that they do not unravel.
- We measure 90 cm from the end of the rope with a ruler (point A from the size table) and mark it with a marker. We tie a knot in the intended place - hold the rope with our left hand, and then throw it with our right hand over the top of our left and pull the rest of the rope through the resulting loop. Carefully tighten the knot so that it is in the intended place.
- We measure and mark the distance to the next point 22.5 cm (point B). We tie exactly the same knot as described in the previous paragraph.
Did you know? Horse hoof
—
it is an extremely complex and sensitive organ. When the horse's weight presses on the hoof, the blood from it is forced up through the veins. Thus, the hoof plays the role of a circulation pump. - We now measure a distance of 25 cm (point B) and again tie the knot from point 2.
- Now we measure and mark with a marker 82.5 cm (point D) and knit the same knot again (point 2).
- Now we retreat 25 cm from the last knot (point D), outline and tie another type. Holding onto the marked area, we make a loop from the free end, wrap the folded loop around the marked area, and insert it into the resulting ring. Pull the end of the loop towards you. It turns out to be a small loop of about 5 cm, tied in the marked place for the nape strap. This loop will be near the ear.
- We retreat and mark 25 cm (point E). We move our marked place to the beginning of the largest gap (point B). We slightly loosen the knot tied at point B and pass the entire long unused end of the rope through it towards ourselves. Then we throw it away from us through the knot and pull it into the loop of the knot and into the new loop that results from it when throwing it over. We pull the remaining length of the rope from the resulting knot away from us and carefully tighten and align it so that it is on the marks at points B and E.
- Pull the free end of the rope 25 cm (point G) back to the knot at point B. Undo the knot a little at point B, pull the free end of the rope toward you and tie the same double knot as in the previous point. Carefully tighten the ends at the marks of points G and B. You get two identical segments tied together, which will act as a fastening belt and be placed on the horse’s nose.
- We measure 82.5 cm from the last node with a ruler and mark it (point 3). We first fold the slightly unfinished product. The loop will go to the ear, the double piece will be on the nose, the remaining rope in the form of a large loop with knots will go under the throat, and the long pieces running parallel to each other should coincide at point G. Unravel the knot at point G a little and pull it through it towards you the free end of the rope to the marking point. We tie a double knot as in step 7, only points D and Z must coincide. These are cheek straps.
- We retreat and mark a gap of 25 cm (point I). Again, we first assemble the product on our hand. We take the double segment that will be on the nose, the ear loop, the cheek strap and lead our point I to point A, the very first node. We expand it again and tie a double knot as in step 7.
- From the last knot obtained, we equalize two pieces of rope - they should be equal and 80 cm long. We cut the rest of the rope to this length and burn the ends with a lighter, placing them next to each other so that they stick together along a length of about 4 cm. This will be the back of the head strap.
- We put a double piece on the hand like on the nose of a horse. We insert the long occipital end, welded by fire, into the loop so that it seems to go through the back of the horse’s head, and tie a knot. To do this, we insert the soldered end under the loop from the side of the animal’s cheek and pull it into the loop formed. Carefully tighten the knot at the top of the loop. It will be easy to untie if necessary. We adjust the size of the halter with the long looped ends of the rope - we tie them together with a double flat knot, but not tightly, so that it can be easily adjusted on the horse. At the same time, at the ends of the knot we leave loops of the required length through which we will thread the chumbur.
Video: making a halter
Why do you need bandages for horses?
The most common injury that occurs to racehorses during dressage is their limbs. Bandages are placed on the metacarpus to secure the tendons and cover the skin and act like a muscle corset.
There are different types of bandages made from woven materials. Each variety has its own purpose.
Elastic
They are considered the most dangerous if used incorrectly. They are used in competitions and dressage, when the animal endures the most significant loads. Their texture is similar to medical elastic bandages and is well suited for fixing padded pads.
Woolen or wool blend
These headbands last a long time, especially half-woolen ones with the addition of acrylic in the composition. In them, the animal’s legs breathe, they are fixed not tightly, but securely.