Almost all pet owners face surgery. The list of the most common includes castration and sterilization. Regardless of the task, surgery is performed with mandatory suturing. If the threads used are not absorbable, then after the postoperative wound has healed, they must be removed. As a rule, this procedure is performed by a veterinarian, but sometimes circumstances force you to solve the problem yourself. If you follow the step-by-step instructions, even a beginner can handle suture removal.
Features of suture material
According to the method of location, seams are divided into internal and external. The former are used to connect cut tissues: muscles, blood vessels, subcutaneous tissue. They cannot be seen during external examination, so they try to reduce possible complications with high-quality material. In 90% of cases, internal sutures are placed with absorbable sutures. The external version is often made from synthetic threads. This is what you have to remove yourself. If they remain in the body for a long time, the threads begin to be rejected, and suppuration occurs.
Any of these materials is foreign. As a response from the body, the four-legged patient experiences itching or other discomfort. In an attempt to eliminate it, the animal licks and damages the wound. If it is not enough to monitor your pet, you will have to sign up for a repeat operation.
Dog sterilization methods
- Ovariectomy
is a method of sterilizing a dog that involves removing the uterus and ovaries through an incision in the abdominal cavity. This is a fairly simple operation that is performed in a cavity manner. - Laparoscopy
is the least traumatic method of sterilizing a dog, which eliminates direct contact of the surgeon with the organs and tissues of the animal. The operation is performed by making small punctures (incisions) through which the laparoscope is inserted. This is one of the most modern methods of sterilization, which has many advantages, but is not used in all clinics. - Chemical sterilization of dogs
is a method of sterilizing dogs that involves the use of pharmaceutical drugs, which results in the temporary deprivation of the animal's ability to reproduce. This type of sterilization is very harmful to health - it is a 100% guarantee of the development of pyometritis, endometritis and oncology.
Many sources use the concept of endoscopic method of sterilization of dogs
, but this concept in itself is incorrect, since endoscopy implies penetration into the body through natural openings and is used for diagnostic purposes (probing).
Benefits of removing stitches at home
Removing stitches for a dog after surgery is not as difficult as it initially seems. Ideally, it is recommended to consult a veterinarian before the procedure. After examining the four-legged patient, he will confirm that the wound has healed and will not come apart when the threads are removed. Additionally, the doctor will explain how to remove the dog’s stitches at home. After receiving the conclusion and detailed instructions, you can proceed with your planned actions without fear of possible consequences.
As a rule, you will have to resort to the help of a veterinarian in two situations: after ear cropping and after eye surgery. This cannot be done without pain, so sometimes animals require anesthesia.
Undoubtedly, the services of doctors at a veterinary clinic are more reliable and faster. But in some situations, seeing a doctor is impossible. A lot of people live in the region, so it’s hard for them to get out to the big city. In addition to hopelessness, other advantages of removing stitches at home are also an important factor. These include:
- Protection against infection. Not only healthy but also sick animals are brought to the clinic. In the postoperative period, immunity decreases. The dog is more vulnerable to infections than usual. The problem can be solved by making an appointment for a specific time, but even so, appointment hours are often shifted due to the previous patient taking too long to examine.
- Reducing the stress factor. The veterinary clinic is associated with pain. Most animals experience severe nervous tension when they find themselves within the walls of this institution. Because of this, even simple manipulations are equated to the ninth circle of hell. Performing the same actions on familiar territory is perceived more adequately by any owner. If a trip to the veterinary clinic is one of the stressors for your pet, then it is better to get rid of unnecessary worries and learn how to remove your dog’s stitches yourself. Otherwise, there is a high probability of secondary infection due to stress.
- Saving. Independent work, although it takes time, is absolutely free. If you are confident in your abilities, set aside money for more important things.
After the stress of spaying and neutering, the dog will be grateful for the absence of strangers smelling of medicine. Before carrying out the procedure, it is necessary to prepare instruments, find an assistant and make sure that the upcoming operation is safe.
Care after sterilization
Many novice dog breeders are concerned about what kind of stitch a dog should have after the sterilization procedure. In most cases, suture removal is not required, since modern materials promote rapid healing and dissolve on their own. The main thing is to keep the operated area clean and timely treatment.
To protect the seams from bacteria and mechanical damage, use a special blanket with ties on the back. Since the thin, breathable material quickly becomes dirty, the bandage should be changed once a day. The new blanket must be ironed and only then put on the dog. When treating seams with chlorhexidine, the device is not removed; it is enough to simply move it to the side by untying several tapes.
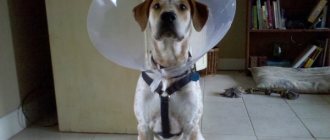
The animal may try to rip off the bandage in order to scratch or lick the cosmetic seam. This should not be allowed, as infection may enter the area undergoing surgery. In these cases, an Elizabethan collar is put on the dog.
How can you tell if a wound has healed?
Not only early, but also late removal of suture material is considered dangerous. In the first case, there is a high probability of wound divergence, in the second - ingrowth and suppuration of the threads. As a rule, at the end of the operation, the veterinarian announces a conditional healing date. On average, healing is about 10-14 days and depends on the location of the surgical intervention:
- neck and head – 5-7 days;
- chest, paws and peritoneum – 10-14 days.
In addition to the area operated on, age affects the healing rate. Tissue regeneration in puppies is higher than in adults and older animals.
Focus on the date announced by the doctor, but do not forget to monitor external changes. After 4-5 days, the formation of granulation is acceptable - a painless ball under the skin. It will resolve on its own a little later. If the edges of the incision have become almost invisible, and the nearby skin is not red or inflamed, proceed to removal.
You should postpone the procedure and seek help from a doctor only if the following symptoms appear:
- unpleasant odor;
- increased redness;
- discharge of pus;
- presence of bleeding or blood crusts;
- increase in local temperature;
- formation of swelling and inflammation.
All of these symptoms occur when an infection occurs and are fraught with an abscess with subsequent blood poisoning. If you find at least one of them, give up independent actions in favor of visiting a veterinary clinic. Pulling out threads during the inflammatory process is more difficult due to pain. Monitor your pet carefully to avoid infection.
How to care for seams
If a lot of time has passed between the application of sutures and the rupture of one, the condition at the site of the rupture does not worsen, the underlying tissue does not protrude through the rupture, care is performed according to the algorithm:
- Inspection of the wound area is performed twice a day. The skin should have a clean appearance upon examination. The edges do not diverge in different directions. There may be slight redness at the edges of the skin. In the first days after surgery, there may be a slight pinkish discharge from the wound.
- To prevent the dog from licking the operated area or trying to chew it out, a special collar or postoperative blanket is worn. This will prevent infection, divergence of wound edges and the development of a number of postoperative complications. The protective blanket ensures that the bandage containing the medicine adheres tightly to the skin.
- Treatment is carried out once daily with an aqueous antiseptic solution. It is better to use chlorhexidine for these purposes. It is possible to use a weak manganese solution or an aqueous solution of furatsilin.
- After the operation, the dog is kept in a clean, dry and warm room. Moisture and dirt should not enter the operation site.
Preparation for the procedure
Arrange in advance to meet with a friend who is willing to take on the role of nurse, or enlist the help of a family member. The dog must know him so as not to feel nervous about the appearance of a stranger. The assistant’s tasks will include holding the four-legged patient until the end of the manipulations. You won't be able to handle the animal alone. You will either injure him or cause him stress by tying him up. As an exception, we can name representatives of small breeds, but even here it is better to have two free hands, since removing a dog’s stitches is a little more difficult than the usual hygiene procedure.
To remove threads you will need the following materials and tools:
- Thin surgical scissors with rounded edges. In extreme cases, regular manicures are also suitable. The main thing is to make sure that they cut well and will not cause problems at a crucial moment.
- Surgical tweezers. A manicure set won't help here. The jaws (rod levers) of this instrument have special notches. With their help it is easier to grab the thread. More experienced owners assure that nail clippers also cope with the task. But for beginners, it is safer to work with reliable tools. They can be purchased at a regular or veterinary pharmacy.
- Water and a metal bowl. Boil water and pour it into a container. Boiling water is an excellent means for disinfecting instruments.
- Bandages or gauze. They are useful for bandaging the wound after removing the threads.
- Disinfectants, antibacterial ointment and cotton pads for applying them. Don't use cotton wool. Its fibers may remain inside during processing. It is also prohibited to use alcohol-containing products or high-percentage hydrogen peroxide. They cause irritation accompanied by a feeling of pain. Lubrication of the postoperative surface with these products is provided only in one case - during inflammation. Do not try to treat the inflammatory process on your own and consult a doctor immediately.
After making sure that the wound has healed, treat the resulting crusts with saline solution. The day before the procedure, lubricate the surface with a rich cream to soften the threads and improve their sliding.
Before starting manipulations, calm and caress the dog. Dealing with a calm pet is much easier than dealing with a fearful and aggressive one. If you are not sure of a calm reaction on the part of the animal, protect yourself and your friend with a muzzle. Place it on your dog and wrap it tightly with a towel on top. For brachycephalic breeds with a short muzzle, one towel is sufficient. Make sure the ends are tied into a strong knot behind your head.
Prepare a flat and hard surface. A regular table will do for this. Cover it with a soft cloth or diaper. After all the manipulations, place the pet on its side in a relaxed and comfortable position. Do not try to roll the dog over onto its back. In this position she feels more vulnerable, which increases her fear. Remember to be comfortable and reduce stress with affirmative pats and conversations.
3-5 days after surgery
On day 3, the dog completely recovers from anesthesia. In this case, the dog may experience anxiety and discomfort. In this case, the veterinarian will prescribe painkillers and other symptomatic medications.
To prevent the seams from coming apart, monitor your pet’s activity. Do not allow the dog to jump from heights or climb onto the sofa. You cannot bathe or wash the dog or get the seam wet.
Walking is carried out on a leash, in quiet, secluded places. Avoid contact with stray animals and other dogs. Monitor your pet's activity. Walks should be short but regular.
Instructions for removing suture material
It is enough to hold small breed dogs by the head, while larger dogs will have to hold their limbs. Pay special attention to the rear ones, since from fright the animal can injure itself and others during manipulations. They can be wrapped tightly with cloth or covered with a blanket.
Try to maintain contact with your pet at all times. Talk, scratch, do everything possible to shift attention away from unpleasant actions. Position your pet's head so that he cannot see the tools or actions being performed. Panic is not always associated with real pain. If your pet is afraid of having its nails trimmed, it will easily become horrified just by looking at the manicure set. Don't tempt fate.
After following all the preparatory steps, including treatment with saline solution, proceed to the main steps
:
1. Keep the tools in boiling water and treat with alcohol. Any dirt that gets inside will cause inflammation. The safer the devices used, the higher the chance of a successful operation. It is equally important to take care of the cleanliness of your hands. Wash them thoroughly under running water and soap.
2 Take a clean towel and soak it in warm water. Remove any dried blood or other debris remaining on the wound.
3. Soak a cotton pad with 3 percent hydrogen peroxide and apply to the cleaned wound. Look closely at the seam. It is divided into outer and inner parts. The first includes two ponytails and a knot, the second includes everything that is hidden from you and located under the skin.
4. Gently move each of the threads from the outside, grasping them with tweezers. After the wound heals, they stick to each other, preventing quick removal. Don't be afraid, the threads are foreign to the body, so they move easily under the skin. During manipulation, slight discomfort for the animal is possible.
5. Use scissors to pick up one of the knots and pull vertically. Cut the seam from the outside of the knot, holding one of the tails with tweezers. Remember that the tips of the tool must be rounded. Otherwise, the likelihood of scratching or causing a puncture wound with the sharp tip increases.
6. Monitor the dog's condition. If the four-legged patient begins to worry, take a break. Put down your tools and talk to your pet. Don't show pity or encourage fear. In this case, the dog will decide that the fears are justified and it will no longer be possible to finish what he started without consequences. Be confident and speak in a calm voice. Encourage your dog by shaking his paw or patting his rump. Convince him that the situation is under control and all worries are not justified. Veterinarians note that the pain threshold of animals is lower than that of humans. Remember that the pet squeals not from pain, but from ordinary fear. The success of the operation depends on your confidence.
7. Gently pull the tweezers upward while holding the cut seam. Due to the tension created under the skin, the dog will experience slight anxiety. This is fine. Continue pulling until the threads are completely removed from the body. You will have to sound the alarm only when the thread is firmly lodged under the skin, and its removal will be accompanied by real pain for the patient. In this case, stop the procedure and rush to the veterinary clinic.
8. Remove the remaining threads in the same way. If the animal is very distressed, delay removing the suture material for a couple of days. If the dog’s condition does not change, resign yourself and provide the four-legged patient to a qualified veterinarian. The same solution is recommended when removing after a complex operation.
9. If you have removed all the stitches, treat the wound again with a cotton swab dipped in peroxide. Check that there are no loose threads inside or outside.
10. After making sure that there are no bleeding, pus or other alarming symptoms, lubricate the wound with Levomekol. This antibiotic is approved not only for people, but also for animals. Make sure you always have it in your home medicine cabinet. Apply a sterile bandage or bandage on top. After completing the final action, be sure to treat the four-legged hero with your favorite treat, regardless of behavior. This will allow you to switch from a stress factor to positive emotions.
Remember that you need to pull the tip of the thread, not the knot itself. It is also important to cut the thread under the knot, maintaining its integrity. Otherwise, some of the threads will remain under the skin, and you will still have to go to the veterinary clinic. When removing suture material, it is important not to allow the external thread to pass through the internal tissue. To do this, cut the outer thread strictly near the place where it enters the skin. Otherwise, when tensioned, it is not the clean side that will go in, but the dirty side. This error is another path to infection.
If you strictly followed the instructions, you don’t have to worry about failures or complications. The whole process takes no more than 10-20 minutes. Monitor the wound carefully for 1-1.5 weeks. If blood or pus is discharged, contact a veterinary clinic.
Observation and care during the first days
Your dog has been sterilized; what immediate care will she need after surgery? It is preferable to spend the first day after surgery in the clinic. There is an opportunity to quickly help the animal in case of unexpected complications. With correctly calculated anesthesia, the dog will begin to come to its senses almost immediately after the operation or within a couple of hours, but it will take a day for it to fully recover.
Keep in mind that the animal will be slightly out of control and may be timid or aggressive. Talk to your pet in a calm, gentle voice, provide peace, but do not leave her alone to monitor her condition.
A four-legged patient must be wearing a special blanket to protect the stitches. Then she is laid on a flat, low bedding covered with moisture-absorbing diapers. The sofa will not work - the dog does not control its paws and may fall off it. When your pet comes out of anesthesia, it is cold; be sure to cover it with a light blanket or rug, and place the bedding not in drafts. Additional heaters are not required to avoid causing bleeding.
The animal cannot control urination in this state, so a diaper is required. Once every half hour it must be changed, and the dog must be turned from side to side to prevent swelling. During hot weather, your veterinarian may recommend using a syringe without a needle to pour some water into your dog's mouth. But usually it is enough to wet the nose and mouth. You should not offer food on the first day, as the dog may choke.
How does castration of a male dog occur?
The technique for castrating male dogs differs from castrating rabbits or cats; these operations cannot be compared. There is only one general point: if both testicles are in the scrotum (the male is not cryptorchid), then castration is not an abdominal operation.
Why, why are we going to the clinic?
A very important point: the surgeon should not cut the skin of the scrotum. There are many nerve endings and even more blood vessels. The incision is made “along the white line” in front of the scrotum, and both testes are brought out through it. A ligature is applied to the feeding vessel and the spermatic cord, and it slips into the pelvic cavity. The skin wound is sutured.
The suture can be cosmetic (all the threads are inside the skin, gradually dissolving) or removable, external. This depends on the qualifications of the surgeon, the availability of suture material, and also on how the operation goes. I never tell owners in advance what exactly there will be “cosmetics”. It happens that the skin is too loose and separates; sometimes it is necessary to “press” the bleeding vessel of the skin with the external sutures. If removable sutures are placed carefully, they will not create any problems.
The entire operation lasts about 15-20 minutes. But the dog will stay in the operating room longer. This is due to the fact that you need to shave, wash and disinfect the skin, isolate this area with the surgical field, and administer local anesthesia. After the operation, wait until the patient begins to wake up. Only then is the pet taken out to its owners - or placed in a cell in a hospital. How is it accepted where?
How to do oral hygiene
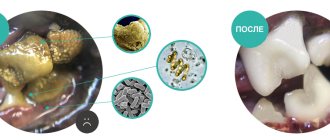
The main task is to preserve the blood clot on the wound of the extracted tooth, while maintaining cleanliness and health in the mouth. How to properly care for your teeth during this period:
- There is no need to carry out any hygiene procedures immediately after tooth extraction. It is better to postpone the first brushing of your teeth until the next morning. You will need a brush with soft bristles. And it’s better to take a new one so that it is sterile. You need to brush your teeth with a small amount of paste, avoiding the wound area, and clean adjacent teeth with caution.
- Do not rinse your mouth (including after brushing your teeth) or use an irrigator in the first three days! The clot may dissolve or be washed away with the flow of fluid, and treatment will have to be restarted. Instead of rinsing, make mouth baths - just take water into your mouth and carefully spit it out. If the doctor prescribes antiseptic drugs, rinse with them,
- try not to touch the open wound with your tongue, hands or toothpick - this can damage or dislodge the clot and introduce an infection into the hole.
You can’t neglect hygiene - bacterial plaque will accumulate in your mouth, which can cause inflammation.
The most complete reminder for patients after tooth extraction
So, you left the doctor's office - the surgeon asked you to tightly squeeze a gauze pad with your teeth, which will help stop the bleeding. You need to hold it for about 20-30 minutes, that is, while you fill out the necessary documents at the clinic or go home. Remove the tampon carefully, moving it slightly to the side, without sudden movements, so as not to damage the fresh blood clot.
Very important! A thrombus (usually called a “blood clot”) protects the wound from microbes and prevents pieces of food and saliva from accumulating in the hole during the first week of rehabilitation. This is a natural sterile dressing that starts the process of new tissue formation. The most important rule that will protect you from complications and severe inflammation of the wound is to never remove the clot, do not touch it with your tongue or fingers, do not touch it with a toothbrush and protect it from other influences. Gradually it will resolve on its own.
Do not keep the tampon in place for more than 30 minutes - gauze soaked in blood and saliva will quickly become a breeding ground for infection. In addition, a blood clot is forming in the hole - the presence of a foreign body and additional injury are of no use to it. You need to give the wound the opportunity to heal naturally.
“If you have a complex tooth extraction, especially if you had surgery to remove wisdom teeth, or if you have an underlying condition, such as diabetes, you may need to observe a doctor for a few more hours. For this purpose, we have our own hospital, where you can sit comfortably and relax while we monitor your condition to see if there are any complications. This will give us confidence that the operation will be successful and will reassure you as the patient.”
Vasiliev Alexander Alexandrovich, implant surgeon, more than 10 years of experience make an appointment
Tooth extraction WITHOUT complications! The modern equipment of our clinic allows us to carry out the most accurate and comprehensive diagnostics. Consultation is free!
Sign up online
Swelling after tooth extraction (especially if it was complicated) can be prevented by applying a cold compress - to do this, wrap an ice pack from the freezer in a towel and apply it to the cheek (that is, from the outside) for no more than 20 minutes. After 15 minutes the procedure can be repeated. If you don't have ice on hand, frozen vegetables or meat will do, but be sure to wrap them in a bag and a towel to avoid cold burns. Cold constricts blood vessels, reduces pain and swelling, although it does not completely remove swelling. Compresses are effective immediately after surgery for approximately 3-4 hours.
Do not warm up the injury site under any circumstances! A hot compress will only make the swelling worse by increasing blood flow to the area of inflammation. This will lead to serious complications after surgery.