hammock for transporting dogs in the car
There are a few important precautions to take into account before taking your dog on a big trip. All the mess and hassle that comes with having a dog makes many people give up on the idea of traveling by car with their four-legged friend. A dog hammock in the car solves this problem in the simplest way possible, it is something that gives your pet a safe and comfortable place to rest in the car. If you think this is an expensive pleasure, we offer you several projects on how to make a hammock for a dog in a car with your own hands , with step-by-step photos, patterns and detailed instructions.
How to properly care for the device
A dog hammock, especially if it is used frequently, requires constant attention. At the same time, care is not difficult: the bed needs to be washed regularly, preferably with laundry soap or other products without strong odors and without harmful chemicals.
Frequent washing may cause the material to deteriorate, so it can be replaced by periodic cleaning using a soft brush.
Do not use high temperatures when washing a hammock. There is also no need to iron or steam the product.
Business concept
The company will produce car hammocks designed for transporting dogs in a car. Different models of unique beds will not only protect the vehicle from dirt, but will also ensure the pet’s immobility throughout the entire trip.
The main clients will be private animal owners, pet stores, and online buyers.
Oval / round lounger
- Oval loungers are made simpler than square ones. It consists of two components - two identical ovals (circles). The dimensions are determined in a similar way: the length of the sides is added to the total area of the overnight accommodation.
- First you need to fill the bottom with filler.
- Afterwards, you need to tightly sew the two parts together in the inner circle.
- Then stuff and sew the border, and put an elastic band (or lace) around the edge of the outer circle.
- If you divide the board into so-called “pockets”, the lounger will end up much softer and more voluminous.
- Tighten the elastic band and raise the side.
- The lounger is ready!
Car hammock care
You need to take care of your hammock like any other item. Proper care will prevent it from wearing out quickly. Care instructions:
- Do not wet a dog hammock with water whose temperature is more than 30 °C;
- Do not clean the coating with a wet sponge or hard brush;
- Do not wring out or dry the product in a washing machine;
- It is forbidden to iron the fabric of the accessory;
- you need to fully open the wet hammock until it dries;
- You can clean the accessory with soap or other harmless cleaning products.
For your information! Exposure to high temperatures is detrimental to automotive fabric products.
Now the dog owner knows how to create comfort for his pet in the car and at the same time protect the interior. A hammock for transporting dogs in a car is a useful and safe thing.
*Prices in the article are for December 2022.
Machine size
Cover for transporting dogs in a car (rear seat cover)
Before purchasing this product, you first need to pay attention to the size of the car. For example, you cannot purchase a hammock for a station wagon if the person drives a minivan. At the moment, manufacturers produce several models that differ in size:
- for the front seat;
- for one seat in the back;
- for two seats in the back;
- with full rear seat protection;
- for the trunk.
Car hammock in the trunk for dogs
The first option is designed to place the animal in the front seat. A product designed for one seat in the back with 30% protection will help free up a couple of seats. A hammock for the two rear seats will leave only one seat free. Full protection of the rear seat will allow your pet to occupy all the space. A car hammock for the trunk is used to transport a large dog if the owner does not want to place it on the seat. In this case, the animal itself will be much more comfortable, but only if the person owns a car in the back of a hatchback, station wagon, or SUV.
Important! The animal should not be transported in a closed trunk, as it may go into shock.
Advantages and disadvantages
Many dog owners, having seen the cost of a bed in a store, prefer to make this item themselves. The advantages of a homemade product also contribute to this.
- Only the owner thoroughly knows all the habits of his pet, he is familiar with the pet’s favorite poses and therefore will accurately determine which base is more suitable for the dog: soft, elastic or hard.
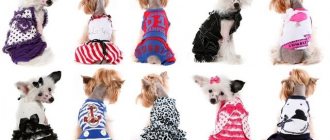
- Each animal needs an individual place that would suit it in all respects. Pet supply departments cannot offer a wide variety of beds and only sell standard designs for miniature breeds.
- Making a product with your own hands is very simple. This does not require experience or at least basic sewing skills. It is enough to set aside one evening on a weekday - and a comfortable soft dog bed is ready.
- Doing it yourself saves a lot of money, since to create a homemade vacation spot you only need available materials.
- If you make a bed with your own hands, you can give it an exclusive appearance and choose a design that will harmoniously fit into your home interior.
The only downside is that it will take some time to create. However, it can be turned into a plus. After all, you can involve children in the work by spending a pleasant family evening with them making a bed for your pet.
By the way, pet owners know that their pets love to sleep on their owner’s clothes. The fact is that four-legged friends experience melancholy and boredom in the absence of their owner. Clothes dropped on the floor smell like their loved one, which is why dogs and cats love to rest on their owner's things. In this regard, the dog will like a homemade bed made from the owner’s old clothes much more than a purchased one.
Another plus in favor of any bed is that it keeps the fur in one place. A dog that does not have its own place can lie down in the bedroom in the morning, in the hallway during the day, and in the kitchen in the evening. Accordingly, within a whole day the whole apartment will be filled with dog hair.
If the animal rests in only one place, then the owner will only have to clean one bed of hair, and not run around with a vacuum cleaner throughout the house.
Step-by-step launch instructions
- Registration. For a business, it is enough to obtain the status of an individual entrepreneur operating on the basis of a simplified taxation system. It makes no sense to formalize your activity in the form of an LLC at the initial stage. Firstly, such registration will be more expensive. Secondly, tax deductions will be higher. You will also need to obtain permission from the Fire Supervision authorities regarding the premises’ compliance with fire safety requirements, and organize a warning system in the sewing workshop in case of fire. The total costs for this item will be approximately 8,000 rubles.
- Room. A sewing workshop can also be set up at home, but for this you will have to allocate a separate room with an area of at least 30 m². If this is not possible, it is worth concluding a lease agreement. The future workshop can be opened on the outskirts of the city, then the rent will not exceed 15,000 rubles. If you want to combine an atelier with a store, you will have to look for premises closer to the center, where a large number of people pass daily.
- Equipment, materials.
- Staff. When selecting personnel, be guided by the scale of activity. If you want to immediately organize a full-fledged enterprise for sewing this type of product and are sure that there will be many clients, hire two seamstresses who will simultaneously carry out cutting and sewing. In the future, when more customers appear, you can find a new production facility and recruit additional people. As for design, you can develop models yourself by choosing sketches on the Internet. Or hire a professional, but then you will have to pay him for the work. The same applies to accounting and marketing. As practice shows, at the start of business development it makes no sense to spend money, since the project in any case requires initial investments. If the company is gaining momentum, then it will be possible to think about expanding the staff.
- Advertising, searching for clients. The best source of information about a company that produces car hammocks is the Internet. You should spare no expense and create your own website, where you can post not only photos of products and company contact information, but also interesting information about animals. Such a resource should contain information that will definitely interest a potential client, and an appeal that gently, but not intrusively pushes him to make a purchase. You can also present your products at dog shows. Immediately take several products to such events as samples, and invite the owners to test them on site. Leaflets, business cards, booklets are additional ways to increase clientele. Advertising costs will be approximately 30,000 rubles.
Round bed with drawstring
This transformable bed easily turns into a soft pillow or a comfortable bed for your pet - just tighten or loosen the drawstring at the top of the side of the product. This is a very simple option for a place to rest and sleep, suitable for pets of all sizes.
Step 1 . Prepare the material. This master class uses two colors of gabardine. The amount of fabric you need to take is sufficient to create a bed for a particular dog. In this case, holofiber is used for padding. You will also need a long cord to create a drawstring.
Cord for creating a drawstring
Two colors of fabric are used
Step 2 . Create a pattern based on the desired size of the bed. An example diagram looks like this.
An example of a pattern for a bed with a drawstring
Step 3 . Let's start cutting the fabric. To make the job easier, first cut out two squares of fabric.
Step 4 . Now each square needs to be divided into 16 sectors - markings must be applied. Find the middle of the square and draw vertical and horizontal lines through it, strictly parallel to the edges of the fabric. You will get 4 sectors. Then divide these sectors into two more parts with markings, and the next smaller sectors into another half (refer to the pattern diagram).
Step 5 . When the sectors are marked, make a mark at the same distance from the center along each line. Connect all the marks with one line - you get a circle. Draw three circles: outer, middle and inner.
You need to draw 3 circles
Step 6 . Cut a circle of fabric around the outer circumference. Make the same circle from the second piece of fabric.
A circle of fabric is cut
Step 7 . Place both circles with right sides facing out and pin together with tailor's pins.
Circles are pinned together
Step 8 . Using a machine, sew all the marked lines of the sectors, except for one going to the center - the stuffing of the bed will be carried out through it. Also, do not stitch the outermost circle yet.
Lines are sewn on a machine
Step 9 . You can start stuffing. First, fill the bottom (inner circle) with holofiber and immediately sew up that part of the sector around the perimeter that was left unsewn for stuffing.
The inner circle is filled with holofiber
Step 10 . Next, fill the sides of the future bed with filler, each sector with the same amount of filler.
The side sectors are filled
All sectors are filled
Step 11 . Sew the fabric along the middle circle, sealing the holofiber inside.
The fabric is stitched in the middle circle
Step 12 . All that remains is to make the drawstring. Fold the edges of the fabric along the very edge of the bed inward to the very seam.
The edges curl inward
You need to fold it all the way to the seam
Step 13 . Sew along the edges 2cm from the outer edge, making sure to leave room for the lace to be threaded through.
Space left for lanyard
Step 14 . Now insert the lace into the bed and let the edges out. The bed is ready.
The edges need to be let out
This bed can be used either unfolded or by tying it with a cord and turning it into a crib.
The bed can be turned into a crib
Your pet will be very comfortable
Articles on the topic
Do-it-yourself scratching post for cats - TOP 9 master classes
Video - A very simple bed-pillow
Necessary materials
To make a carrier bag & car hammock for a dog, we will need the following materials:
- Fabric with water-repellent impregnation. I used lining stitch. But my top stitching is made from jacket fabric, and not from the lining. You can take any anti-vandal fabric with water-repellent impregnation: raincoat, oxford or membrane fabric. For the autohammock I needed 2 meters of stitching with a fabric width of 1.5 meters.
- Sintepon. Since my stitch already has a small layer of padding polyester, I didn’t use the thickest padding polyester for sewing. The density of my padding polyester is 150g/m2. If you use fabric without an additional layer, for example, just a membrane, then it is advisable to take a thicker padding polyester. For example, with a density of 300 g/m2. For a car hammock of my size, 1 meter of padding polyester is enough (with a width of 1.5 meters).
In addition to fabric, you will need the following accessories:
- Belt sling 3 cm wide - 3 meters.
- Sling width 2.5 cm - 30 cm.
- Belt sling 2 cm wide - 0.5 meters.
- Velcro 2 cm wide - 10 cm.
- Plastic fastex fastener to the size of a wide sling (3 cm).
- Two plastic adjustment frames with a jumper (3 cm wide).
- One plastic adjustment frame with a jumper for the width of the narrowest sling (2 cm).
- Two metal carabiners the size of a wide sling (3 cm).
- One metal carabiner, the size of the narrowest sling (2 cm).
- Two durable metal half rings of 2.5 cm.
- One durable metal half-ring 2 cm.
All plastic and metal fittings are selected based on the width of the sling, and are measured by the width of the holes into which the sling will be threaded.
Bed in the form of a pillow
- Take measurements of your pet.
- Draw a pattern on paper.
- If the pillow is made for the growth of a pet, calculate the approximate size of the animal.
- You already know the shape of the pattern.
- Transfer this shape onto the fabric.
- You should end up with two identical fragments.
- Then sew all the parts, not forgetting the filler.
- Fill the pillow with filler (it can be silicone, foam rubber or any other).
- Then finally sew all the details.
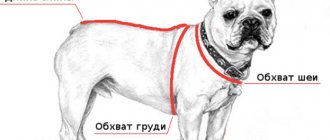
Taking measurements
Before you start sewing a pattern bag, you need to take measurements of the animal. To do this, you need to measure the length and height of your pet. Length is the distance from the front paw to the tip of the tail. Height is the distance from the pad of the paw to the neck.
You can make a small reserve so that the dog feels comfortable: it can move, turn around or stand up to its full height.
For car trunk
Owners of SUVs, crossovers, station wagons or minivans often transport their dogs in the trunk of their car. To protect the standard luggage compartment upholstery from the claws and teeth of pets (as well as from dirt and fur), specially designed covers are used for this purpose. Structurally, they are in many ways similar to conventional luggage car covers, designed to protect against debris or scratches when transporting construction materials or tools. The main difference is the material from which they are made: the fabric must be safe for animals (that is, not cause allergies in them). In addition, the surface of such covers is softer, as it consists of three layers: an inner lining made of waterproof fabric, a foam pad and an outer layer.
Such protective devices are produced both for a specific car brand and universal (which can be easily adapted to the size of the trunk of most vehicles).
A universal model from Osso Fashion (with overall dimensions 210x120x55 cm) with belts (for fastening to seat headrests) and Velcro (for fixing to the standard trunk upholstery) costs 2600-2800 rubles.
A similar device from China with a soft quilted bottom will cost 2100-2200 rubles.
Video with master class
We present to your attention detailed, detailed and step-by-step instructions for making a dog bed yourself at home.
This demonstration will briefly introduce you to how to make a lounger at home.
Dear readers, tell us how you went about making beds for your pets. We look forward to your feedback and comments.
It is generally accepted that every cat needs its own soft and comfortable bed. Dogs have enough space on the rug. But that's not entirely fair to man's best friends. Own place is an important psychological factor in tying an animal to home, and, of course, most breeds would prefer to rest in a soft, cozy bed than on a thin doormat.
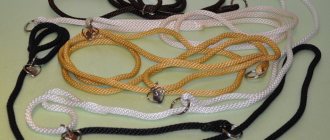
Safety leash for dogs in the car
Domestic ferret - pros and cons of the animal
The animal can be secured to the back seat with a leash. It is equipped with a steel carabiner on one side, which is attached to the pet’s collar or harness, and a connector on the other side. Reliable fastening will help to hold the animal. You don't have to worry about your pet tearing it off. The safety leash can be any color you like. Advantages of the device:
- conveniently fastened;
- length adjustment;
- strength.
Note! A leash will provide additional safety in case of a traffic accident.
How to train your dog to travel by car
The ideal option is training from puppyhood. So the dog gradually gets used to it, and traveling by car becomes a normal procedure for him.
If you are planning a road trip with your four-legged friend, and he has rarely been in a car before, give him a chance to get used to it first. Before you hit the road, take your dog on a few short trips. This will allow her to get used to the noise of the engine, the sound of the brakes, and the need to remain in the transporter, crate, or tied with a seat belt.
Be sure to check if your puppy is having problems while riding. Many animals suffer in the same way as people - when traveling, they can get motion sickness. If it turns out that your dog does not tolerate riding well, then you will have time to prepare him. First of all, start driving with it more often, this will help get rid of your fears about the car.
You must learn to differentiate between normal puppy anxiety and motion sickness symptoms. Reasons for concern are:
- apathy,
- nausea,
- salivation,
- panic attacks,
- loud barking.
If you notice such symptoms in your pet, be sure to reduce the amount of food before a planned trip or skip feeding. It is best to give only water to drink. However, if you find that your baby is vomiting frequently in the car, consult your veterinarian. The doctor will prescribe a mild medicine for motion sickness. It works the same way as for people - it calms and causes drowsiness. In this state, animals tolerate travel much better.
Communities › My Beast › Blog › Car seats for animals PupSaver
I want to tell you about such a wonderful invention as a car seat for dogs (and indeed for any pets weighing up to 15 kg). Yes, yes, you understood everything correctly, progress in this area has come to our smaller brothers.