People who decide to buy a dog also think that it would be good for the new family member to prepare his own place in the house by properly equipping it. So, if you buy a large dog, then you need to make a warm and comfortable kennel or a large bed for it, and if it’s a small one, its home should fit into your apartment and be comfortable. We will tell you how to make a dog house with your own hands in this article.
DIY dog house
Material
The variety of houses for four-legged friends on the Internet is fascinating. Colorful and vibrant creations inspire you to create a masterpiece. Don't be afraid to improvise and combine different house models. Before work, clearly think about what materials should be used specifically for your dog. Consider the animal's personality traits.
Cardboard houses look very impressive, are easy to create and do not require any special expenses. Such houses are suitable for dogs of small and medium breeds. The only drawback of such a shelter is its fragility. Don't rule out the possibility that your pet might want to chew on your efforts.
Foam rubber “huts” are a universal thing: such a house can be washed, folded and taken with you to nature/on a visit, so that your tailed companion feels more comfortable, and can be easily moved around the apartment. However, some owners note loss of shape after washing and the lack of a rigid frame as shortcomings of this product.
REFERENCE! Most dogs are diggers. When sewing a soft house, decorate the inside with durable fabrics.
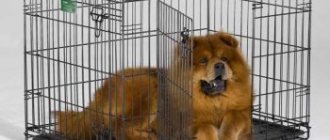
Wooden kennels are the most durable and reliable structures, serving for hundreds of years to provide comfort for dogs. For an apartment this option is more than acceptable. The inconvenience of such “furniture” lies in its bulkiness and heaviness: it will be difficult to move around the living space.
The best option is to try to combine different materials when working, complement the houses with pillows, beds with canopies, which will increase the level of comfort for your pet. It is not necessary to strictly adhere to the schemes. Try experimenting with the shapes of the house and upholstery yourself. To invent something unique, you don’t need to run to the store for materials. Take a closer look at old things: cabinets, cribs, old TVs. And such things can be breathed into new life, while providing a cozy nest for your dog.
Interesting booth ideas
You can build a dog house in the most unusual places. To do this, you can use the space under the stairs, free space in the library, living room, TV stand, corner of the room, and even the bathroom. Under the stairs, most often the free space is empty and unused. It is in this place that you can make a booth for your pet with your own hands.
Aviary for a dog in an apartment: home fencing
A house for a puppy or an adult dog can be made from a wooden box or cardboard box. Most often, preference is given to just such houses for dachshunds or Yorkshire terriers. Moreover, this does not require significant financial investments.
Note! A house for a small dog, made in the form of a wigwam, will look no less attractive. This option will become one of the cutest elements in a house or apartment.
Fancy dog kennels are currently considered a trend. Animal owners give free rein to their imagination and sometimes create real works of art. They even use chopped timber to build a home, and the result is an aesthetically pleasing miniature log house. Dogs in such a house feel comfortable and at ease. Even traditional booths can look interesting if you choose the right colors and use your imagination.
Wigwam for dogs
Size
The first thing you should pay attention to is the breed of your dog.
ATTENTION ! If you have a puppy in your home, make inquiries about the breed. What approximate parameters will a dog have at an older age?
The house should be of such a size that the dog can freely go inside, turn around, sit upright (without bending his head) and lie stretched out. The following parameters must be taken into account:
- Height at withers.
- Distance from the withers to the tip of the front paws.
- Width at chest.
- Length from nose to tail.
For an approximate calculation, refer to the approximate table for some dog breeds.
Measuring is an important part when creating a future house or lounger. By neglecting this procedure, you increase the chance of creating an uncomfortable product.
Based on the size of the breed, it is easier to determine what the future house will be like:
- From cardboard.
- Fabric (made of foam rubber).
- Made of wood or plywood.
By creating a “cozy nest” for your pet with your own hands, you get a huge scope for flight of imagination:
- You can design the model yourself.
- Use fabrics at your discretion (density, pattern, etc.).
- Add decor to your taste.
Remember, all diagrams are provided for illustrative purposes. The dimensions shown in the drawings may not be suitable for your pet.
How to secure a birdhouse
The birdhouse is fixed at a height of 1.5 to 3 meters so that cats and predators cannot climb. Attach to a pole or tree.
If the tree is alive, then tie it tightly to the tree so as not to damage it. In other cases, the birdhouse is either nailed to a tree or board, or hung on specially made loops.
The birdhouse must be well attached; birds do not settle in houses swaying in the wind.
Taking care of birds will definitely give you pleasure, and they will delight you with their beautiful trill.
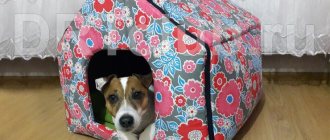
For small breeds with your own hands
For small dogs of small breeds (Chihuahua, Dachshund, Maltese, Pomeranian and other breeds), you can use cardboard boxes, fabrics and foam rubber.
Small dogs for home
From cardboard or plywood
Original and exclusive
Houses using geodesic dome technology have become widely known on the Internet. Such houses are made of slats and fabric or cardboard. Such houses are used both for children and for pets, including dogs.
The advantage of such home kennels is that they are suitable for small dogs and are easy to make with your own hands. Plus, you can involve your child in doing them!
So, instructions on how to make a booth for an apartment out of cardboard with your own hands:
Step 1. Constructing patterns and cutting out parts. For this you will need:
- Cardboard.
- Scissors/construction (stationery) knife.
- Ruler.
- Pencil pen
Let us conventionally designate a triangle with red edges as “Triangle A” and with blue edges as “Triangle B”. You will also need squares for the bottom of your structure or rectangles. You can choose the sizes of the triangles yourself based on the proportions: use small triangles for a smoother dome shape and large ones for a rougher one; the side of a square or rectangle is slightly smaller than the height of the entrance.
From the edge of the triangles and squares, a 2-5 cm margin is counted, which will later serve as a place for fastening the parts.
Step 2. The triangles are fixed with hot glue or Moment glue along the released strips. You should start working from top to bottom. Form a pentagon from five triangles, then attach the remaining parts to each triangle using the diagram. For a beautiful entrance, you can remove one of the triangles of the last tier. The bottom is glued together from squares, leaving space for the entrance.
Step 3. Proceed with registration. The shelter can be painted using spray paint.
REFERENCE ! This work can be supplemented with a wooden plywood floor, a personalized wooden sign above the entrance or any other decorative elements. The house is painted or covered, and a blanket or sleeping place is placed inside.
Cheap
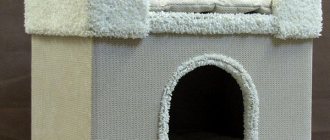
There is also a simple way to make a dog house with your own hands. To do this, you will need a box of such size that your pet can comfortably turn around inside and sit upright.
How to make it out of the box:
We cut the top part of the box and glue it together as follows:
Use extra sheets of cardboard to create a roof. Cut out the doorway completely.
The final part is decoration (painting, possibly adding curtains for the entrance, etc.). We present to your attention one of the options for such a house:
The work is made of cardboard, covered on both sides with fabric and decorated with bows, ruffles and a decorative teddy bear. Making a booth out of cardboard is quite simple. This option is affordable and allows you to fully express yourself when creating.
Soft foam
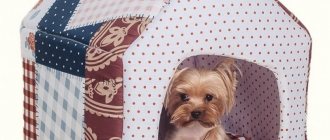
The most beautiful and warm options for houses for small dogs are fabric dog beds made of foam rubber. Experienced needlewomen make patterns for houses of the most diverse and amazing shapes.
To create such a house you will need:
- Textile . The best choice would be linen, chintz, velor, fleece, faux fur jeans. When synthetic fabrics come into contact with fur, they will become electrified and give an electric shock to the dog. Your pet will not live in such a house.
- Foam rubber, synthetic winterizer, satin or down.
- Scissors.
- Sewing machine (can be done manually, but the quality of work will be significantly lower).
How to make a house from foam rubber:
- The first stage of your work will be choosing the shape and pattern of the bed-house, cutting.
- The “Foam House” pattern is quite simple and does not require any special drawing skills. Based on the diagram provided above, cut out the parts: 2 pieces for each side of the house and roof, and one piece of foam rubber. For each fabric part, leave allowances equal to 1.5-2 cm on each side; do not allow allowances for foam rubber.
- The second stage - how to sew a house from foam rubber? The fabric parts of the walls are folded with the front side inward and stitched on three sides, leaving a pocket for foam rubber (it is more convenient to leave the lower part unstitched). The base and roof are stitched in the same way.
- At the third stage distribute the foam over the corresponding parts and sew along the front side.
Fold and sew the walls of the house together (the seams go inside the house). We carry out a similar procedure with the lid base. - The final stage - decoration. You can sew ruffles or lace along the edge of the roof, make an embroidered nameplate above the entrance, or anything of your choice. Here's a glamorous and beautiful option you can make:
You can use another pattern.
In the diagram, the unshaded parts indicate the primary building, from which the roof and bottom will be formed during the work.
How to sew:
According to the principle of a “house” pattern, the parts are cut out and sheathed on both sides with material. In the place where the roof and wall are sewn, the seams can be hidden under lace, ribbon or braid. The finished work looks like this.
Both options in one photo. The pink house is made according to the first scheme. The slight differences are the rounded front and rear walls, and the rounded roof due to a different sewing method.
Beds
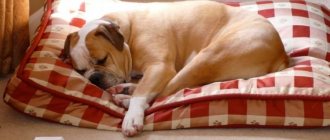
Handicrafts also did not ignore the production of beds: they make beds from fabric, from tires, mixed compositions (fabric + wood). The most economical and easiest way to create a bed is to alter an old sweater or jacket: imagine, you don’t even need a pattern for a bed!
For work you will need:
- Sweater or textile jacket.
- Pencil/felt-tip pen.
- Filling, padding polyester or foam rubber.
- Scissors.
- Needle and thread/sewing machine.
Lay out the sweater on a work surface. The neckline is sewn up, a stitch is made from one sleeve to the other at the chest level of the jacket. Fill the future side with foam rubber through the sleeve and place one sleeve into the other.
The sleeves are then sewn together. At this stage, you can adjust the shape of the side: make it rectangular (stitch the corners) or round. The bottom is stuffed soft and also sewn; for a rounded shape, the bottom is folded and hemmed to the shape of the side. The final touch is to sew the sleeves to the base.
Comfort and beauty cheap: a dog house on the street
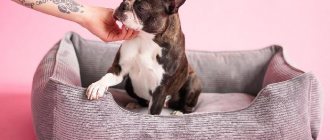
Lounger-pillow with ties
They look like designer ones and will be very suitable for decorative dogs:
Step 1. Constructing a pattern.
To do this, based on the parameters of the dog, draw a rectangle - the base. From the base, make allowances of 1-1.5 cm on all sides for lifting. From each edge, draw more rectangles of the desired height with allowances of 2.5-3 cm upwards. This way you will get a pattern that vaguely resembles a cross. Cut an opening from the side that will be the front.
Step 2. Cut out 2 pieces from the fabric according to the pattern.
Step 3 . Sew the pieces along the top sides of the sides. Turn the product out through the side holes.
Step 4. Stuff the lounger with padding polyester and carefully sew from one side through the center to the opposite. Thus, by sewing all the edges in the center you will get a pillow.
Step 5: Add ribbon or lace ties. Add decorative elements (buttons, bows, embroidery, etc.). You can complement the lounger with a canopy or pillows.
The best enclosures for dogs and puppies in an apartment: how to make them yourself cheaply and with high quality?
Building with a pitched roof
To protect the animal from the cold, it is recommended to insulate the house, directly during the assembly of the structure.
Stage 1. Assembling the bottom box
4x4 cm bars are cut based on the parameters of the bottom, laid out on a flat surface, and secured with self-tapping screws into a rectangle. For a large dog, the frame is reinforced with a wooden plank, and then one side with boards.
Stage 2. Floor insulation
The upholstered frame is placed so that the bars are on top. The inner part is lined with glassine, fixed with staples using a stapler, a piece of foam is cut with scissors based on the dimensions, and laid out between the wooden parts.
At the top, the synthetic material is covered with an additional layer of rolled glassine and the finishing floor is nailed.
Stage 3. Frame assembly
A 10 x 10 cm board is sawn into 4 pieces: two at a distance equal to the height of the building; the other pair is 8 - 10 cm larger. The elements are fixed vertically in each corner. Long support posts are placed in the front part, and shorter ones are placed in the rear. This design creates a slope of the roof.
All bars are aligned using a measuring level and secured with self-tapping screws. Additional vertical boards are nailed in the center of the walls and two small bars on the sides of the entrance hole.
Stage 4. Wall covering
The assembled frame is trimmed with boards on the outside, and the interior space is insulated. The walls of the building are covered with rolled glassine, fixed with a stapler, and then they begin to fill the voids between the boards with foam plastic or mineral wool.
After this, an additional layer of film is nailed down, and plywood is placed on top. The upholstery is fastened flush with nails so that the animal does not get hurt.
Stage 5. Making the roof
First, a frame is mounted from wooden blocks 4x4 cm, equal to the perimeter area of the booth. They cut out the same plywood sheet and nail it to the frame. Styrofoam is placed between the boards as tightly as possible, film is laid, and secured over the entire area with a stapler.
A plywood sheet is placed on top, making a protrusion from the side walls on the back and front sides. The manufactured eaves will protect the kennel from rain. Using door hinges, the finished roof is fixed to the building, and a sheet of roofing felt is laid.
Stage 6. Finishing
Paint the wooden booth with an antiseptic solution, then dry it for two days. They line the bottom of the structure with a piece of roofing felt, bending the sections 3-5 cm to the surface of the walls, attach two 10x5 cm boards to it. Turn the kennel over, trim the entrance opening and the ends with platbands.
Stage 7. Installation
When choosing a site for a kennel, it is important to provide your four-legged friend with a wide view of the area. The site should be in a dry, shady area with sufficient natural light. This will ensure a comfortable stay for the dog.
Recommendation: “The owner should take care to maintain a distance between the doghouse and buildings where other breeds of animals are kept. Otherwise, their waste will end up in the dog’s territory, causing him aggression and discomfort.”
Pets for large and medium breeds
Made of wood
For dogs of large breeds, it is safer to create a large wooden house even for the apartment.
The first option is to create it from wood (bars). To do this you need:
- Wooden blocks or boards.
- Roulette.
- Jigsaw or saw.
- Nails/screws for fastening.
- Hammer/screwdriver.
- Paint for decoration.
- Grinder for grinding.
How to build:
- The initial stage of building a wooden booth is frame building.
To do this, cut the boards to the required size and fasten them with nails or screws. This creates a box. - The next step will be cutting and sanding the boards for the floor, walls and roof . Attach the sanded boards tightly to the frame, starting from the base and ending with the roof. If such a kennel will be permanently located in the apartment, the roof can be decorated with small sheaves of straw.
- Carefully mark the entrance with a pencil and cut out with a jigsaw.
- The final stage will be finishing, decorating or painting the house.
A simplified option for creating a wooden house is to work with plywood. The principle of operation is similar to the first option, the only difference is in the sheathing (a sheet of plywood is nailed instead of boards).
With a gable roof
This type of canopy is more suitable for small booths, since it is inconvenient to lift massive structures during processing.
Stage 1. Frame assembly
They knock together a lower frame from four 5x5 cm wooden boards. Racks are mounted in each corner, and a frame of boards is made on top. To strengthen the frame, additional strips are nailed to the bottom on both sides of the wooden frame.
Stage 2. Roof fastening
Combine two equal beams 5x5 cm with an angle of 40 degrees. Next, a similar blank is made. They are placed on the top of the frame, aligned vertically, at the same level with the walls of the booth, and fastened with galvanized nails.
The resulting gables are sheathed with a transverse board, protruding 15-18 cm forward from one side. Next, a couple more boards of the same size are cut and nailed to the lower rafters.
Stage 3. Sheathing
The outside of the booth is covered with slats, preventing the formation of gaps. The bottom is finished with roofing felt, wooden stands are installed and secured.
Stage 4. Insulation
The internal space of the frame is lined with glassine roofing material, fixed at the corners with brackets. Next, the insulation is inserted. Lay the film again, and cover the walls and floor with a sheet of plywood.
Stage 5. Roof sheathing
The frame of the canopy is removed, the inside is trimmed with a sheet of plywood cut to the required size, and the structure is turned over. Rolled glassine is laid on top.
The voids are filled with insulation, and then the corrugated sheet is fixed with self-tapping screws. A ridge is installed at the joint line of the slopes, and the front rough cuts are masked with even strips.
To make it easier to remove the roof, one nail with sawn heads is nailed into the ends of the corner supports. Holes equal to the diameter of the nails are drilled in the eaves boards, and then the roof is put on.
Photo
Examples of beautiful and original houses in the photo: recycling old furniture and household appliances into a bed, wicker beds, bed beds, bunk beds.
Feeder house Very stylish!
Real retro: the smallest doghouse for an apartment Two-story cottage
Wicker Ideal soft home for a little dog! Cool idea: a super lounger made from a wine barrel!
Plastic egg house for small breeds such as Yorkies and Spitz
Mink
Hut for doggies: a real wigwam!
Selection of tools
Usually a dog house is built from pine or hardwood building material. They are inexpensive and will last a long time.
To make a doghouse with your own hands, you need to prepare a drawing. Already here it becomes clear what is needed. Experts recommend arming yourself with:
- Use a hammer to drive nails.
- A hacksaw will help you cut the material to size.
- To tighten the screws, use a screwdriver.
- You can make the surface smooth using a plane. Otherwise, the pet will often get splinters and get injured.
- The structure should be measured using a tape measure.
- To determine the levelness of the work, use a building level.
- To draw lines, use a pencil or marker.
Also prepare special compounds to protect the surface from the negative effects of aggressive substances.