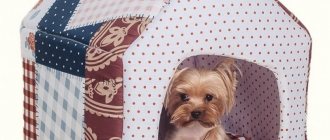
Today we will sew a veterinary protective collar for a dog or cat. Moreover, it will be not one, but two models. And both styles are a soft alternative to a plastic protective collar.
In addition, in the article you will find a pattern for a veterinary collar and a detailed video master class on making it.
If you have a dog or cat living in your house, every owner has probably at least once encountered some kind of disease or even a simple cut on the paw. With a situation where you had to put a veterinary collar on your pet to avoid licking the wounds. By the way, I advise you to study the material: What to do if your dog cuts its paw.
As a rule, veterinary stores offer a plastic protective collar for such purposes. But I would like to note that such collars are not 100% comfortable: it is uncomfortable for the dog to sleep, eat, and when moving around the house, the collar has to knock all the corners off.
But the pet industry does not stand still, and everything is being done to make our furry friends as comfortable as possible. Recently, an excellent alternative to a plastic collar has appeared - these are soft protective collars for cats and dogs. They also protect your pet from scratching wounds while being much more comfortable.
We recently had to face a similar situation. Jack had surgery. I wanted to ease his suffering and make his time during this difficult postoperative period as comfortable as possible.
This is how the idea of creating a soft post-operative protective collar for dogs arose. I found both of these models on the Internet. I really liked them and decided to sew them for Jack.
The need for a protective collar
Collar for a cat: how to make it yourself
The collar is commonly used on dogs following surgery. It prevents wounds from being licked, which helps speed healing. Such use is typical for the recovery period after abdominal surgery, castration, and sterilization. The collar prevents animals from chewing the suture threads, which may require additional processing and treatment.
Why else do they put a cone around a dog’s neck?
- If the dog has otitis media or ticks. This will protect his ears from the wounds that form from constant scratching.
- After treating scratches and ulcers with special ointments, which should not be touched until completely dry.
- When using flea products. Some time must pass after application for them to become safe.
When it's needed
A protective barrier is used when there are damaged areas of the dog’s body that cannot be touched. For example, the product may be needed:
- In the postoperative period. At such a moment, the animal may be bothered by itching and pain at the site of the sutures, so the animal may lick or scratch them. This is dangerous because you can get infected. A barrier in the form of a dense semicircle prevents the animal from itching.
- For limb injuries. With wounds on the paws, the pet may try to remove the bandage, but such a product prevents this.
- For dermatitis and other skin diseases. Animals can get sick from a large number of dermatological ailments, including parasitic ones caused by ticks and fleas. The cervical collar prevents the dog from licking the affected areas and spreading the infection to other parts of the body.
- If the ears and eyes are affected. Many of them are treated with ointments, and the device prevents the animal from smearing them with its paws.
Features of the protective structure
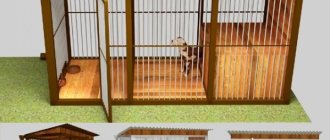
DIY dog house: drawings and dimensions
A collar is a cone or cap, the top of which is truncated, and is usually attached to a collar or tied around the neck. The pet cannot turn its head, lick itself or chew. Also, he will not be able to reach his head with his paws.
Note! The collar does not interfere with drinking and eating; it’s another matter when dogs refuse food while wearing the accessory. Then you have to temporarily remove it.
Julia
Zhulya The time has come for her to give birth, she suffered all night, but never gave birth.
In those distant times, private clinics were just emerging, so we urgently learned the doctor’s address and rushed to save the life of my favorite. Just as women undergo caesarean sections, they cut my Zhulya. The doctor warned that the operation itself was not complicated; the postoperative period was dangerous, when the dog, while licking the wound, could bite the threads and the stitches would come apart. You can’t tell her that she can’t do this. After the operation, I “wrapped” my dog in a blanket: I took a piece of fabric, cut out 4 holes for the legs, and laced the back. While my Zhulya was recovering from anesthesia, everything was quiet and calm, she lay in her crib, snoring through her nose.
But then she began to get up, and imagine my surprise when I saw my Julia without this blanket. How she managed to free herself, I have no idea.
Product options and their features
DIY dog bed: how to make
There are several options for dog neck collars, from which you can choose the most suitable one:
- Soft. They are easy to use, do not interfere with the animal, and are comfortable to eat and sleep in. Such collars do not make frightening sounds when they hit, for example, the floor and walls. But they are not suitable for large dogs.
- Inflatable. They are easy to transport and do not interfere with the animal. Suitable for pets with short limbs.
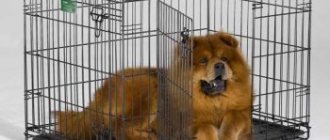
- Plastic. Such collars are inexpensive and accessible and are sold in every pet store. They are transparent, thanks to which the animal sees everything that is happening around them, and are easy to clean. But they are quite noisy, which often frightens dogs.
The plastic collar is inexpensive but comfortable
Useful video
To learn how to properly put a protective collar on a dog, watch this video:
Similar articles
- How to treat a dog's wound, treat purulent, lacerated... For this purpose, the wound surface can be covered with a bandage or a special collar can be put on the dog. ... This leads to the body’s defenses engaging mechanisms aimed at the formation of pus. Read more
- Candidiasis in dogs: symptoms, damage, incl.
skin... After applying the treatment, the affected area of skin is covered with a bandage, and a special collar is put on the dog to prevent licking. Read more - A broken paw in a dog: how to determine the front...
A broken paw in a dog: first aid, surgery, recovery after. Dogs are mobile and active... if they attempt to lick or chew post-operative sutures, a special protective collar should be used. Read more - How to remove fleas from a dog, how to do it with folk...
You should not use drops or sprays designed to combat cat fleas to treat your dog. ... If necessary, use a special protective collar to prevent licking... Read more - Caring for a dog's coat: how to care for long...
During the combing procedure, the fatty protective layer is distributed throughout the dog's body. ... To learn how to choose a shampoo for a dog, watch this video: Which breeds have less hair. Read more
What is needed to make a collar
You can make a cone for a dog’s neck yourself using available materials:
- thick cardboard;
- plastic bottles;
- foam;
- felt.
You will also need scissors, tape or adhesive tape, shoelaces, and possibly a stapler.
The main thing is to take the correct measurements so that your pet is comfortable. To do this you need to find a centimeter.
Note! Some people use a plastic bucket to create a post-op collar, making a hole in the bottom for the head. But such an invention is inconvenient for the animal, especially if it is much longer than the muzzle. In addition, the bucket will make noise, scaring the dog.
You can take pills
You can take tablets. Liquid medicine can be injected from a syringe without a needle: pull back the corner of your lower lip and pour in the mixture.
You can use tricks, but this doesn’t always work: chew a piece of boiled meat, roll it into a ball and put a tablet in it.
You may find some life advice regarding our favorite animals useful, but it would be better if they were never in demand, so that we would always be cheerful and healthy!
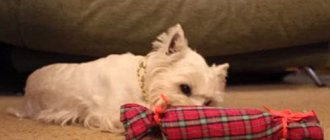
And these are my four-legged friends!
Manufacturing process
Before creating a pattern, you need to measure the girth of the dog’s neck and the length of the head. Then you need to take the material from which you plan to make it.
Step-by-step instructions for creating a pattern:
- A dot is placed in the center of the prepared material; you will need to draw three circles.
- The radius of the first is found as the ratio of the neck circumference to the number 6.28.
- The second one is drawn larger than the previous one. To the radius of the previous one you need to add a second value - the length of the head. Measure the resulting number from the center of the circle. This will be the radius of the new circle. You can add a few more centimeters. It is better to make a collar with a margin and, if necessary, shorten it in the future.
- The smallest circle is 4-6 centimeters smaller in diameter than the first. You will need it to make fastenings on the collar.
Then you need to cut out a large circle. Next, draw a line on the product from the center to any point on the resulting circle. Then you need to make a cut along this line. You will get a strip or an unfolded product. Next, you need to cut out the smallest circle and make notches from it to the middle one. They can be folded, attached to the base, and threaded through them, for example, a lace.
From a plastic bottle
For your dog, you can make a protective cone from a bottle that holds five liters of water.
How to make a dog collar with your own hands:
- Cut a plastic strip and fold it into a funnel shape.
- Fix the edges, they should fit snugly against each other. To do this, use tape or adhesive tape.
- To tie the collar, you need to make several holes in the plastic using an awl. All that remains is to thread the lace through the holes.
A bottle collar is very easy to make
From cardboard
The cardboard dog collar can be made permanent, then you need to make a pattern with two radii. If you want to periodically remove it, you will have to make loops by drawing a small circle.
From fabric
A post-operative dog collar can be made from fabric. You need to choose a cotton base and a seal. Felt or non-woven fabric will do. Next, you need to prepare two identical parts from soft fabric and one identical piece from dense fabric. The latter needs to be sewn inside. To fasten the collar, it is convenient to attach Velcro.
From foam rubber
A soft collar can also be made from foam rubber. In addition to the material itself, you will need fabric that will be on top.
Manufacturing procedure:
- Cut a circle from a sheet of foam rubber.
- Prepare two pieces from fabric. They need to be sewn together along the outside.
- Turn the product inside out, place foam rubber inside and sew it up along the inner diameter.
- Make a part that resembles a belt.
- Prepare two long strips of fabric that will be sewn to the base of the collar. They will later be used for the lace.
- Attach the strips to the almost finished product and connect them to each other. Leave slits on the side where a cord is inserted to tie the collar to the collar.
Inflatable
Inflatable collars can be purchased from veterinary pharmacies. They are convenient if the dog travels a lot with the owner. The materials from which they are made do not cause allergies in pets.
Knitted
A knitted collar requires a base. You can prepare two identical parts and sew them, for example, on top of cardboard or plastic. It will work out in the same way as in the case of a fabric collar, using felt as a sealant.
Possible problems
Even the most expensive and high-quality cat collar does not guarantee that there will be no problems with it. Most often you encounter these.
- The animal clings to everything. Most likely the protective part is too long. The simplest way out is to trim the edge by a centimeter and a half and see if this measure helps the cat.
- The same symptoms plus the cat’s inability to jump onto a chair and a constantly bowed head position. The collar is made of too heavy plastic - it will have to be replaced.
- Neck chafing. Usually near the loops, but can be along the entire line of contact with the neck. Too sharp edge; You should cover it with tape to prevent scratching.
How to put the product on a dog
You cannot immediately put the protective cone on your dog. First, you need the animal to get used to it, smell it, and examine it from all sides. Let the dog see it disassembled.
When she gets used to the new item and stops being afraid of it, you need to carefully put it on. It is better that the pet does not stay in it for too long the first time. Therefore, after some time, you need to remove the postoperative collar, observing the behavior of the animal.
Note! It must be shown that the product does not interfere with normal activities, for example, playing with a dog if its condition allows it.
A collar that doesn't get in the way won't irritate your dog
Terms of use
It is not enough to make or buy a collar. You also need to use it correctly. While wearing the collar, the animal must be constantly monitored. During feeding, you will have to remove it all the time, because the pet simply will not be able to reach the bowl. Also, owners will have to monitor when the cat or dog wants to drink.
If the pet’s treatment continues while the collar is being worn, the device must be put on so that it does not interfere with the injections (they are given to the animals at the withers). It is very important that the collar fastener does not fall into this place. She can rub.
Some animals cannot come to terms with the innovation for a very long time and constantly try to remove the structure. During this period, it is important to show maximum love and patience. Experiment, your dog may not like the hard plastic collar. But your pet will wear fabric or foam rubber without objection.
How to train a dog to wear a collar
The collar should only be worn on a calm dog. This is the main condition for the pet to react normally. You can distract him, appease him with a treat. As soon as he allows it, carefully put it on, securing the product. Be sure to praise the dog.
If he doesn’t like the new accessory, it’s better to remove it for a while and try again later. The main thing is to ensure that the size is appropriate. Perhaps the animal is uncomfortable, so it resists.
Important! Usually after a couple of days the dogs get used to wearing the cone. It is important not to scold or punish, but to show patience.
A dog needs a collar at least once in its life. You can buy it or make it yourself, using scrap materials. It is important to make correct calculations and measurements so that the animal is comfortable.
Price
The price of a protective collar for a dog depends on its size, type, and manufacturer. So, an ordinary Elizabethan collar costs from 90 rubles, the cost of other types varies between 200-1000 rubles. Soft collars are more expensive, for example the Procone model costs 840-1000 rubles, and the cost of the Procone elastic neck corset exceeds 1500 rubles.
If it is not possible to purchase a ready-made protective collar, you can make it yourself from available materials, but at the risk of causing the animal even more discomfort.
We use lightweight plastic
The easiest way to make a protective collar is from a regular plastic stationery folder. If you cut it from the bottom and along one of the end sides, you will get a fairly long, wide and very flexible plastic sheet. In addition, you will find it useful:
- sharp scissors;
- tape measure;
- calculator;
- stapler with strong and wide staples;
- wide fabric-based patch, adhesive tape or regular tape.
For cutting you will need only 2 sizes:
- length of the animal's head from nose to neck;
- neck girth.
Side effects
The instructions for using collars always indicate possible side effects:
Collar allergy in dogs manifests itself as redness of the skin, itching, and then hair loss. The pet may simply be in a lethargic state. This may indicate an incorrectly selected collar, or the animal’s intolerance to the substance with which the protective strap is impregnated.
When the first symptoms of an allergy appear, you need to remove the collar, wash the dog with shampoo and give it antihistamines.