An insulated, spacious kennel is a guarantee of excellent mood and good health for the dog. Keeping your pet in damp and cold for a long time will certainly lead to the development of illnesses.
You can make a house for an animal yourself within a few hours, without spending money on expensive ready-made structures.
You should first consider the design of the building and choose the preferred material for interior and exterior decoration. Once inspired with ideas, you can get to work.
Dimensions of the kennel
Design parameters depend on the size of the dog. In a small building the animal will be cramped and stuffy, in a large building it will be cold. In order for the depth of the kennel to be suitable, it is necessary to determine the length from the tip of the tail to the dog’s nose.
The height of the kennel is calculated by measuring the animal at the withers, adding an additional 5 cm to the resulting figure.
The dimensions of the manhole are calculated based on the dog’s chest circumference, plus 5 centimeters. The entrance opening is made 3-5 cm wider in height.
For small dachshunds, miniature poodles, and Pekingese, a booth with dimensions of 70x55x60 cm is suitable. At the same time, the entrance to the building can be made with dimensions of 30x40 cm.
For bulldogs and Rottweilers, a design format of 115x75x80 cm is suitable, and the dimensions of the entrance opening can be made 35x50cm.
A kennel for shepherd dogs is built with dimensions of 135x100x95 cm, while the parameters of the opening should be 40x60 cm.
Names for Saint Bernards
Initially, St. Bernards performed security and rescue functions for people. Remembering the selfless past of these animals, many owners give them names that reflect such qualities as courage, loyalty, fearlessness, perseverance .
- Ike,
- Vulture,
- Kin,
- Simon,
- Morgan and others.
A girl St. Bernard is also a large, massive creature, to which all the character traits of a boy St. Bernard apply. The following nicknames will be relevant for them:
- Aza,
- Alma,
- Tina,
- Petra,
- Terra and others.
The Saint Bernard dog is a wonderful creature in many ways. She is able to bring a sea of smiles and positive emotions to the family. This animal will respond to the love and affection of its owner with all the sincerity of its canine soul.
Schemes and drawings
For a lightweight structure, you can sketch a diagram with a pencil on a piece of paper with the dimensions of the building. When building a more complex structure, you will need a drawing with precise measurements. It is important to take into account the following features:
- The interior space of the house should be comfortable and spacious so that the dog can turn around freely. It is better for the puppy to make a large booth right away, understanding that he will grow up quickly;
- the presence of unnecessary elements in the form of partitions, ledges and stairs will create inconvenience for the dog;
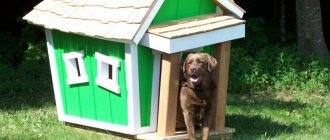
- An excellent option is a rectangular house with a side entrance and a removable pitched roof;
- It is advisable to make one wall removable for weekly cleaning of the house;
- a gable cornice is optimal for a small kennel when you need to increase the size of the internal space.
Breed characteristics
| Short description | |
| Origin: | Estonia |
| Conditions of detention: | Private house with a large plot |
| Purpose: | Hunting; gunhound |
| Color: | Tricolor with “blush”; black-and-white; bicolor (white-red) |
| Wool length: | Short coat 2 – 3 cm |
| Adult dog size: | Height: males 44 – 50 cm, females 42 – 48 cm; weight of males 18 -23 kg, females 13 - 18 kg |
| Average life expectancy: | 11 – 12 years old |
| Walk: | A daily walk twice a day is required. |
| Physical activity needs: | High demand requires daily walking of 3 hours a day |
| Fédération Cynologique Internationale (FIC) classification: | The breed is not recognized by the FCI |
| Puppy price: | From 10,000 to 35,000 rubles |
Tools and materials
When the drawing is made, we begin to select the material. The most popular wood for building a kennel is soft coniferous wood, which is characterized by heat retention, environmental friendliness, and reasonable cost.
In areas with cold climatic conditions, it is better to choose a construction option made of a three-layer log profile with special insulation between the panels.
In order not to be distracted by purchasing additional tools and materials during construction, it is advisable to prepare them in advance:
- Dry beams - 10x10 cm; 10x50 cm;
- block 2.5 cm thick;
- boards 4x4 cm;
- upholstery strip;
- door hinges;
- roofing felt sheet;
- nails;
- Styrofoam;
- hammer;
- antiseptic solution.
Important! “Building materials should be thoroughly sanded to avoid injury to the pet’s paws. It is advisable to treat wood with antiseptic impregnation after completing the assembly of the house and only from the outside: pungent odors can cause fear in the animal and reluctance to be in the booth.”
How to install the booth correctly.
It should be installed in such a way that the dog has a clear view of the gate or doors of the yard in which it lives and guards. Thus, it will be convenient for her to observe the situation on her territory. It is also advisable to place the booth in the shade so that it heats up less in summer.
The floor should never touch the ground. There must be a distance of at least 15cm between the floor and the ground. This space is necessary to ensure ventilation in the underground space. If the floor is not raised enough above the ground, moisture will accumulate under it and create increased humidity inside the room, which will promote the proliferation of parasites, and this, in turn, will have a bad effect on the dog’s health.
To make a simple booth without insulation, it is best to use tongue-and-groove softwood boards or plywood. This will avoid gaps in the structure. Plywood should be chosen that is moisture resistant. Such plywood is less susceptible to delamination and swelling when wet.
Building with a pitched roof
To protect the animal from the cold, it is recommended to insulate the house, directly during the assembly of the structure.
Stage 1. Assembling the bottom box
4x4 cm bars are cut based on the parameters of the bottom, laid out on a flat surface, and secured with self-tapping screws into a rectangle. For a large dog, the frame is reinforced with a wooden plank, and then one side with boards.
Stage 2. Floor insulation
The upholstered frame is placed so that the bars are on top. The inner part is lined with glassine, fixed with staples using a stapler, a piece of foam is cut with scissors based on the dimensions, and laid out between the wooden parts.
At the top, the synthetic material is covered with an additional layer of rolled glassine and the finishing floor is nailed.
Stage 3. Frame assembly
A 10 x 10 cm board is sawn into 4 pieces: two at a distance equal to the height of the building; the other pair is 8 - 10 cm larger. The elements are fixed vertically in each corner. Long support posts are placed in the front part, and shorter ones are placed in the rear. This design creates a slope of the roof.
All bars are aligned using a measuring level and secured with self-tapping screws. Additional vertical boards are nailed in the center of the walls and two small bars on the sides of the entrance hole.
Stage 4. Wall covering
The assembled frame is trimmed with boards on the outside, and the interior space is insulated. The walls of the building are covered with rolled glassine, fixed with a stapler, and then they begin to fill the voids between the boards with foam plastic or mineral wool.
After this, an additional layer of film is nailed down, and plywood is placed on top. The upholstery is fastened flush with nails so that the animal does not get hurt.
Stage 5. Making the roof
First, a frame is mounted from wooden blocks 4x4 cm, equal to the perimeter area of the booth. They cut out the same plywood sheet and nail it to the frame. Styrofoam is placed between the boards as tightly as possible, film is laid, and secured over the entire area with a stapler.
A plywood sheet is placed on top, making a protrusion from the side walls on the back and front sides. The manufactured eaves will protect the kennel from rain. Using door hinges, the finished roof is fixed to the building, and a sheet of roofing felt is laid.
Stage 6. Finishing
Paint the wooden booth with an antiseptic solution, then dry it for two days. They line the bottom of the structure with a piece of roofing felt, bending the sections 3-5 cm to the surface of the walls, attach two 10x5 cm boards to it. Turn the kennel over, trim the entrance opening and the ends with platbands.
Stage 7. Installation
When choosing a site for a kennel, it is important to provide your four-legged friend with a wide view of the area. The site should be in a dry, shady area with sufficient natural light. This will ensure a comfortable stay for the dog.
Recommendation: “The owner should take care to maintain a distance between the doghouse and buildings where other breeds of animals are kept. Otherwise, their waste will end up in the dog’s territory, causing him aggression and discomfort.”
Dog house: construction recommendations and reviews from dog breeders
Construction recommendations and reviews:
Alexey, 40 years old. I live in my own house, I have a Labrador. I started it 2 years ago. At that time I was not working, so I could afford to build a booth. Spent about 4 days. I made it from old pallets, I think it turned out quite nice. The building was insulated using polystyrene foam. I made the roof pitched and covered it with bitumen shingles. He did it in vain; the dog chewed off part of the roof. It's good that I didn't get poisoned. I was forced to remove this roof and screw on regular galvanized roofing. I selected the size, but did not take into account the dimensions of the dog; at that time he was a puppy. I was guided by the average data of the breed.
Alexey, 35 years old. I have a small poodle, initially we lived in an apartment, but then we moved into our own house. The baby lived with us in an apartment, but in his own house there is a lot of free space, there is an area near the house, so I decided to build his own home for him. Surprisingly, the dog really liked it, she enjoys relaxing there on hot days, in the shade. Made from old furniture. I had a chest of drawers that I smashed and then built a booth. The roof was made from corrugated sheet metal. It remained in the barn after renovation. Very happy, the kennel does not leak. I didn’t insulate it with anything, we feel sorry for Nancy, she lives in the house with us in the winter.
Oleg, 27 years old. We have a German Shepherd, we got her a long time ago. The house is big, but Bucks is a pest, so he often digs up vegetables in the garden. We decided to make an enclosure and a booth for her. Made from brick. I think this material is not the best, but at that time construction was underway, so there was a lot of such building material. Didn't insulate the inside with anything. We'll have to take care of insulation somehow, the kennel is cold. Covered with slate. Overall it turned out well, but it seems to me that Baksu is a little cramped in it.
Structure
Remember that housing for an animal must be comfortable. Some owners provide special canopies or verandas for such purposes. In fact, they divide the booth into two parts, one of which is left open, and the second is closed by installing a roof. In hot weather, the dog can rest in this part and not enter the building.
With a gable roof
This type of canopy is more suitable for small booths, since it is inconvenient to lift massive structures during processing.
Stage 1. Frame assembly
They knock together a lower frame from four 5x5 cm wooden boards. Racks are mounted in each corner, and a frame of boards is made on top. To strengthen the frame, additional strips are nailed to the bottom on both sides of the wooden frame.
Stage 2. Roof fastening
Combine two equal beams 5x5 cm with an angle of 40 degrees. Next, a similar blank is made. They are placed on the top of the frame, aligned vertically, at the same level with the walls of the booth, and fastened with galvanized nails.
The resulting gables are sheathed with a transverse board, protruding 15-18 cm forward from one side. Next, a couple more boards of the same size are cut and nailed to the lower rafters.
Stage 3. Sheathing
The outside of the booth is covered with slats, preventing the formation of gaps. The bottom is finished with roofing felt, wooden stands are installed and secured.
Stage 4. Insulation
The internal space of the frame is lined with glassine roofing material, fixed at the corners with brackets. Next, the insulation is inserted. Lay the film again, and cover the walls and floor with a sheet of plywood.
Stage 5. Roof sheathing
The frame of the canopy is removed, the inside is trimmed with a sheet of plywood cut to the required size, and the structure is turned over. Rolled glassine is laid on top.
The voids are filled with insulation, and then the corrugated sheet is fixed with self-tapping screws. A ridge is installed at the joint line of the slopes, and the front rough cuts are masked with even strips.
To make it easier to remove the roof, one nail with sawn heads is nailed into the ends of the corner supports. Holes equal to the diameter of the nails are drilled in the eaves boards, and then the roof is put on.
What is an aviary
An aviary is a fenced area for keeping poultry, pets and dogs. It may or may not be covered.
One of the options for respectable pets
A dog enclosure is a building in which an animal can be kept. For large dogs, the enclosure is made outdoors, and in such a way that it can withstand the pressure of the animal for a long time.
This is an enclosure (fence) for small dogs
For small domestic dogs, an enclosure usually means a portable fence that allows you to limit their movement. The same enclosures are usually needed for older puppies, so that they do not wander around the house.
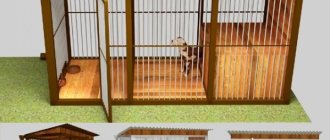
Design with vestibule
To build such a kennel you will need simple boards. The difference from other options is the insulated partition with an entrance. The thickness of the bars should be at least 2.5 cm, and the dimensions of the bars should be 4x4 cm or slightly larger:
- First, the wooden frame is assembled. The floor will be ideal if you lay a piece of plywood on top. To insulate it from below, you can sew up OSV - with a slab or simple boards, laying insulation under them.
- To moisture-proof the lower part of the booth, the frame is sheathed with roofing felt using a stapler. To prevent the floor from getting wet, it is advisable to make legs under it or install the building on level stones. The walls of the booth are lined with bars.
- The boards should be nailed to the frame horizontally so that the lower edge of the top plank overlaps the cut of the board from below. Next, the walls are insulated from the inside. To do this, vertical strips are stuffed onto them and insulation is laid between them. After this, cover the top with film and cover it with a sheet of plywood.
- To simplify the manufacture of wall ceilings, instead of boards, you can use OSV - slabs. The final step in constructing a kennel is making the ceiling and roof.
After familiarizing yourself with the options for booths and assembly techniques, you can choose the most suitable one for your pet. A well-built structure will serve the dog for a long time. The dog will appreciate taking care of himself, in return giving his owner his love, devotion and fidelity.
What to build from
The best option is considered to be a wooden building made from chamber-dried lumber or natural moisture (in the second case, natural shrinkage will have to be taken into account). Heat-treated and modified wood is undesirable. When creating a frame structure, care should be taken to waterproof the walls and roof.
When using brick, concrete, foam and aerated concrete, it is advisable to line the interior with wood or wood-based materials. Strongly smelling paints and coatings should not be used.
Important: the materials used for construction must not be toxic or treated with toxic coatings! Dogs often chew on boards or posts when idle (especially puppies), so care should be taken to ensure that the surfaces are durable and smooth. Protruding nails, screws, staples and other sharp objects are unacceptable!
Let's look at several popular do-it-yourself dog kennel designs.
Useful tips
Below are some practical tips regarding building an enclosure at home:
- Too large a structure area will prevent the concentration of heat in the enclosure during cold weather, so saving space, of course, is not necessary, however, it is also not advisable to allocate too much area.
- The best option would be to use forged lattice and wood. Forged elements are practical, and wood will serve as a natural material.
- Be sure to install a booth, as it will be the one that can protect your dog in the winter.
Ready-made options
Ready-made versions are purchased in stores. Their cost may vary, but you can rest assured of the quality of such a design.
Choosing a location for an aviary in the yard
You want to make an enclosure so that your pet feels good, so you need to take into account its character and habits. While in the enclosure, the dog will continue to guard its territory, so it is best to fence off the area on a hill, if there is one. It is very good if the entrance to the house, the entrance to the site is visible, or at least it will be possible to track one of these important points. When choosing a place, keep in mind that your pet needs to see you at least from time to time. You or family members. Otherwise, whining and howling are guaranteed, especially if the dog is not used to restrictions.
When choosing materials, keep in mind that everything that can be chewed will be chewed
When choosing a location, pay attention to the following points:
- It is better to retreat at least half a meter from the nearest building or fence, otherwise you will not be able to clean the debris from there.
- The enclosure should not be in danger of snow melting. If a huge mass suddenly falls onto the roof with a corresponding sound, the dog will receive a shock. It will be very difficult to drive her into an enclosure.
- The structure must be unfolded so that the open part faces southeast or southwest. In the northern regions, it is preferable to go south. Just don't go north.
- It’s not bad if there is a massive bush or spreading tree nearby - they will protect you from the wind and heat.
Taking all these wishes into account is far from easy, but it depends on how well the pet will feel.
Enclosure sizes
To make an aviary with your own hands, you will first need to decide on the size. It all depends on the breed, or rather, on the size of the dog. The larger it is, the more spacious the enclosure it needs for normal well-being. For shepherds, huskies and other not too large dogs, a pen with an area of 6 meters per individual is sufficient. For Alabais, Caucasian Shepherds, Mastiffs and other large breeds, much more is needed. If the pen is considered only for “locking it while someone comes,” then you can fence off the same 6 squares. Otherwise - at least 8
We assume that the depth of the pen is desirable to be at least 2 meters. The width “emerges” from the required area and the available free space.
Recommended enclosure area for large and medium dogs
Usually the enclosure is made covered. You can leave part of the area without a roof so that your pet can bask in the sun if desired. But you shouldn’t leave the area unprotected: either your dog will run away or someone will come to visit. Instead of a “normal” roof, there may be a lattice made of rods - there is enough light and there are no surprises to expect.
If the dog will spend the winter in the enclosure, you can provide a winter road or install an insulated booth. Most likely, your watchman will like the second option better. They often prefer to sit on the roof of the booth, since there is a better view from there, and not everyone agrees to go into the closed part - they can’t see anything. You can quickly stick your head out of the booth, but you have to run out of the winter road. In general, you better know your pet's personality. An enclosure is not always built because it is cheaper, but so that it is durable, reliable and comfortable for the animal.
What height should a dog's enclosure be? Since it’s up to you to clean anyway, the height is taken so that you can move inside without problems. Usually the height is from 180-185 cm, but depends on the height of the owner.
Northern regions may require an insulated winter road
If you are going to keep a dog in an enclosure only for a short period of time - neighbors, construction crews, etc. will come. — they only make a pen with a roof. If you plan to leave the animal behind the fence for a long time, you also need a booth. It can be placed inside or attached.