Creating knitted dogs using knitting needles is not only a pleasant and relaxing activity, but also very useful. After all, you can delight friends and family of any age with the results of your labors. Knitted dogs can not only decorate the interior and add warmth and comfort to the home atmosphere, but will also surely delight children with their appearance and mothers with their safety.
Knitting a dog with knitting needles has advantages over crocheting; the components of the toy are knitted faster, and the yarn consumption is less. All parts, as a rule, are knitted separately, therefore, if you strictly follow the knitting pattern, even novice needlewomen will be able to create a dog.
Can you knit? Publish your work on knitka.ru
Which yarn to choose
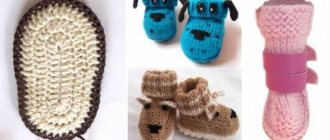
All dogs created using different numbers of knitting needles differ not only in shape, color and size, much depends on the yarn chosen for knitting; the most popular materials are the following:
- half-wool, acrylic - these threads are easy to knit, the dogs come out smooth, with a classic look;
- bouclé - the special processing of this yarn will allow you to create cute curly puppies;
- grass - dogs made from such thread turn out cute and shaggy;
- mohair - suitable for making soft and fluffy dogs.
In general, you can choose any yarn you like, the main thing is that the thread is of high quality, does not fade or split. It is imperative to select knitting needles according to the thickness of the thread, or even a little thicker, then the fabric will be dense enough so as not to deform and not let the filler pass through. Synthetic materials such as holofiber and padding polyester are best suited for filling the toy. When creating a product, in addition to the number of knitting needles indicated in the diagram, you will definitely need a needle for stitching the parts. To decorate the dog, you can use scraps of different fabrics, such as felt or leather, various buttons and decorative eyes.
Knitted dog “Buffy”
A hand-knitted Buffy will be a great gift for a child for any occasion. And if the house loves to knit toys, then this animal will ideally fit into an already connected family.
There is one interesting legend that tells how Buffy dogs first appeared. Once upon a time, in the old days, one grandmother knitted a beautiful wool sweater for grandfather. Grandfather treasured the gift very much and carried it carefully every day.
However, all things are not eternal, time passed, and the sweater was safely put away in a chest that stood in the attic of the house. Over the years, the sweater has been eaten by moths in some places, the previously bright colors have faded, and the buttons have fallen off. Of all the buttons, only one remained. And so the nanny came into the attic to tidy up and remove the dust that had accumulated over time.
She looked into the chest and, of course, found her grandfather's old sweater lying in it. The fur has become slightly matted over the years and has become thin. However, the nanny remained confident that this thing could still be reborn.
The nanny went downstairs with the sweater and laid it out near the fireplace. From the heat of the fire, the wool threads fluffed up, and the sweater itself took on a puffier appearance. This made the nanny feel like he looked like a small gray dog.
Then the handicraft nanny decided to unravel the sweater. When she did this, a lot of wool appeared, from which the nanny wound balls. Then she started knitting. So, first a kind face with erect ears and a cute brown nose appeared. Then a body, legs and tail appeared. The nanny sewed the only surviving button onto her stomach.
Similar toys are still sold in stores today. However, making Buffy with your own hands will be much more interesting. Even a beginner can knit a dog using this master class.
What you will need to make Buffy the dog:
To make a dog, you can take wool of any composition, for example, with the addition of acrylic. You can also choose any colors of wool, the main thing is that they match each other and are suitable for knitting a dog. It is also necessary that one color be lighter than the other. It would be optimal to use gray and beige colors for knitting.
Also, before making a toy, you need to stock up on the filler that will be inside it. For small-sized toys, you can use beads.
One of the simplest filling options is also padding polyester, which is sold in almost any sewing store.
If the knitted toy is not supposed to be washed, then an unusual option can be used as a filler - lentils. You need to choose one type of filler.
Lentils are small, flat seeds of the legume family. It is sold in grocery stores. If it was decided to fill the knitted toy with lentils, then you need to make bags from any lining fabric. You need to sew lentils into the bags, and then fill them with the finished toy. This will allow the filler inside to settle more evenly.
All of the following pieces will be made from a darker colored thread.
Knitting starts from the back, in garter stitch. It is necessary to make 2 such parts:
Explanations for the number of loops:
Knitting a toy dog
Dog in mixed media
Labrador puppy using knitting + felting technique! The dog is made using mixed media. The filler is wool, which I pull out with a needle up the knitting. The result is, like a real animal, hair growing from the inside. The toy is elastic, as if dry
Read more…
We knit Sharik the dog, master class
The toy's height is 17 cm. The hat and scarf are removable.
Necessary materials to create a dog:
- Alize Softy yarn - beige, milky, yellow or orange (let’s call it our main color); - stocking needles No. 1.75; — filler (holofiber or synthetic fluff); - eyes or half beads 9-10 mm; - Super glue.
For a step-by-step master class on knitting a dog, see the link
How to knit a Scotch Terrier dog with knitting needles
Description and knitting patterns
How to knit a dog named Sharik
The height of the toy is 18 cm. All legs are movable - on a thread fastening. The blouse is removed.
Necessary materials to create a dog:
- Yarn Kamtex cotton grass (2 shades), Pekhorka Children's novelty (for feet, for clothes).
- Knitting needles 1.75.
- Eyes - 8-9 mm.
- Spout (homemade or ready-made, at your discretion).
- Filling: holofiber.
- Velcro for combing.
Step-by-step master class, see the link
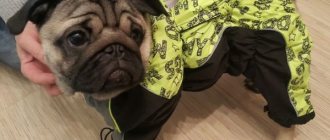
New Year's Pug dog knitting
Dimensions: Height – 22 cm, Width – 26 cm. Materials needed: Robin DK yarn (100% acrylic; 300 m / 100 grams) – 100 grams beige (thread A), 25 grams black (thread B), 25 grams red (thread C), 25 grams green (thread D); King Cole Moments yarn (90 m / 50 grams) – 50 grams of white color (thread E), two eyes with a diameter of 16 mm, filling (sintepon). Tools: No. 4 knitting needles, tapestry needle.
How to knit a pug dog with knitting needles, step by step description
Knitted dog Kipper
The height of the finished dog toy is 46 cm.
Materials: Double Knitting yarn (or other yarn, suitable in thickness for knitting needles No. 3) -125 g orange, 50 g white, 25 g each dark brown, gray and black; 300 g of washable filler (stuffing); pair of knitting needles No. 3; orange and brown pencils.
Description of the toy
We knit a Dalmatian dog with knitting needles
Toy designer Alan Dart. Size – 28 cm.
For knitting you will need: 100 grams of white yarn, 50 grams of black yarn, 25 grams of green and a little dark brown and silver gray. Fill plastic eyes for toys too.
See the link for description
Dog Mitten knitted
Description of a knitting dog
Knitted dog Bernese Mountain Dog Bob
Yarn: Lana Gatto Super Soft DK (125m/50g, 100% fine merino wool) 1 skein of each color: Cream (A), Coffee (B), Black (C), Cocoa (D), a small amount of Burgundy (E) . Knitting density: 24 loops per 26 rows = 10x10 cm stockinette stitch. Needles: a pair of straight and double needles 3.5 mm.
Other Dog Knitting Supplies:
- tapestry needle,
- filler
- for toys,
- crochet hook (for knitting eyes)
The toy measures approximately 20 cm from the top of the head to the bottom of the feet.
Description and knitting patterns
How to knit a dog
Dog length: about 36 cm. You will need: Approximately 100 g of yarn in two folds of beige color; some black yarn; knitting needles 3.75 mm; polyester filler; pieces of felt black and white; 1 m of tape. Note: the dog is knitted in stockinette stitch using beige yarn, except for the nose piece, which is knitted from black yarn.
Description via link
We knit a New Year's toy dog in a ball
New Year is a special holiday and preparations for it need to start in advance. The coming year 2022, according to the eastern horoscope, is the year of the dog, so souvenirs with the symbol of the year are relevant. I propose to knit a Christmas tree toy - a hemisphere with a puppy.
- Types of creativity: Knitting
- Difficulty: medium
- Working time: 2 hours
Author of the description Natalya Maykova,
To knit a dog you will need materials and tools:
- white and yellow wool (200-250 m per 100 grams);
- white and yellow Kamtex stretch cotton yarn for dogs;
- some black yarn for embroidering the nose;
- holofiber;
- stocking needles No. 2, 5;
- a pair of plastic eyes;
- tapestry needle, scissors, hook No. 2, Moment-Crystal glue.
Master class on knitting dogs
I’ll say right away that I chose the color, and the composition can be any wool or wool with acrylic, of medium thickness. I have 3.5 knitting needles.
See the link for a step-by-step description of the dog.
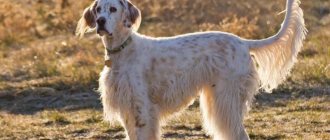
Spaniel dog knitting
The dog is knitted with needles No. 3.
See the link for step-by-step description
How to knit a Yorkshire Terrier dog
Knitting patterns and descriptions
How to knit Wesley the dog
All parts of this puppy are knitted in stockinette stitch; for all parts knitted with white yarn, the front side will be the one knitted with purl stitches.
Description and knitting patterns
Knitting a white poodle
Toy designer Alan Dart. All details are knitted with 4 mm needles in stockinette stitch, unless otherwise indicated.
Schemes and description of the poodle
How to knit a Labrador dog
Toy designer Alan Dart.
For knitting you will need:
- yarn Toytime DK color Oatmeal (964) 5 skeins of 25g/120m;
- Leftover yarn Toytime DK color Royal (979) , color Mink ( 94 b) f color^~” 31 neb eel ( 969} and color
- Black (965);
- Pair of knitting needles 3 mm;
- Filler for toys 225g;
- Pair of 13.5mm brown eyes for toys;
- Long tweezers;
- Brown pencil;
- Cardboard 10cm square.
Description of the dog
Dachshund Dani knitting
The length of the toy is about 35 cm excluding the tail. It is knitted with knitting needles No. 3 and 3.5.
How to knit a dog - a puppy with knitting needles
Talisman of the year in three evenings
If you have at least basic skills in circular knitting, then making a dog (the diagram and description of which you will find below) will not cause any difficulties, because it uses a simple pattern - stockinette stitch.
Necessary materials:
- yarn in four colors - white, light brown, orange and just a little blue;
- needle;
- double-edged knitting needles number 2;
- auxiliary knitting needle;
- padding polyester
Step-by-step description of the process:
- Start with the body - cast on 8 stitches. Distribute them on four needles (2 stitches on each).
- Knit the first row.
- In the second, add 1 stitch.
- All needles will have 3 stitches.
- Knit the next odd row without making any increases.
- In this order (in even numbers, one additional stitch on each needle, and in uncounted numbers, no increments) work until there are 9 stitches on each needle.
- Knit 3 rows.
- From the next you need to reduce the loops by knitting the first 2 stitches. together.
- Decrease in three rows in a row, then knit the same number of rows without adding stitches.
- Next is a row with decreases - 1 on four needles.
- Simply knit the next 10 rows in the round.
- Divide the loops into two equal parts. Transfer one of them to a pin or an additional knitting needle (or take a thread of a different color, as in the photo).
- Knit the other part in the round on three needles. Complete 12 rows.
- Switch to white threads. Work an increase row every 2 stitches.
- Go 5 more rows.
- In the sixth, reduce the loops (every other).
- You now have a torso and one leg.
- Fill these parts with padding polyester and seal the edge.
- Similarly, knit the other paw from the set aside loops.
- Now your toy has two legs.
- Start knitting the head - cast on 8 stitches. white yarn (2 stitches on each needle). Knit one row.
- In the second, start adding loops.
- Knit the third, fourth in the round.
- The fifth one is with increments, the next four ones are round.
- Switch to orange threads. Again, increase through one loop on two needles, and do not add loops on the second.
- Work a row of knit stitches (without increasing the number of stitches).
- Now on those knitting needles where there are more loops, increase again in increments of one loop.
- Simply knit the loops on the other two needles.
- Repeat these steps two more times. Then add loops on four knitting needles one at a time.
- Knit seven rows according to the pattern.
- At 8 - decrease stitches after 2 stitches.
- Knit the next one without decreasing.
- In the final row, knit the remaining stitches two together.
- Fill the blank with padding polyester and tighten the hole.
- The hind legs will be shaped like two balls. Our dog's are white.
- For them you should cast on 8 stitches. (2 per needle).
- Knit a row of knit stitches and increase on the second row.
- Knit four rows in satin stitch.
- Fill the foot with filler.
- Make decreases through the loop.
- Pull the hole.
- Tie the second ball foot in a similar way.
- Sew them to the body.
- For the ears cast on 10 stitches. on a knitting needle. Work five rows in garter stitch. Close the canvas.
- Sew the ears to the head.
- Embroider the eyes and nose.
- For the ponytail, cast on only 3 stitches. You need to knit a couple of rows.
- In row 3 add 1 st.
- Tie the ponytail to the length you like.
- Sew it on one side and sew it to the body of the dog.
- Knit a collar strip (with knit stitches, cast on 4 stitches) and sew it on.
Video tutorials on knitting dogs
In this video we will connect all the details. The dog is knitted from 50g\75m thick yarn. The weight of the finished dog is 384g, height 40cm. For knitting you will need number 3 knitting needles, short and long.
The video should load here, please wait or refresh the page.
The video should load here, please wait or refresh the page.
Little puppy knitting needles
For knitting you will need: white, brown yarn and short knitting needles.
The video should load here, please wait or refresh the page.
Crochet puppy toy pattern
Muzzle 1p.
6 sc in amigurumi ring 2p. inc x 6 times = 12 sc 3p. sc, inc x 6 times = 18 sc 4p. 2 sc, inc x 6 times = 24 sc 5r. 3 sc, inc x 6 times = 30 sc 6r. 4 sc, inc x 6 times = 36 sc 7-14r. (8 rows) 36 sc 15r. 12 sc, 12 increases in a row (we knit the increases with dc), 12 sc = 48 16r. 19 sbn, (inc, sbn) x 6 times, 17 sbn = 54 sbn 17-27r. (11 rows) 54 sc 28r. 7 sc, dec x 6 times = 48 sc 29r. 6 sc, dec x 6 times = 42 sc 30r. 5 sc, dec x 6 times = 36 sc 31r. 4 sc, dec x 6 times = 30 sc 32r. 3 sc, dec x 6 times = 24 sc 33r. 2 sc, dec x 6 times = 18 sc 34r. sc, dec x 6 times = 12 sc 35r. dec x 6 times = 6 sc Pull the loops, cut the thread and hide inside the part. Ears Inner part We knit from yarn of a different color. Cast on a chain of 6 ch. Insert the hook into the second loop from the hook. We knit in turning rows. At the end of each row we knit 1 runway. 1r. 5 sc 2p. inc, 3 sc, inc = 7 sc 3r. 7 sc 4r. inc, 5 sc, inc = 9 sc 5r. 9 sc 6r. inc, 7 sc, inc = 11 sc 7r. 11 sc 8r. 11 sc 9r. 11 sc 10r. 11 sc 11r. dec, 7 sbn, dec = 9 sbn 12r. dec, 5 sc, dec = 7 sc 13r. dec, 3 sbn, dec = 5 sbn 14r. dec, 1 sbn, dec = 3 sbn Fasten the thread, hide it. We knit the second (upper) halves of the ears in the same way, using the main color, but do not cut off the thread at the end. We put the top part on the inner one, tie it in a circle with one row of sc.
Legs (front) with transition to the body after connection Left leg 1p. 6 sc in ring 2p. inc x 6 times = 12 sc 3p. sc, inc x 6 times = 18 sc 4p. 2 sc, inc x 6 times = 24 sc 5r. 7 sc, inc x 3 times = 27 sc 6r. 27 sc 7r. 27 sc 8r. 6 sbn, 3 dec (we knit decreases with dc), 1 dc, 3 dec (we knit decreases with dc), 8 sbn = 21 sbn 9-23r. (15 rows) 21 sc At the end of the 23rd row we knit ss, ch. Stretch the thread, cut it.
Right leg We knit the right leg in the same way. But we do not knit ss and ch at the end of the 23rd row. Next we connect the legs together. From the right foot we knit 2 ch, insert the hook into the place where the ss was knitted along the left foot, and knit 1 sc. Mark the beginning of the row. The numbering of rows continues. 24-45r. (22 rows) 48 sc 46r. 6 sc, dec x 6 times = 42 sc 47r. 5 sc, dec x 6 times = 36 sc 48r. 4 sc, dec x 6 times = 30 sc 49r. 3 sc, dec x 6 times = 24 sc 50r. 2 sc, dec x 6 times = 18 sc 51r. sc, dec x 6 times = 12 sc 52r. dec x 6 times = 6 sc Pull the loops, cut the thread and hide inside the part.
Paws (hind) 1 rub. 6 sc in ring 2p. inc x 6 times = 12 sc 3p. sc, inc x 6 times = 18 sc 4p. 2 sc, inc x 6 times = 24 sc 5r. 7 sc, inc x 3 times = 27 sc 6r. 27 sc 7r. 27 sc 8r. 6 sbn, 3 dec (we knit decreases with dc), 1 dc, 3 dec (we knit decreases with dc), 8 sbn = 21 sbn 9-23r. (15 rows) 21 sc 24r. Fold the part in half at the edge, knit 10 sc, inserting the hook into two halves at once. At the end of the row we knit 1 ch, pull the thread through, cut it, leaving the end for sewing the part together.
Ponytail 1p. 6 sc in ring 2p. sc, inc x 3 times = 9 sc 3p. 9 sc 4r. 2 sc, inc x 3 times = 12 sc 5r. 12 sc 6r. 12 sc 7r. 3 sc, inc x 3 times = 15 sc 8-16r. (6 rows) 15 sc At the end of the 16th row we knit a ss. We stretch the thread, cut it, leaving the end for sewing the part.
Scarf Cast on a chain of 110 chains. Knit two rows of 110 sc.
Assembling a crochet puppy toy: Sew on the eyes in the 15th row, where the increases were crocheted. Embroider the nose and eyebrows with dark thread, the tongue with red thread.
Master class Dachshund rainbow amigurumi crochet
Before you start working directly, prepare everything you need:
- yarn of the desired colors (as a rule, you will need several);
- hook relative to the thickness of the yarn;
- filler (you can use cotton wool or padding polyester);
- scissors, glue;
- a special needle for sewing soft toys or a needle with a large eye;
- blanks for the nose and eye (these can be beads), other decorations, if you like.
Decide on the expected appearance of your future toy. An amigurumi puppy can be any breed: dachshund, bulldog, poodle, dalmatian, papillon, shiba, shiba inu or any other. Depending on what you choose, you will need to select the colors of the yarn.
And here are some examples for inspiration. Let's start with the dachshund.
- The dachshund amigurumi will look very beautiful if you use threads of bright rainbow colors to create it. You will also need a thin hook (No. 1.5).
- First make the body of the dachshund. You need to start and end with one color (let it be brown), and in the middle place stripes of all the colors of the rainbow. Having tied the body, fill it with filler.
- Then grab your head. You need to start knitting it from the spout, that is, with black yarn. Then also stuff and tie.
- Now it’s the turn of the neck and ears. And after that - the tail and paws.
- When everything is ready, sew all the parts together, glue on the eyes (or sew on beads). You can also make a small beautiful collar for your dachshund. To do this, you need to knit twenty chain stitches, connect them into a ring and knit twenty single crochets. Then cut the thread, choose some other color and use a thread of this color in the first row of the chain that you already have, knit another twenty sc on the reverse side. To finish the collar, take a bead, thread it through the thread and secure.
- Your rainbow and cheerful dachshund is ready!
Using the same principle, you can knit any other dog. If you are not too confident in your abilities, you can use diagrams that clearly show the order of work.
A gift with meaning!
Those who follow the astrological calendar know that the coming year is the year of the yellow earthen dog, so knitting just such a toy is the most relevant topic. You can knit it as described above, just use yarn in golden yellow shades. And here is another option for knitting a dog with knitting needles (a pattern is not required for it, since it is knitted without a pattern).
Necessary materials:
- yellow yarn - 50 g;
- filler:
- knitting needles;
- darning needle;
- some black knitting threads.
Step-by-step description of the process:
- Knit from the body (cast on 11 stitches).
- The first row and all odd rows are purled (without adding loops).
- In the second, knit like this: edge, knit 1, extended from the bottom row, knit 1. ordinary. Repeat this pattern until the end of the row (so you will add 9 stitches in the first yard and there will be 20).
- Next, in even numbers, add 1 knit each. before the additional one. In the 4th row - 29 stitches, in the 6th - 38 stitches.
- Having brought the number of loops to 68, start decreasing them in exactly the same way (knitting 2 together where you added).
- Bring the number of loops to 11 and cast them off.
- For the paw, cast on 7 stitches. Knit them in a similar way (purl rows - purl rows), knit rows - with additions.
- In the second row there will be 12 stitches, in 4 - 17, in 6 - 22, in 8 - 27.
- Knit the tenth row like this: after the edge knit 5, 3 stitches. 2, 3 persons. together, 3 by 2 together, 5 persons, chrome. (19 pet.).
- Knit 2 cm high.
- To make an extension, add 1 stitch at a time, knit 2 cm and add another 2 cm along the loop (from the sides of the part), and finish knitting.
- Knit 4 paws.
- Knit the muzzle in the same way as the paw.
- Increase the stitches until there are 47 of them. Then start narrowing the piece: edge, knit 5, knit 3. together, persons Repeat this pattern 10 times, knit 1 triple, knit 5. and chrome.
- After knitting 2 cm up, make decreases (as for the body).
- For the ears, knit trapezoidal details, casting on 11 stitches. and adding 4 stitches. in every 3rd row (from the “face” of the part). Fold them in half and sew them together.
- For the ponytail, knit a tube from the cast-on 7 stitches, which you decrease after 4 rows of 1 stitch.
- Sew all the parts.
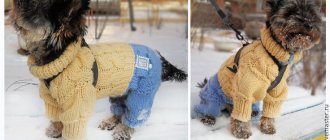
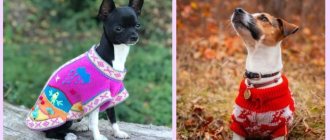
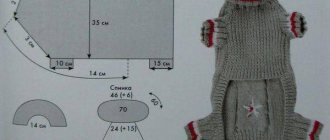
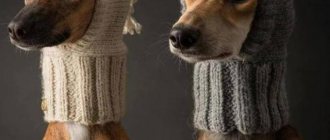
Clothes without seams
Clothes with a hood
Knitted by adding and decreasing stitches in the right places.
We measure neck circumference Chest circumference Waist circumference Leg circumference Distance from the “collar” to the dog’s paws
Naturally, each dog has its own size.
We calculate the loops. The yarn is different. We cast on loops on knitting needles equal to the circumference of the neck.
We knit a collar.
After the collar, we divide the knitting into three parts. It depends where the fastener will be. If it is on the belly, then there are approximately 15 loops on the sides and the rest is on the back.
The number of loops depends on the density of the yarn (threads). In every 2nd row, add one loop to the center of the sides.
So we knit up to the paws. Before the start of the hole for the paws.
These three pieces are then joined and knitted together. Approximately 3 cm. Then we begin to decrease the loops in the middle from the hole for the paws. Approximately two loops in every 4th row. And so on until the end of knitting. I get 35-36 cm from the neck to the tail, including the elastic band.
Well, the design is as your imagination dictates! It is tied with an elastic band on the armholes and straps using stocking needles. You can make holes for tassels after knitting the collar and stretch the cord with tassels, etc.
For girls, I knit the belly to the end of the fabric; for boys, it’s better to 8 cm from the armholes and close the loops. Continue the required distance only for the central part - the back. Everything is individual and needs to be measured. To sit beautifully!