If summer clothing for dogs is mostly purely decorative, then with the onset of autumn, owners of babies, such as Yorkshire terriers, need to think about replenishing their pet’s wardrobe. Pet supply stores and online stores offer a large assortment of clothes, but often the price tags scare you away, or you can’t find what you really want. The way out of this situation is simple - sew clothes for your Yorkie with your own hands. To do this, you need to have basic sewing skills, a little time and the desire to dress up your pet.
Knitted clothes for dogs
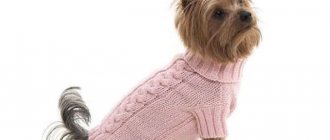
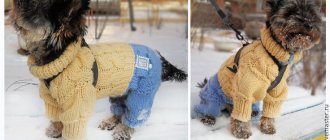
You can not only sew beautiful, as well as functional clothes for your dog, but also knit them yourself. This will be a little more difficult to do, but the result is worth it.
Experts recommend using knitted clothes in the autumn season, and in the winter simply putting them under a windproof jumpsuit
Also pay attention to the quality of the threads, as they should protect against the cold and not interfere with the absorption of sweat
This is very important for your dog's health and comfort.
There are many different options for knitted dog clothes. We have selected several ideas for you, among which you can find something suitable specifically for your pet.
Features of sewing winter overalls
Both the first and second options can be made for winter. It is insulated using a fleece lining, fleece and synthetic fillers (sintepon, holofiber). The lining is cut and sewn in the same way as the main part, and then both parts are carefully sewn together from the wrong side.
You can sew the top with lining in several places (along the chest, waist or across) so that the jumpsuit fits well and does not “fidget” in different directions. In the winter version, the sleeves, neckline and tail cutout must be placed on soft elastic cuffs so that they fit more closely to the animal’s body.
The item can be decorated with fur, buttons, rhinestones and appliqués. Make sure that the animal cannot reach the decorative elements, bite off and swallow them.
Stages of work taking into account the type of clothing
To make a specific item for any dog, you need to select the appropriate instructions
It is especially important to choose a simple pattern and high-quality material. Also, from the very beginning it is worth considering exactly how and where the fastener will be attached.
The remaining nuances relate to sewing or knitting, as well as decorative finishing.
Simple blanket
A blanket is a universal clothing for dogs that has many advantages. The item is easy to choose without trying on, it does not restrict your pet’s movements and warms the body in cold weather.
What a simple blanket looks like Additional information. Initially, blankets were used in equestrian sports to protect the animal from hypothermia during active physical activity.
You can sew the dog version of the blanket yourself. It is worth choosing a warm material such as felt or drape. Then use the simplest pattern, for example this one:
Pattern of a simple blanket
When the workpiece is ready, you can start sewing. Additionally, it is worth considering how exactly the product will be fastened on the dog.
Overalls
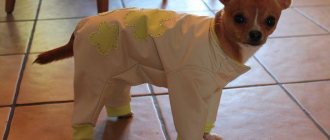
Sewing a jumpsuit is a little more difficult than sewing a blanket, although the functions and features of such things are quite similar. The complexity of the overalls pattern lies in the fact that in addition to the blanket base, there are also pipes for the paws (sleeves).
Overalls pattern
The pattern diagram may be slightly different, consisting of 1 piece. But this pattern option is much more difficult to calculate in accordance with the dog’s parameters.
Sweater
Knitting is the easiest way to make things for a dog, if you have skills in this type of needlework. Typically, the most popular clothing option for dogs is knitted sweaters.
Additional Information. For work, you can use knitting needles or a crochet hook - there is not much difference. But fabric knitted with knitting needles will be much more elastic and pliable during wear.
The principle of making a sweater is partly similar to knitting mittens. As a sample, you can take the following manufacturing algorithm:
Algorithm for knitting a sweater
If you don’t want to knit, you can use your owner’s old sweater and remake it into a product for your pet.
Dress
A dress is not necessary clothing for dogs, but many owners of miniature breeds like to decorate their pet. Usually such a thing resembles a children's sundress, and the sewing principle is approximately the same:
Dress pattern
In addition, a dress for a dog can be crocheted. You will get a very beautiful openwork product in retro style.
Video tutorials on crocheting dogs, puppies and doggies
Master class: crochet a dog
Yarn Arn Art baby 100% acrylic 150m/50g) beige and a little brown and white, hook number 2.
The video should load here, please wait or refresh the page.
Crochet marshmallow dog
The height of the toy is 15 cm. In this master class we will knit a marshmallow dog from plush yarn. You will need about 30 grams of Himalaya Dolphin Baby yarn, hook 4. It took me 1 hour to knit it.
The video should load here, please wait or refresh the page.
Winter clothes
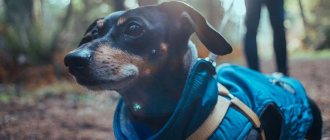
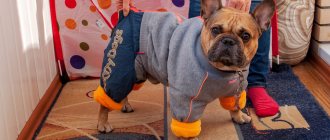
For many short-haired breeds (Dalmatians, Beagles, etc.), winter overalls are a necessity, especially for long walks. A thick waterproof top, thin filling and fleece or flannel as a lining are quite suitable for active dogs. In such a jumpsuit your pet won't be cold, but it won't get too hot after playing or jogging either.
For long walks, trips to nature, to the country - when the animal will be outdoors for several hours in a row, choose warmer clothes. And for small and medium-sized breeds (Chihuahua, Dachshund, Yorkshire Terrier, Spitz, French Bulldog, Lapdog, Spaniel, etc.), give preference to fur-lined overalls. Modern fillings such as synthetic winterizer or synthetic fluff are also suitable. Very light, but at the same time warm, they will not cause discomfort to the dog, allowing it to move.
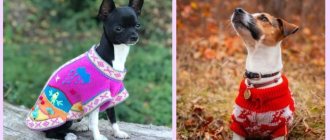
Dogs of the Chinese Crested, Mexican or Peruvian Hairless breed will need to wear a sweater underneath.
Dog clothing patterns
Almost every product requires its own pattern. Sometimes it can be difficult to understand the details, so we offer a more universal version of overalls with a pocket. The main thing to do is to adapt it to your dog’s parameters.
For those who are trying to sew something with their own hands for the first time and are worried that they won’t be able to calculate the correct dimensions for the pattern, we suggest using the simplest pattern. To do this, you need to take the following measurements from your dog:
- back length;
- chest circumference.
Divide the length of the back by ten and you will get the size of the side of the square. Use this to create your own pattern. It’s better to do it on a sheet of paper and first draw a grid. Only then start drawing dots.
Please note that the back should consist of two parts, and the fabric for the belly should be a one-piece piece
The following patterns are great for small dog breeds such as Chihuahuas, Yorkshire Terriers and others.
Knitting a hat
Knitting a hat with your own hands is easier than a “serious” piece of clothing. And for many small breed dogs, this is not just decoration, but a truly necessary accessory. For example, hairless Mexican or Chinese crested dogs without a hat can easily catch a cold in cold weather. So try to start replenishing your pet’s wardrobe with a headdress.
In order to knit a hat on knitting needles, we cast on the number of loops based on the volume of the head. We begin to knit from the muzzle to the neck in a circle. Having knitted to the base of the ears, we divide the knitting into two parts: the front and back of the head. We knit the front part of the hat, closing some of the loops under the holes for the ears. Having knitted to the desired height (to the beginning of the crown), we transfer the open loops to the auxiliary thread. We also knit the back part. Then we collect all the open loops on knitting needles and continue knitting in the round, gradually decreasing the loops at the top. We make the top of the cap rounded and decorate it with a pompom or tassel.
For small breed dogs, you can knit a hat with ears. If you knit with knitting needles, then try to knit it the same way as the previous model, only then pick up air loops from the holes for the ears and knit “ear covers”. If you crochet, then knit two parts like two halves of panties, where the “legs” are the ears. And then simply sew or crochet the connected parts.
So knitting for dogs can be not only entertainment and “hone your skills.” Hand-knitted clothes will protect them from the cold, and therefore from colds. And what can please the owner more than the good health and good mood of her beloved dog?
How to sew a windbreaker for a dog (instructions with pattern)
To do this you will need the following materials:
- Warm fabric
- Elastic band (“elastic band”)
- Elastic cord, two tips and a clamp for it
First, we take measurements and make paper patterns, only then we move on to sewing.
How to take measurements
- The volume of the neck is measured at its base, at the widest part. Always add about 2 cm to this figure so that the dog can breathe freely.
- The length of the neck is the distance from its base (the widest part) to the top of the head.
- Chest girth is measured at the widest part of the chest, just behind the front legs. You also need to add about 2 cm to this indicator (for very fluffy dogs - 3 cm) so that the animal does not feel tight in clothes.
- The length of the sternum begins at the shoulder blades and ends behind the rib cage, where the dog's torso begins to taper.
- Waist circumference is measured at the narrowest part of the torso, between the chest and hips.
- Back length is the distance from the base of the neck between the shoulder blades to the base of the tail.
- The length of the leg is equal to the distance from the lower edge of the shoulder blade (where the leg meets the torso) to the floor.
- The girth of the leg is measured at its base (the place where the leg meets the torso).
Body pattern:
1. Draw a rectangle that is the length of your dog’s back and the width of ½ the circumference of his chest.
2. Mark the length of the sternum (A) on the rectangle
3. Mark the center of the rectangle in height (B)
4. Draw a smooth curve from A to B. In the figure, the curve that is more suitable for female dogs is marked in pink. The curve more suitable for the male sex is marked in blue.
5. Mark ½ of the circumference of the neck (C) and a point about 1 cm (a little more or a little less, depending on the size of the dog) from the edge of its long side (D). Connect both points with a smooth line.
6. The opening for the sleeve should be slightly narrower than the circumference of the neck, but at the same time be free enough for the dog to move around without interference.
Sleeve pattern:
in the top picture on the left
1. Measure your dog's feet
2. Draw a rectangle whose length is equal to the length of the leg and the width is half of it.
3. Draw a smooth curve at the top of the rectangle according to your leg circumference
4. Leave a small seam allowance on the right side and along the top edge of the pattern (the left and bottom will not be needed)
Hood pattern (in the picture on the right):
in the top picture on the right
1. Measure your pet's neck circumference
2. Draw a rectangle using the length of the neck and ½ its circumference for the length and width of the piece, respectively.
3. Slightly round the top right corner of the rectangle
4. Leave a small seam allowance along the bottom, left and right sides of the piece. Don't add anything at the top.
5. Mark the places where the hole for the lace will be
6. Fold the piece of fabric in half, wrong side out. Attach paper patterns to it, as shown in the photo, secure with sewing pins and cut out all the parts of the future windbreaker. Finish the edges of the fabric with an overlock or zigzag stitch.
Having completed the described manipulations, you can proceed directly to sewing the windbreaker. It consists of three stages:
Sleeve stitching
1. Wrap the rubber band around your leg, directly at the paw, to measure the girth of the cuff. Allow a small allowance as the tape will shrink a little when stitched to the fabric. Cut the resulting piece, and then another one of the same length.
2. Lay out the sleeve pattern on a flat surface, wrong side up. Stretch the elastic so that it matches the width of the fabric on the side where the cuff will be. Pin it to the pattern, about 1 cm from the edge, and stitch it in a stretched state with a zigzag so that it remains elastic. When you release the elastic, the fabric will bunch up. Do the same with the second sleeve.
3. Fold the bottom edge of the sleeve so that the elastic remains inside, stretch the pattern again and sew only the fabric. You should have a simple cuff.
4. Fold the sleeve in half lengthwise and stitch the edges.
Sewing the hood and body
5. Hem the fabric on the flat (not rounded) side of the pattern by 2 cm. You will thread the lace into this cuff.
6. Fold the rectangle in half and stitch the edge opposite the drawstring cuff.
7. Turn the hood inside out and thread the drawstring through the cuff. Place the clamp and lugs on it.
Sewing the sleeves and hood to the body
8. Fold the rectangular body pattern in half, wrong side out, and stitch the edges between the sleeve holes. Sew the sleeves and hood to the corresponding holes and turn the windbreaker right side out. And now your jacket is ready!
How to take measurements correctly
Any pattern is based on the measurements taken. Inaccurate measurements will result in an ill-fitting item or the wrong size. The final result of the work will depend on how correctly you do this.
An important rule: all measurements are taken from the dog in a standing position!
First of all, take 3 pieces of soft, thin elastic. Tie one around the neck where the dog usually has a collar. The second elastic band goes around the chest, then around both front legs, up the sides and tied on the back. The third tag is tied at the waist - in the thinnest place in front of the hind legs. We get three main marks for further work.
Measuring the dog:
- Using the first mark we measure the circumference of the neck;
- We measure the circumference of the chest immediately behind the front legs along the widest part;
- We measure the waist using the third mark;
- the back is measured from the first mark to the beginning of the tail;
- the distance between the front and back paws (horizontal line parallel to the floor);
- for boys, measure the distance from the front paws to the genitals;
- paw circumference (front and back);
- measure along the chest the distance from the neck (first mark) to the front paw;
- the distance between the paws along the chest;
- the length of the front and rear legs (may vary depending on the product and your desire);
- back width - measure from the beginning of the right front paw to the left, across the back;
- width of the pelvis - removed similarly in the area of the third mark.
It may be useful to measure the distance from the first to the second mark, from the first to the third, from the second to the third mark. The volume of the tail can also be useful.
Sewing tips
So, you finally decided to sew clothes for your pet yourself, rather than buying expensive and faceless dog clothes in the store. It’s wonderful, because hand-sewn clothes will make your four-legged friend individual, and your little pet will definitely appreciate such care for him. How to sew clothes for a dog using patterns?
Small dogs should be measured as follows:
- first of all, we measure the length of the pet (along the back) from the withers to the tail;
- then we measure the height of the paws from the floor to the dog’s sternum;
- then you need to measure the dog’s belly;
- Next, measure the length from the dog’s neck to its groin (this size will depend on the gender of the pet);
- The last thing to measure is the animal’s body and its circumference.
The measurements have been taken, the next stage will be making patterns and sewing clothes. The process of creating patterns and modeling clothes is very important.
This will require considerable perseverance and attention. You can look for diagrams and patterns in this article
Below you will find what you need. The article contains not only photos, master classes, but also a video on how to sew clothes for small dogs.
1) Pattern of overalls with a hood for a Chihuahua:
2) Clothes for Yorkies:
3) Pattern of shoes for toy terriers:
The choice of fabric for sewing clothes for a pet depends on seasonality. It must be remembered that summer is diametrically opposed to winter. For winter clothes, it is better to choose warmer materials; it would be useful to use insulation (sintepon).
Spring and autumn clothing should be waterproof and repel dirt well.
Remember, tailoring clothes for dogs is impossible without high-quality accessories: buttons, zippers, Velcro, hooks and fasteners. The fittings must be strong and beautiful.
Let's start with the hook
There are many techniques for crocheting. Let's look at two of them:
- Moroccan technology;
The use of this technique provides such advantages as the tightness of the knitted clothing and retention of shape for a long time. Typically, sleeveless vests, blankets and capes are knitted using this technique, which turn out very beautiful.
- Freeform knitting technique.
In this technique, first, a full-size pattern is drawn up and only then the elements of the future clothing are knitted. As a result, all elements are connected to each other using a thread or hook. The freeform knitting technique will take a little more time, but it will be worth it. Clothes made using this technique are absolutely original and unique.
Related article: Owl made from salt dough step by step: master class with photos
But what to do with the fact that crocheted dog clothes are not warm? This problem can also be solved, and there are several options for getting out of this situation:
- You can use a lining that is sewn from the inside out. It is important to note that this option will significantly complicate the washing process. However, if your pet also has other clothes, this will not be a problem;
- The second option is to decorate products with ornaments that can be embroidered on the finished item or knitted - this will help retain heat.
Fashion ideas for different occasions
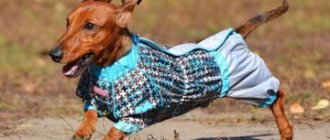
A dachshund’s personal wardrobe is needed not only to protect the animal from bad weather and cold. With the help of clothing, the owner shows the personality and charm of his pet.
Exhibition options
At the exhibition it is especially important to demonstrate your pet in all its glory. And a beautiful outfit may well serve this purpose.
Dog owners can decorate their pets with unusual clothes, bought in a store or made with their own hands.
A fashionable wardrobe for a dog may include:
- overalls;
- blankets;
- sweaters;
- coat;
- jackets;
- vests;
- trousers;
- tunics;
- caps and hats;
- smart shoes.
For winter
For cold, snowy winters, overalls with high-quality insulation or a fur coat are perfect for dachshunds to wear.
Your dog should have several warm clothes in his wardrobe so that it is important to wash them.
Handicraft lessons
It is not always possible to purchase an original vest or blanket for your pet. Also, postoperative blankets are not always available.
However, if you have at least minimal skills in using a needle, sewing machine or crocheted knitting needles, there is always the opportunity to make (sew or knit) original clothes for your pet with your own hands.
How to sew a blanket with your own hands?
The lightest option for a blanket would be a regular cape of a rectangular or triangular shape. The rectangular blanket is secured around the neck with buttons or Velcro.
In a triangular cape, two corners of the long side are passed between the dog’s paws and fixed on the back. You can also use buttons, Velcro or beautiful brooches.
For convenience, you can make a loop at the base for the tail to hold the blanket tighter.
For those who love and know how to sew, you can complicate the design a little. And sew a full-fledged warm or summer vest, decorating it with a collar or hood.
To make such a product, you first need to take measurements of your dog.
Sewing instructions
Required measurements:
Liked this:
Like
Tips for sewing clothes for dogs of different breeds
When making clothes for dogs, it is important to take into account not only the climate, season, breed and gender of the animal, and to carefully think through the placement of parts in this regard, but also the character of the pet. Dogs often play with other animals while walking, rub against trees and poles, run diligently and perform tricks at the behest of the owner.
Therefore, clothing must be made not only of high-quality and durable material, but also tightly stitched, so that it is impossible to easily tear off parts of the general pattern for dogs.
You might be interested in DIY methods for hemming jeans without a sewing machine
Universal outfit for dogs
In addition, you need to think about safety. It’s not uncommon for novice craftsmen to sew on a lot of unnecessary parts, which come off and are swallowed by the pet.
Note! It is necessary to place accents where the dog cannot reach with teeth or claws
This is important to remember when making products
Overalls for dachshund
The dachshund is the most unusual breed of dog. It requires special patterns, since it differs from other animals in the height of its paws, the length of its body and neck. She also often has long, furry ears and a small head. Making overalls for a dachshund is very simple from the material presented above, but it is much more interesting to make it from ordinary socks. At the same time, it is not necessary to have any special sewing skills to get a high-quality and comfortable product. You need to prepare:
- Socks;
- Yarn;
- Elastic type of thread;
- Needle with hook;
- Paper with a ruler.
The work process is as follows: First, you need to place the sock with the heel up and draw a line from the center to the other edge. After this, step back 3 centimeters from the heel and draw a line perpendicular to the one already drawn. Measure 10 centimeters from the perpendicular strip and draw another similar line. Make a mark for the paws on the created stripes. On paper, draw a template for the pattern - circles with a diameter of 6 by 3 centimeters.
Pattern for sewing clothes for a dachshund
Fix the templates using threads in the indicated places on the textile. Cut out circles on the fabric and remove the paper blanks. Using a hook and yarn, tie the holes, making double crochets. Try the blank on the animal and make holes for the legs, tail, head and urethra.
Ready product
For toy terrier
The Toy Terrier differs from other dog breeds in that it has a very thin body and stick-thin legs. Therefore, it is necessary to carefully measure everything before creating clothes. To do this, you should take a measuring tape and write down all the measurements, namely the parameters of the length of the back with the chest, neck, distance from the front to hind legs, the length of the abdomen and the diameter of each paw.
Regardless of which particular model of overalls was chosen, the algorithm of actions will look like this:
- Taking measurements and creating life-size patterns;
Patterns for toy terrier
- Cutting out templates and applying to the wrong side of the fabric;
- Fixing with pins and outlining with chalk;
- Cutting out the pattern with a margin of 2 centimeters;
- Cutting out the lining and sewing the parts where they join;
- Making hems for elastic bands and folds for edges;
- Trying on the product and adjusting to production sizes;
- Threading elastic bands into the cuffs, creating a zipper and turning the product right side out.
Note! Additionally, you can decorate the resulting product using various buttons fixed on both sides, pockets, luminous lines for walking in the dark. You might be interested in Description of printers for sublimation printing on fabrics
You might be interested in Description of printers for sublimation printing on fabrics
Clothes for Toy Terrier
Crocheted amigurumi chihuahua dog
Small lap dogs of the Chihuahua breed are the favorites of many. We will crochet such a dog in this master class.
To knit such a dog we will need:
Let's start by knitting the Chihuahua's head. While knitting, do not forget to fill the parts with synthetic padding.
We perform 2 air.p. and knit into the second loop of two six double stitches.
Next we will knit two double stitches. in all the loops. Let's make an increase in the next row as well. We will tie them into every 2nd loop. And in the new row we will increase in every 3rd loop. Then we will knit a row with increases in every 4th loop and after that we will perform another row, adding in every 5th loop. We will knit 5 rows.
Then we will knit a row in which we make ub-ki in every 5th loop. In the next row we will make a slip in every 4th loop. And then we will tie ub-ki into every 3rd loop of the row.
In total we have 18 stitches left in knitting. The head is ready.
Now we will immediately knit the dog’s neck. We knit 1 row in a circle. In the new row we will knit 2 dc. in every 2nd loop. After this we knit 2 more rows. Next, we increase in every 3rd stitch of the row. Next we knit 3 more rows. So we tied the neck.
We will knit the body separately.
The first row is a circular row of six st.b.nak.
Next, in all these six loops we will knit two double stitches.
Now we will increase in the row in every 2nd loop, in the new row we will increase in every 3rd loop. Next we will knit an increase in every 4th stitch.
Let's do 1 round row.
Then we will increase in every 5th stitch of the row.
We knit 3 more rows.
Let's move on to decreases.
We knit ub-ki in a row in every 5th loops. Then we knit 3 rows without decreases.
Next we will make ub-ki in every 4th loops. And we will knit 2 more rows.
Now we will knit ub-ki in every 3rd loops, in the next in the 2nd and in the last in all loops. The body of the future dog is also ready.
Now let's sew the head to the body. But we sew it so that the dog has a slight bend.
Now we will knit the ears.
We make a loop and then another one. In the 2nd we will tie 6 double stitches..
Then we will increase in the 2nd loops of the row.
In the new row we will make the increase in 3 stitches of the row.
And in the 1st row we will tie the increase in the 2nd loops.
We knit 3 more rows in a circle. And then we make ub-ki in every 2nd loops. That's it, the ears are connected.
Now we tie the front legs and start with white threads.
Now you need to perform 6 double stitches in the loop.
Next, we knit 3 lush columns, 1 each in a loop. These posts will replace the dog's fingers.
Let's connect further st.b.nak. 3 rows in a circle. Now let's continue knitting 5 rows with sand yarn. After this, we will perform 3 ub-ki in any places and knit another 5 rows in a circle.
Sew in the 2nd stitches of the row. And then into everything. Paws are tied.
Let's start knitting the hind legs with white threads.
Let's knit 2 stitches and then in the 2nd stitch we'll make a row of 6 double stitches. Then we will tie 3 lush columns. Then we perform 3 more rows in a circle.
Now we only need to knit the soles of the paws. And therefore we knit only the lower 4 stitches in double stitch. We turn around and do air.p. Next we need to knit another row of 4 double stitches. And let's repeat the same series again.
Sew the heel of the joint. This is how we got a little slipper.
Now we attach a sand-colored thread to the heel.
We knit a row in a circle and make ub-ki in it through a loop.
And then, on the contrary, we will make increments. Let's knit 2 double stitches. in all loops.
After this, perform 2 circular rows. Then we will make ub-ki through the loop. And in the last row we will make ub-ki in all loops. The paws are ready.
Let's knit a face for the dog. It will be white.
We knit the first row of 6 double stitches. We will expand the 2nd row by doing 2 double stitches. in all loops. Next, we’ll knit the row in the row through a loop.
We knit 3 rows in a circle without increases. Sew on the muzzle and embroider the forehead.
Let's tie the eyelids together. We do 6 air.p. Let's knit a joint st., 3 st.b.n.c. and 1 more tbsp.
Let's tie a ponytail. We perform 6 st.b.nak. into a loop and knit 5 rows in a circle.
We sew all the details into place.
Using a needle, sew beads on the eyes and on top of the eyelids.
We cut out a scarf from felt and tie it around the dog’s neck.
MOST READ:
podelki-x.ru