Any owner will not allow his dog to live on bare ground. It is much more important for outdoor pets to have shelter that will protect them from the sultry heat and piercing wind. But even domestic dogs will not refuse their own house, where they can relax from noise or games. You can purchase a ready-made booth, or you can build or make it yourself.
Types of booths
Booths can be very diverse, it depends on the financial condition and imagination of the owner. However, it is customary to divide types of housing according to certain criteria:
- The material from which the house is made;
- Type of insulation;
- Roof shape;
- Size;
- House format.
There are small, medium and large booths; this criterion varies, depending on the size of the pet. There may also be a house with a flat, gable or pitched roof. The first option is the simplest, but does not ensure proper drainage of rainwater. The second type allows you to use the created attic space and expands the volume of the booth. The third could be an interesting option if the roof opens. The house can be easily washed and ventilated.
The insulation of the booth depends directly on the climate. Some owners set up several homes so that the pet does not freeze in winter and does not overheat in summer. There are booths without insulation (summer), with insulation (winter) and with electric heating.
The format distinguishes a kennel with a simple structure, consisting of four load-bearing walls with a passage (manhole) and a roof. And complex booths with an entrance hall and a separate sleeping area. They are usually larger and more comfortable. Another option is an aviary. This is a typical enclosure with one solid wooden or brick wall and a protective roof.
In addition, the main typification is characterized by the material of manufacture. Houses can be made from almost any materials. The most popular are brick and wood . You can construct a booth from straw, plywood, drywall and other available materials. But the worst decision would be the choice of metal. It does not retain heat and heats up quickly. Often materials are combined.
Made of wood (boards or timber)
Wood is the most common and correct material for building a dog house. It retains heat well, lasts a long time, and if properly processed and protected, does not become damp or spoil. The best is considered to be pine needles - boards or logs, dried to 10%, without cracks, knots or pronounced irregularities.
walls from them . This material delaminates quickly and does not last long. To cover a wooden booth, you can choose wooden or plastic lining or a block house. The floor must be laid with solid boards without holes.
Made of stone or brick
A brick booth always looks more expensive than a wooden one . It is solid and cannot be moved. Therefore, the choice of location for such a house should be justified and one hundred percent. Building a kennel like this may take more time, but brick provides as much protection from the cold as wood. Such a structure will not be subject to drafts.
Design with vestibule
To build such a kennel you will need simple boards. The difference from other options is the insulated partition with an entrance. The thickness of the bars should be at least 2.5 cm, and the dimensions of the bars should be 4x4 cm or slightly larger:
- First, the wooden frame is assembled. The floor will be ideal if you lay a piece of plywood on top. To insulate it from below, you can sew up OSV - with a slab or simple boards, laying insulation under them.
- To moisture-proof the lower part of the booth, the frame is sheathed with roofing felt using a stapler. To prevent the floor from getting wet, it is advisable to make legs under it or install the building on level stones. The walls of the booth are lined with bars.
- The boards should be nailed to the frame horizontally so that the lower edge of the top plank overlaps the cut of the board from below. Next, the walls are insulated from the inside. To do this, vertical strips are stuffed onto them and insulation is laid between them. After this, cover the top with film and cover it with a sheet of plywood.
- To simplify the manufacture of wall ceilings, instead of boards, you can use OSV - slabs. The final step in constructing a kennel is making the ceiling and roof.
After familiarizing yourself with the options for booths and assembly techniques, you can choose the most suitable one for your pet. A well-built structure will serve the dog for a long time. The dog will appreciate taking care of himself, in return giving his owner his love, devotion and fidelity.
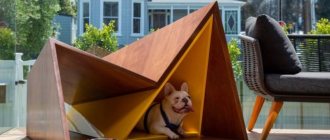
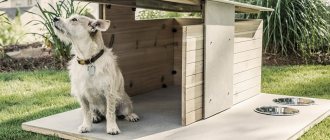
Photo selection of beautiful and unusual booths
Made of wood
Made of brick
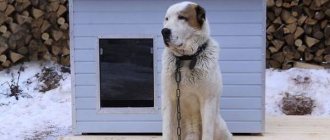
Pet shelter
To create a canopy you will need several metal, metal-plastic pipes or wooden blocks. Plastic sheets, corrugated sheets or slate may be suitable for a canopy. It is better to cut out pieces of the canopy, such that they will cover the roof of the booth.
At a distance from the side or front wall of the kennel, dig 2 pipes or long, thick bars that will serve as a support for the canopy on one side, and on the other side the support is the roof of the kennel.
For a stand on the ground, you can place a wooden pallet under the roof, which is leveled with a sheet of plywood. If the roof is triangular, then the canopy is attached at a large angle from the junction of 2 roof sheets or is fixed under its overhang. This is necessary to prevent water from pouring between the joints.
Choosing the best location for installation
You need to choose a place for your pet, adhering to certain rules. It is important to remember that the worst option would be to keep the dog in a dark barn. The animal will not see the territory and people, it will become irritated by the sounds of mice or insects, electric lighting spoils the dog’s vision, and the pet’s body heat will not be enough to heat a large room.
Criteria for choosing the best location for the booth:
- An elevation, not a pit; the kennel should not be allowed to stand in a puddle, otherwise the floor will become damp and the dog will freeze;
- The best option would be to build a booth near strong structures (fences, sheds, houses), they will provide additional protection from wind and rain;
- It is important to select a place with a natural hard surface so that during dirty seasonal periods both the pet and the owner can easily reach the house; concrete and asphalt can negatively affect the formation of the dog’s paw;
- Remote location from the central passage to the house, pets do not like it when people constantly scurry past them, this brings discomfort and irritation;
- One of the most important points is a good overview; the dog should be able to freely look through all corners of the yard, keep an eye on family members and strangers coming and going.
And if there is a strong minus outside. Do you need to take your dog into a warm place?
First, let's define what kind of dogs we are talking about. We think that in most cases these are at least medium breeds weighing 10 kg or more. It is better not to take such dogs home in cold weather. Even when it’s -20 °C outside, even when it’s -30 °C and below. By taking your dog into a warm place - no matter in a house or a barn - you are still doing him the same disservice.
There is no need to worry about your pets. Nature has made them more perfect in terms of adaptability to external conditions. As cold weather sets in, their body is actively rebuilt: the animal’s undercoat grows, biochemical processes are optimized so that the necessary part of the energy is spent on heating. By keeping your animal warm, you disrupt the functioning of this delicate mechanism, which results in stress and discomfort for the dog. The best way you can show care in such a situation is through proper nutrition. In the cold season, the diet needs to be made more caloric or additional feeding should be introduced.
The process of making a wooden booth
The process of making a simple booth cannot be called labor-intensive and long. It is important to choose the right materials, know the basics of design and how to use tools. First of all, a drawing is built. It can be simple or designer. Of course, if a beginner is engaged in construction, then it is better to abandon all non-standard solutions.
After determining the dimensions and constructing the drawing, you need to select materials and calculate their quantity . This is easy to do if you know the basic proportions of the future house. Then you just need to follow the instructions, use the advice of professionals or resort to their help.
Mating
Only completely healthy individuals over 18 months of age are allowed for breeding. Later it’s possible, earlier it’s absolutely impossible. For vyzhlovki this is the 3rd or 4th sexual heat. For survivors, the main condition is age; they are always ready for insemination.
Mating is carried out no earlier than the 10th day of estrus and no later than the 18th . To be sure, you can take a special test at a veterinary clinic to determine readiness for mating.
Making a drawing of the booth
A drawing is the basis of any structure. It helps you determine the measurements and calculate the amount of materials needed. To begin with, proportions are calculated using formulas. After which a graphic design and a three-plane schematic drawing in scale reduction are drawn up. The last step will be to apply the dimensional grid.
There is no need to come up with an intricate shape. Extra partitions, stairs and columns will interfere with the animal's movement. It is better to opt for the classic version - a cube with a veranda ledge.
How to find out what size booth is right for your pet
You cannot save materials on the size of the kennel. The pet will have to spend most of its time in it, and in a cramped, uncomfortable house the animal will develop stress and problems with the support system (spinal deformity, for example).
You need to calculate the size using formulas, despite the fact that there are ready-made approximate proportions:
- For small dogs (Fox Terrier, Dachshund): height at least 60 cm, length – 70 cm, and width 55 cm; manhole: width – 30 cm, height – 40 cm;
- For medium dogs (Shar Pei, Boxer): height – 80 cm, length – 120 cm, width – 75-80 cm; manhole: width – 35 cm, height – 50 cm;
- Large pets (Caucasian Shepherd Dog, Great Dane): height – 95 cm, length – 100 cm, width – 135 cm; hole: 40 by 60 cm.
Usually, the parameters of the future house are determined using formulas. The height of the booth is equal to the height of the dog at the withers + 20-25 cm . The length is determined by the length of the pet from the end of the tail to the claws of the front outstretched paws ( +10-12 cm ). The ideal shape is considered to be a cube, that is, the base should be square, in case the pet wants to lie across the house.
The hole can be oval, round or square. Its size is also calculated. Height – pet’s size at the withers + 10-12 cm, width – animal’s chest + 10 cm.
Don't build a kennel that is too big. The dog warms the home with its breath and body heat; a “house” that is too large will be difficult to “heat.”
What tools and materials will be needed for the job?
The set of tools and materials directly depends on the wishes and capabilities of the owner, the planned design and size of the future kennel. If the owner already has any building materials, then you can use them, avoiding some materials:
- Plastics, varnishes, coatings that emit unpleasant odors and toxins, especially under sunlight;
- Slate sheets (they are harmful to humans and have no benefit for animals);
- Metal (as the main or cladding material);
- Foamed polystyrene and compressed cotton wool are not suitable as insulation; they can cause allergies and reduce the olfactory ability of pets;
- Furniture wooden boards (due to low moisture resistance).
For any construction, a basic set of tools is useful: a hammer, a saw, several types of screwdrivers, a hacksaw, nails, a chisel.
The following basic materials should be prepared in advance:
- Wooden edged boards, timber;
- Lining for cladding;
- Chipboard sheet, plasterboard;
- Blocks;
- Styrofoam;
- Ruberoid;
- Fleece or other soft, warm fabric.
If a special design is planned, then the materials are selected individually. Similarly, in the case of building a brick booth (you need cement for the foundation). The roof can also be covered with tiles.
Construction of a booth with a pitched roof (video)
This is the best option for a booth. This kennel is easy to design and comfortable for your pet. In addition, many dogs love to hang out on the roof. There must be a slope, but not towards the hole . It is needed to drain rainwater. It is best to make the roof openable; this will make cleaning and ventilation of the house easier.
Step-by-step construction instructions:
- The bars are marked for subsequent cutting (the size depends on the parameters of the dog);
- A bottom frame is made (a rectangle connected with self-tapping screws; for large dogs the frame must be reinforced with additional partitions);
- The frame is sheathed with wooden boards, leaves of foam plastic or other insulating material are placed between the beams, and another board is laid on top of the structure;
- Legs or bars are attached to the outside of the frame to raise the future house above the ground;
- A long beam is cut into 4 sections: 2 of them should be equal to the height of the booth, another 2 should be 10 cm longer; the resulting blocks must be secured in a vertical position at the corners of the finished bottom;
- Additional bars are also installed vertically in the middle of the walls; two short beams form a hole in the front of the kennel (in the highest part);
- From the outside, the frame is covered with clapboard, mineral wool is laid between the bars and the resulting wall and secured with a stapler; the insulation is covered from the inside with glassine and filled with plywood boards;
- To make a roof, you need to knock down a frame of bars along the inner perimeter of the finished frame; foam is placed in the gaps between the beams and covered with film; a board is installed on top so that its lower edge (along the slope) protrudes beyond the frame by 15 cm, and on all other sides by 10 cm;
It is important to treat the top of the booth with impregnation or antiseptic.
Booth with a gable roof (video)
This construction option is convenient for small booths that will be easy to lift, carry and empty during cleaning. The construction principle is the same - manufacturing the bottom, frame, load-bearing walls and roof.
The beams are sawn and fastened in a horizontal position so that a rectangle or square is formed. A board is nailed from the outside, insulation is laid between the beams and covered from the inside with another board. Vertical bars are installed at the corners of the resulting pallet, equal to the height of the future booth. When making a frame, it is important to understand where the hole will be located and limit it to equal bars. From above, the vertical rods are connected by horizontal ones until the parallelepiped is completely closed.
Load-bearing walls are strengthened with additional partitions, surrounded on the outside with clapboards, insulated with foam plastic between the bars and covered with plywood on the inside. It is important that the front and rear walls are installed only after the roof has been placed.
Roof making:
- 2 bars, equal in length, are fixed at an angle of 40° (or greater, if required by the size of the booth);
- A similar blank is made and installed parallel to the first one (on the back of the frame), secured with nails;
- I cut out a beam equal in length (or 10 cm longer) and install it between the resulting blanks, and the roof frame is folded.
A blank for the outer wall is cut out of the lining, which in shape resembles a rectangle with a triangular attachment on top, where the hole will be is marked on top, and a hole is cut. The second similar blank must be solid . Install the casing on the uncovered areas of the booth.
Further actions are aimed at insulation, improving the design and improving the kennel.
Making a booth with a vestibule (video)
A booth with a vestibule can have either a pitched or a gable roof. This is an improved version of the single-chamber booth. The vestibule provides additional protection from the cold.
The construction of such a booth is standard and does not differ from previous options. But another partition wall is added. It turns out that the main frame will be larger than the sleeping place, which is fenced with additional beams and the main front load-bearing wall with a manhole.
With a gable roof
This type of canopy is more suitable for small booths, since it is inconvenient to lift massive structures during processing.
Stage 1. Frame assembly
They knock together a lower frame from four 5x5 cm wooden boards. Racks are mounted in each corner, and a frame of boards is made on top. To strengthen the frame, additional strips are nailed to the bottom on both sides of the wooden frame.
Stage 2. Roof fastening
Combine two equal beams 5x5 cm with an angle of 40 degrees. Next, a similar blank is made. They are placed on the top of the frame, aligned vertically, at the same level with the walls of the booth, and fastened with galvanized nails.
The resulting gables are sheathed with a transverse board, protruding 15-18 cm forward from one side. Next, a couple more boards of the same size are cut and nailed to the lower rafters.
Stage 3. Sheathing
The outside of the booth is covered with slats, preventing the formation of gaps. The bottom is finished with roofing felt, wooden stands are installed and secured.
Stage 4. Insulation
The internal space of the frame is lined with glassine roofing material, fixed at the corners with brackets. Next, the insulation is inserted. Lay the film again, and cover the walls and floor with a sheet of plywood.
Stage 5. Roof sheathing
The frame of the canopy is removed, the inside is trimmed with a sheet of plywood cut to the required size, and the structure is turned over. Rolled glassine is laid on top.
The voids are filled with insulation, and then the corrugated sheet is fixed with self-tapping screws. A ridge is installed at the joint line of the slopes, and the front rough cuts are masked with even strips.
To make it easier to remove the roof, one nail with sawn heads is nailed into the ends of the corner supports. Holes equal to the diameter of the nails are drilled in the eaves boards, and then the roof is put on.
Construction of a brick kennel
Material required for construction:
- Brick or natural stone;
- Roof;
- Thread and a special level with a plumb line;
- Cement mixture, water and sand;
- Tool for construction;
- Wooden bars.
Stages of building a brick booth:
- Pouring the foundation according to the shape and size of the future floor, this can be done using pouring cement or gravel;
- Wooden boards are laid on top;
- Then the walls are erected using a level and a plumb line (to avoid distortions); bricks can be laid either edgewise or flat, with construction bonding mortar placed between them;
- The inside walls are surrounded with felt fabric and reinforced with clapboard;
- The roof is formed according to the principle of a frame system (as for a wooden booth), the base can be made of bars or metal strips, it is recommended to cover it with boards, but the option of tiles is allowed.
How to choose a puppy
Before choosing a dog, you need to decide what place it will take in life. A hunter needs to look for good working nurseries. For a person who is simply looking for a companion, it is not necessary for his parents to have field diplomas.
An exceptional condition is the purchase of a healthy pet. It’s good if the breeder can show documents about the absence of genetic diseases in the parents of the future pupil. All veterinary measures taken must be noted in the passport.
Buying a puppy that is barely 4-6 weeks old is highly not recommended. The puppy must have time to fully go through the first stage of socialization with its mother and littermates.
The ideal age for moving to a new home is 10 – 16 weeks of age.
Insulating a doghouse for the winter
Insulating the booth is especially important for countries with cold climates. Some breeds are accustomed to sleeping in the snow, while others freeze even at room temperature. The type of insulation and its reinforcement is selected individually.
Insulation of booth walls (video)
The instructions above offer options for constructing already insulated booths (foam in a frame) . The summer version is made without internal cladding, so a timber frame remains on the inside, which needs to be covered with heat-insulating material. Mineral wool and foam rubber are suitable for this. Don’t forget about the bottom, which is insulated in a similar way.
It is important to hang a windproof curtain over the manhole. It is best to cut it from felt or other dense material. Sandbags are attached to the ends of the curtain to prevent the booth from opening during strong winds.
Insulation of floor and roof (video)
To insulate the floor, you need to cover the outer side of the bottom with roofing felt and treat it with substances that protect it from destruction. Inside, the floor is reinforced with waterproofing film or roofing felt, this is done using a construction stapler. Then the insulation itself (foam plastic, cotton wool) is laid and clogged with plywood or boards.
The roof is insulated like the floor - both from the inside and outside, however, for surface covering, roofing material alone will not be enough. It is better to use the same scheme according to which the internal insulation of the substrate was installed.
Infrared film
This is a material that is often used to insulate booths. It is especially effective when heated electrically. The film is laid between the bars during construction and in cold weather, when the heated floor function is turned on, the material is able to heat the booth to 60-70°C . However, not all dogs need this temperature inside their home.
Electric heating
An effective way to heat a kennel is considered to be thin electric panels that heat up to 50° , which means that the pet will not get burned. Therefore, there is no point in inserting them into complex cladding, but simply laying them under a sunbed or placing them near the walls is enough.
Building a kennel can be an interesting process when the owner is willing to experiment and can master his abilities as a builder. There is no point in buying a ready-made, expensive kennel when you can easily design one yourself.
5 / 5 ( 1 voice )
Do-it-yourself winter dog house: how to inexpensively make a warm enclosure
“The winter was very cold, not only trees, grapes and perennials froze, but also dogs,” writes a member of our portal. This article tells you how to make a winter kennel and an insulated enclosure for a dog with your own hands. Here are diagrams, drawings and photographs of buildings in which even freezing dogs can easily survive the most severe frosts.
- How to make a dog house for the winter: dimensions, drawings, work order
- How to make a warm enclosure for a dog: drawings and photos
- Examples of ready-made warm enclosures from FORUMHOUSE users
Capital structure made of stone, brick, building blocks
If the booth is built in one place forever, and this often happens in a small yard, then a permanent structure is most suitable. The main advantage of such structures is not strength and durability. Stone, including artificial stone in the form of monolithic concrete, is a natural material.
A shelter or shelter made of stone is similar to a hole or cave in natural conditions . If such an artificial hole is kept dry and clean, then a better home for a yard guard is not needed. Below in the photo is the principle of constructing a burrow booth: such options are easier to implement in stone or monolithic concrete.
Monumental stone booth
Recommendations for sanitation of a doghouse are, in principle, correct and justified, but it is extremely rare to find owners who carry out general cleaning and disinfection in the doghouse once a week, as recommended by sanitary rules. Essentially, these requirements and recommendations are written for keeping animals in a kennel or for a dog breeding business. Carrying out preventive sanitary treatment of the booth two or three times a year is quite realistic and sufficient.
But the conversation is about the design of the booth: is it necessary to provide it with a hinged lid or collapsible walls for cleaning and putting things in order inside. Serious practical breeders of dogs of large commercial breeds arrange capital structures without additional conditions: it is quite possible to carry out disinfection several times a year through a manhole.
An all-stone or concrete structure in the form of a cozy hole is much more comfortable for a home guard; dogs can also perceive their home as a fortress.