DIY dog shoes: knitted and waterproof boots
We are responsible for those we have tamed. Especially in the autumn, when pets’ paws are cold and need insulation. To make walks more comfortable, some owners prefer to make their own shoes for dogs. Making cute shoes with your own hands is not as difficult as it seems.
- 2 Taking measurements
- 3 Simple model
- 4 Two-piece option
- 5 Waterproof boots
- 6 Knitted slippers
- 7 Training a dog to wear boots
Before starting work
To prevent boots from interfering with the dog’s frolic, it is necessary to provide a small amount of space inside the shoes
Before the fabric is cut, it is important to remember the nuances regarding dog clothing.
Important details:
- A dog has four paws, so there will be the same number of shoes. But you shouldn’t cut all the units using the same pattern. We model the shoes in pairs - for the hind and front limbs separately.
- The dog should be comfortable. You should not choose sliding material. If you have to sew from such fabric, we provide pieces of rough material, which we later sew to the sole.
- As a fastener, we choose an option that will allow you to adjust the volume of the boot to the foot. The ideal type of fastening is Velcro, ribbon, lacing. Bad choice - buttons, zipper, buttons.
- You can eliminate the discomfort from wearing shoes by “turning” the cut with the seams facing out. You can hide them under any edging tape or braid.
It is important to remember that by accustoming a dog to improperly made shoes, the owner will not get rid of worries. In uncomfortable shoes, the dog will begin to adjust its gait, which will later lead to problems with the joints. It is better to immediately change the shoes if the dog’s paws move apart or the dog minces while walking.
Regardless of the model you choose, you will need for sewing:
- upper material - waterproof or wear-resistant fabric;
- warm material for the insole;
- clasp;
- threads, scissors, pins and other tailor's little things.
So, all the nuances have been taken into account. You can start sewing.
Tools
To sew shoes, you need to get:
- fabric, it is better to use fleece or synthetics that will not stretch;
- an elastic band wide enough to make a strap;
- Velcro that will serve as a fastener;
- vinyl circles for soles;
- needles and threads.
Many note the advantages of fleece, since it dries well and quickly, does not stretch due to washing, and is characterized by long-lasting wear. Of course, having bought the material, some of it will remain, so you can also make a beautiful jumpsuit.
Taking measurements
When taking measurements, the dog should feel calm and not break out
Sewing any clothing begins with choosing a style and taking measurements. Shoes are no exception, even if they are worn by a pet. Since the dimensions of animals even of the same breed may differ, we take measurements directly from the “model”.
We catch the dog and fix it in a standing position. To measure the foot correctly, we wait until the paws are freely positioned, when the dog leans on both pairs of legs. After this, lightly press on the pet’s heel. He should not bend or move his leg.
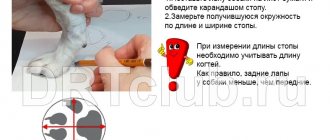
When walking, a dog does not step on its full foot, like a human, but only on its edge. Therefore, we measure the distance from the fingertips to the bottom edge of the pads. The width is determined by the outside of the paw.
There is another way to take measurements most accurately: place the dog’s paw on a wet towel and “imprint” it on the dry floor. We measure the print by recording the data on paper.
Why put shoes on your dog?
In winter, dogs' paws need to be protected from the cold, especially if the walk takes place on ice or snow. It is very important to protect your pet from salt and other chemicals that are sprinkled on the road. In rainy weather, they also protect paws well from getting wet.
In spring and summer, they help protect your pets' feet while walking on hot asphalt or too hard a surface. You should not deny your dog shoes if there are cuts on the paws through which various microbes can enter, causing rashes, inflammation or allergies.
You can please your pet by making his own boots.
The owner is faced with an important task - to correctly measure the paw, make a pattern and sew a product that will not embarrass the animal, but only protect it from unpleasant situations.
Simple model
To cut basic boots you will need two basic measurements and the height of the paw.
Even a novice craftswoman can handle the simplest sewing option.
To draw a pattern, draw a circle on paper with a diameter equal to the width of the paw. If the length and width of the foot are equal, we make the circle correct. If one of the measurements is a little larger, we “stretch” the circle into an oval, taking into account the width and length of the foot. In this case, mark a line in front of the insoles. In the figure, the diameter of the circle is marked AB.
Next, we apply a meter to the dog’s leg and determine how high the future shoe should be. This is the CD measurement. It is better to take the height of the boot with a margin so that the shoes do not fly off the paw while walking.
We cut out the front and back boots one by one.
Step-by-step instruction:
- Add one and a half centimeters of seam allowance to the circle drawn on paper and cut out the circles.
- We apply them to the fabric, pin them and cut them out.
- Place the dog's paw on the resulting part and gather the fabric around it.
- Grasping the metacarpus, we collect the excess fabric into darts and secure them with pins.
- From warm fabric we cut out a piece that follows the shape of the inner circle. This will be an improvised insulating insole.
- We adjust the insole in the middle of the main part.
- You can sew insulation or bologna fabric over the boot.
- We sew the dart lines and cut off the excess folds of the fabric.
- We add 1.5 cm to the top of the product, leaving a hole for the lace. We thread the lace.
- We form the same tie on the metacarpus of the hind paw.
It is important to remember that shoe sizes for front and back paws are different.
How to sew shoes?
Making a new item involves performing the following steps:
- Choice of style.
- Taking measurements.
- Creating a pattern.
- Sewing.
Boots
Let's quickly and step by step figure out how to sew shoes for a large dog, in the form of simple boots with a comfortable fit and without a complex pattern. The material should be selected soft, elastic, waterproof.
The inner circumference includes the length and width of the foot. The straight CD displays the estimated boot height.
Next, cut out a large circle from the fabric, made in accordance with the measurements. In this case, it is important to leave a small margin (two centimeters is enough) for the hem at the top. Then the dog’s paw needs to be placed on the fabric, in the very center, then lift the material and wrap it around the paw.
In this form, the fabric is fixed with pins. Excess material (if any) is collected in darts (the fabric must be sutured very carefully - shoes must be put on loosely). It is advisable to sew a felt insole inside the boot or, alternatively, attach a thick sole to the outside.
Next, we sew the material along the darts, cutting off unnecessary fabric. The final touch is the fastener: it is recommended to do it in two places - at the very top and immediately above the foot (around the metacarpus).
Boots
This pattern is designed for sewing comfortable boots for dogs for the winter. These shoes are made from thick leather and are characterized by a high top and lining.
And this is what the finished product looks like
Part #1 indicates the sole with a cut heel. Part No. 2 is the upper part of the boot, covering the foot all the way to the boot. Detail No. 3 means additional free space inside the boot. The width of the rectangle is equal to the height of the foot, and the length of the part corresponds to the circumference of the sole. Part No. 4 (in the form of a cylinder) displays the bootleg - the height is selected arbitrarily, but it should be remembered that low shoes do not fit securely.
Sewing boots comes down to the following algorithm:
- Part No. 3 is sewn to part No. 1 along the semicircle line.
- Part No. 2 is sewn to part No. 3 - not completely.
- Part No. 4 is left open and not sewn. The bottom of the boot (the back) is connected to the strip behind the heel and to the upper front of the boot. The edges should be left free to make it easier to put on and take off your shoes.
- To protect the paws from getting wet and hypothermia, you need to sew a strip of fabric to one side of the boot (part No. 5).
- Next, try on the boots, marking the place immediately above the foot. Two strips of fabric are sewn here - you will need to stretch the Velcro tape through them. Two rows of fasteners will ensure reliable fixation of the shoes on the paws - such boots do not slip, do not interfere with walking, and do not twist.
Note: High boots can be paired with the inside of the overalls legs. Buttons or Velcro are ideal for fastening. The fastener needs to be divided into two parts - one is sewn to the shoe, the second to the inside of the legs.
Knitted shoes
For those owners who do not like to sew, we can recommend the knitting option. Knitted shoes for dogs are very similar to socks or booties. The advantage of such shoes is maximum wearing comfort. The pet's paw is completely on the ground, nothing limits the freedom of the fingers, and the fasteners do not put pressure on the joints.
Knitted shoes
The disadvantages of knitted boots include their extreme impracticality: they quickly collect dirt, stretch, and become thin. In addition, wearing such shoes requires regular trimming of your pet's nails, otherwise they will constantly pierce the fabric.
It’s not even worth talking about walking in bad weather. Knitted boots are also not suitable for winter: snow stuck to the fabric melts at the touch of the paws, after which the moisture saturates the material, freezes and forms an ice crust.
Shoes can be made more durable in one of the following ways:
- fix a thick insole made of felt or fleece inside the boots;
- create the sole of the product from dense waterproof material;
- upgrade the toe of the boot by reinforcing it with a small piece of nylon fabric or leather (then the claws will not pierce the toe);
Knitting shoes for a dog will not be difficult if the owner knows how to knit booties or socks. The first option is preferable, since the product sits loosely on the foot (like a shoe), and does not tighten the paw like a sock. The knitting algorithm is as follows:
- Sole.
- Shoe top.
- Rubber.
- Connecting parts.
- Ready product.
You can knit either with knitting needles or with crochet - whichever your hand is more accustomed to. Air loops are unacceptable (the product will quickly stretch), the threads must be strong and coarse, but not prickly.
Note: Knitted shoes are not suitable for long-haired dogs (if it is important for the owner to maintain the ideal quality of the pet’s fur), since the material of the product electrifies and rubs the animal’s fur. You can fix the problem (if desired) by adding a silk lining inside the boots.
Two-piece option
This cutting method will allow you to sew boots that fit your figure. Unlike the previous pattern, this boot will not be bunched up in a bag and looks more natural.
Step-by-step instruction:
- In accordance with the measurements of the foot, draw a circle. Add seam allowances to it and cut out the piece.
- Next, draw a trapezoid, as in the picture. The height of the figure in the middle is the height of the future shoe. The width of the trapezoid is a value equal to the circumference of the metacarpus. The narrowest part of the figure will be at the heel, and the sharp corners will form the toe. In order not to make a mistake with the “wave” of the bottom, we make a pattern on paper and try it on the dog’s paw.
- We line and stitch the top of the craft. For additional fastening, it is recommended to run an elastic band along the upper edge.
- We bend the trapezoid in half and try it on the paw. The fold of the figure will be on the back side at the heel. Sew the trapezoid to the round piece.
- Next, we sew the trapezoidal part along the straight sides, which are marked in orange in the figure. The back of the product will be straight and vertical, the front side will be beveled.
- If the shoe is too loose, we make a dart in the front, collecting unnecessary volume into a fold.
- We try on the product and mark the place above the joint. On the inside of the boot in this place we sew an elastic band or a lace with a plastic clip on the outside (number 2).
Shoe pattern for small dogs
Pet stores, Russian and the world's largest, offer a great variety of dog shoes.
And it’s good if you have the opportunity to come and try on boots, but what if not? Buying a “pig in a poke” means almost certainly throwing money down the drain, because the shoe should suit your dog, and without trying it on you can’t be sure.
Moreover, according to our observations, more than half of the owners of babies cannot find what they want: cheap Chinese consumer goods are of low quality and can be simply dangerous to use, and the cost of branded models is too high (with a modest choice). And no one has canceled the benefits of self-made shoes.
In this article we will share with readers our pattern, which we have been using for several years. With its help, you can make shoes for your dog with your own hands without any problems or unnecessary questions. Both those who know how to sew well and those who are picking up a thread and a needle for the first time will cope with the task.
Required Tools
Everything you need can be found in literally every home:
Fleece is the best material: it dries quickly, is easy to sew, does not stretch at all and lasts a very long time. And from its remains you can sew a beautiful jumpsuit for your baby.
First of all, download and print our pattern:
You will need to adjust the sample to the size of your dog's paw. Measure the pad using a centimeter (we wrote about this in the article “Does your dog need shoes” - at the bottom of the page there is a picture from which everything will immediately become clear) and transfer it proportionally to paper.
Sequence of work
As a result, this is what you should get.
Important! If you are not sewing with fleece, you may need to leave more seam allowance because... the fabric may delaminate, etc.
Also, if your dog has long and thin legs, you may need to lengthen the top of the product so that the clasp attaches above the metatarsus.
Putting on our shoes
It's quite simple: take the dog's paw in your hand and insert it inside the boot, like in a regular sock. Wrap the rubber band around the foot fairly tightly and secure with Velcro.
Now is the time to learn how to train your dog to wear shoes.
Useful tips
Shoes made in this way can be used not only for winter walks, but also in case of cuts, when the wound on the pad needs to be kept clean outside. Therefore, always have a sufficient supply of finished products.
The big advantage of this model is that the boot itself is soft, it does not restrict the dog’s gait, so it can be recommended even for puppies.
Waterproof boots
To sew waterproof boots you will need nylon or any raincoat fabric. You can insulate it with padding polyester, duplicating the part of the freebie and sewing them together.
This version of shoes for dogs is more complex in design, but one of the warmest and most comfortable.
We cut out the parts according to the instructions:
- Part No. 1 - boot sole;
- No. 2 - upper part of the boot;
- No. 3 - a strip of fabric to ensure free movement;
- No. 4 - detail of the lower leg;
- No. 5 - shelf of the product.
Add seam allowances to all parts and begin sewing:
- First of all, we attach a strip of fabric No. 3 to the sole.
- We connect strip No. 3 to the top of the boot, stitching it along the front edge.
- We sew part No. 5 to the shin detail. It will become a kind of valve that prevents moisture from entering the boot.
- We sew the top to the rest of the product. We do not sew up the side seam to make the boot easier to put on.
- We sew Velcro over the joint of the foot, the upper side of which will be attached with an overlap.
You can sew Velcro onto the top of the boot to secure the shoes to the dog’s overalls. To do this, we attach the soft half to the boot, and sew the hard Velcro to the jacket
We shoe your pet in custom-tailored shoes
Home page » Dogs » Keeping and caring for dogs » We put shoes on your pet in custom-made shoes
Tips before sewing
The Internet provides access to a large number of videos on how to make shoes for dogs.
Let's figure out what you need to know about shoes for our little brothers:
Remember that even people have health problems when wearing the wrong shoes. Dogs are also not immune to this, which is why it is better to make boots for dogs with your own hands; you can always alter them, making them more convenient for use, as, for example, in the photo.
Sorry, there are no surveys available at this time.
Materials and tools
In order to make shoes for your pet, you won’t need anything supernatural: materials and tools for making. They all depend on the model you choose.
What materials are best:
We have selected the materials, now we will decide on the tools; a pencil and a centimeter will be required. If you sew shoes, you will need thread and a needle or a sewing machine. To knit the accessory, knitting needles or a crochet hook and woolen thread are used.
Step-by-step master classes
On the Internet you can find many photos and videos with step-by-step instructions on how to make shoes for a dog with your own hands. Let's take a closer look at shoes.
Simple boots, no pattern
The model of simple boots is great for all types of dogs, including can be used as protection for a wound on the paw. However, veterinarians do not recommend wearing this shoe model for a long time.
How to make such a model with your own hands, details can be found in the video:
Warm boots with ties
Typically, a small dog needs boots for warmth when going outside, so warm two-piece shoes are an excellent option. The photo below shows an approximate pattern, but you need to make it according to your pet’s measurements.
Master class, warm boots with ties with your own hands, with details in the video above:
A dog wearing boots with ties will feel comfortable in both winter and summer. You just need to choose the right material, warm felt and angora for winter, fleece is suitable for summer.
Boots with tongue
The shoe model with a tongue has 4 parts for each shoe, all of them are made according to the pattern, which is presented in the photo below:
Now let’s figure out how to make such an accessory with your own hands, with a short description in the video above:
Warm and comfortable - knitted shoes
For those who don’t like or don’t know how to sew, there is another way to make dog shoes with your own hands - knit them. Typically, such accessories are used for home needs: after a bath or when there is a strong blow across the floor.
It will not be difficult to knit shoes for a dog in the form of regular socks or booties in the right size, especially since there are many videos on this topic on the Internet. Remember that the loops are knitted tightly and the threads hold their shape well (coarse, not scratchy).
It is clear that such an accessory is not suitable for the street; it requires improvement:
Photo gallery
The request returned an empty result.
Video “Boots for dogs”
The video shows how to sew boots for dogs of different models with your own hands.
Knitted slippers
Shoes may be needed not only while walking, but also at home. You can insulate your pet with cute knitted slippers that are easy to make yourself. For knitting you will need two knitting needles corresponding in diameter to the thickness of the thread, scissors and a ball of yarn.
For knitted slippers-boots, the same measurements are useful as for walking shoes
We measure the width and length of the foot, and also choose what height the freebie of the product will be.
Step-by-step instruction:
- We knit the sole detail. To do this, we cast on a knitting needle a number of loops equal to the width of the foot, periodically applying the yarn to the paper pattern. We knit the piece to the length of the paw.
- Next, we knit rectangular parts. Their size depends on the girth of the dog's paw and the desired height of the boot. You can make boots with the top turned up.
- Then we connect the sole part with the boot.
- As fastening we use lacing, knitted with a chain. We pass it between the loops in a circle and tie the ends into knots.
It is important to choose a yarn that does not cause itching for your pet.
The accessory will be useful for small breeds of dogs with short hair.
To soften the slippers, they are washed and dried
We offer a way to knit a jumpsuit for a Yorkshire Terrier dog with your own hands.
Dimensions
:
- Back length -28 cm.
- Neck circumference – 21 cm.
- Bust circumference -35 cm.
- Front leg girth -11 cm.
To work on the overalls you will need:
- gray wool yarn – 100g (about 300m);
- white and red wool yarn for finishing - 10g each;
- circular knitting needles No. 2;
- straight knitting needles No. 2.5 - four pieces.
Patterns used:
- elastic band 1 front, 1 purl;
- braid pattern with diamonds.
