Intravenous fluid administration to a dog
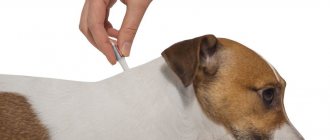
- To begin intravenous fluid therapy, your veterinarian will lightly sedate your dog and shave the area around the vein targeted for injection. This will allow the veterinarian to easily find the vein, insert the catheter and secure it with medical tape before connecting the IV.
- The IV is then connected to a bag of fluid (usually saline) that is lifted above the dog so that it can flow evenly by gravity into the body.
Subcutaneous administration to a dog
- The procedure for subcutaneous fluid administration is similar to intravenous fluid administration, but instead of inserting a catheter into a vein, a needle is used to transport the fluid under the dog's skin near the spine. The procedure is performed by veterinarians in a hospital setting, but is also commonly recommended for home use for dogs with chronic health problems such as kidney disease.
Ordering accessories
Your healthcare provider will provide you with enough supplies for 2 weeks of use. If you need more supplies, they can be ordered through your visiting nurse or we can arrange for the supplier to send them to you. The accessories you need and their quantities are listed below.
| Name | vendor code |
| Adhesive remover – 1 box | 3170 |
| Alcohol wipes – 1 box | 3330 |
| CathGrip - 1 pc. (CathGrip - each) | 2675 |
| Micropore paper tape - 1 box | 3174 |
| Non-sterile gloves – 1 box | 4545 |
| Plain gauze - 1 package | 3424 |
| Skin Prep – 1 box | 3332 |
| Perforated dressing material Telfa - 1 pc. (Telfa - each) | 3327 |
| Drainage bag - 1 pc. (Drainage bag - each) | 3361 |
Prefilled syringes
You will need a prescription for pre-filled syringes with normal saline. You can get a prescription from the IR Clinic. If your local pharmacy does not carry syringes, you can get them from the outpatient pharmacy at Memorial Hospital at 1275 York Avenue, between East 67th Street and East 68th Street. It is open from Monday to Friday, from 09:00 to 17:45. Pharmacy phone number: 646-888-0730.
to come back to the beginning
Installing an intravenous catheter in a dog
Catheter selection
Stiletto catheters are most commonly used in small animal veterinary medicine. In such catheters, a stainless steel stylet needle is located inside the catheter and protrudes from it by 1-2 mm. The stiletto is used to puncture the skin and veins. After the catheter is inserted into the vein cavity, the stylet is removed from the catheter. Catheters of this type are available in a variety of sizes and usually with an outer diameter from 24 to 14 G and a length of up to 50 mm.
The cephalic catheter is the most common IV catheter in dogs:
- 24 G for puppies
- 22 G small dogs
- 20 G for medium sized dogs
- 18 G for large dogs
Always use personal protective equipment and hygiene.
Hands should be thoroughly washed or disinfected before and after venipuncture.
Call a veterinarian Moscow
+7(495)162-70-70
A set of necessary tools
- IV catheter model with feeding kit and red fluid bag;
- intravenous catheter;
- plug or T-port;
- medical tape - two strips, cut to size before starting work;
Additional equipment you will need with a live animal:
- clipper and blades;
- 70% isopropyl alcohol;
- tampon/cotton wool;
- needle;
- syringe;
- sterile saline solution;
- gloves;
Flushing the system without a needle
Pre-flush the port with sterile saline solution. This avoids the formation of an air embolus with liquids or medications.
Site preparation
In dogs, the catheter is placed in the cephalic or medial saphenous vein.
- Place the animal in a thoracic or lateral recumbent position. Your assistant should support the animal in this position.
- Remove fur and shave the skin covering the IV site.
- Locate the cephalic vein visually or by palpation.
- Clean according to the clinic's standard operating procedure.
Catheter placement
- Your assistant should close the vein by applying pressure to it as close to the catheterization as possible.
- Insert the catheter with the needle at a slight angle to facilitate penetration through the skin into the vein with an upward bevel.
- Once blood appears in the needle hub, hold the needle in place while advancing the catheter from the needle into the vein.
Installing the adapter
Once the catheter is fully inserted into the vein, remove the stylet and place the installed adapter or injection cap on the end of the catheter.
Most veterinarians and technicians prefer the T-set adapter because it has an injection port and a port to which IVs can be attached to administer fluids.
Call a veterinarian Moscow
+7(495)162-70-70
Secure the catheter in place
- Using 15-25mm wide medical tape, place a 10cm strip, adhesive side up, on the underside of the catheter hub with a mark approximately 1.5cm to the left of the catheter.
- Carefully wrap the tape around the catheter hub and wrap the remaining tape around the animal's limb.
- Perform 2 additional wraps of 15-25 inch wide tape starting midway down the catheter under the hub and wrapping around the leg and continuing proximally over the catheter hub.
- Wrap another 25mm wide piece around the middle under the catheter hub. Make sure it is wide enough so that the injection cap does not come into contact with your skin or fur.
- A successfully secured catheter should prevent any movement of the catheter into or out of the vein.
Checking catheter placement
Once the catheter is secured in place, ensure that it is still properly placed in the vein by injecting heparinized saline or saline through the injection or tee adapter port and feel/observe for subcutaneous leakage.
Call a veterinarian Moscow
+7(495)162-70-70
Catheterization: indications
- The catheter should be placed first when urine is standing still, which can happen with benign prostatic hyperplasia or kidney stones.
- The device is used for perineal trauma, which leads to damage to the urethra. Before the organ heals, drainage is inserted through the abdominal wall directly into the bladder.
- Catheterization is also necessary after some operations on the genitourinary and gastrointestinal systems.
- The catheter is inserted into patients in a pharmacological coma.
- The device helps laboring women if they are unable to empty their bladder.
Bedridden patient with a catheter
In all these cases, the catheter is not inserted for long, since its presence contributes to urinary tract infections. But some patients need catheters permanently. For example, urine diversion is needed for people with a neurogenic bladder and neurological diseases.
Installing a drip (part 1)
There are various ways to administer fluids, but the most common method is to use a "drip bag" (a bag containing the fluid to be administered) and a length of "drip tube" attached to a needle that is placed under the skin (or into a vein through a catheter) and most dogs are very tolerate fluid therapy well.
The IV bag should be suspended at least 1m above the dog's level so that the liquid can flow under the influence of gravity. It usually takes a few minutes for the fluid to be administered and it is often helpful to hug and pet the dog during this period or offer the dog some food to distract it.
Preparing accessories.
- liquid bag
In most cases, a liquid called Ringer's solution is used.
- sterile IV set
Remove protective packaging.
Attach the liquid tube to the bag.
- There will be a large spike at the top end of the fluid line that will fit into the bottom hole of the fluid bag. Remove the rubber covering of the spike and insert it into the fluid bag. Do not let the tenon touch anything before inserting it.
- Rotate the spike so that it fits snugly against the bag of liquid.
Fill the dropper about halfway.
There is a drip chamber at the top of the fluid line that allows you to see how fast the fluid is flowing. Squeeze the liquid bag until the chamber is about half full.
Run liquid through the line.
- To pass liquid through the tube, remove the protective cap from the bottom of the tube. Loosen the roller clamp and watch the liquid flow through the tube and out of the bottom hole.
- Do not allow anything to touch the lower fluid line opening. This is the place for the needle.
- Close the roller clamp after a few seconds to avoid wasting too much liquid.
- Place a protective cap at the bottom of the tubing to connect the IV to the catheter or needle.
Hang the bag of liquid.
The bag of liquid should hang about a meter above the dog. If you don't have special equipment, you can place the top opening of the liquid bag on a clothes hanger.
a) In order to use the intravenous method of administering fluids, the catheter is connected to the drip system.
b) To use the subcutaneous fluid injection method, a needle is used to deliver fluid under the dog's skin near the spine.
Call a veterinarian Moscow
+7(495)162-70-70
Attach a new needle.
The bottom of the needle (where it attaches to the fluid line) may have a plastic coating. Remove this cover, if present, and attach the connector on the needle to the lower fluid line hole. The needle will have a different covering to protect the top end (the actual needle that is inserted under the skin). Do not remove this covering until you are ready to begin injecting fluid.
Catheterization: how to behave at home?
Most of us have seen patients in the hospital walking around with a bag of urine hanging on a stand. But in most cases they leave the hospital without it. However, sometimes the healing process after surgery or injury takes a long time, so patients are discharged home with a catheter. How do they live with it every day?
In principle, patients with a catheter can lead a normal life, that is, do light exercise, walk around the house, go for a walk or even go to work (the urine bag can be attached using special Velcro straps to the inner thigh).
Fixation of the catheter
However, if you have such a device, you need to get plenty of rest and remember to follow a few rules:
- First of all, you need to be careful with hygiene. Wash your hands thoroughly with soap and water before emptying the bladder or replacing it with a new one. It is also important to take care of intimate hygiene by washing the perineum and the outside of the catheter at least once a day with soap and water to prevent the migration of microorganisms into the urinary tract.
- For the same reason, you should not unnecessarily disconnect the bag from the drain hole.
- It is necessary to empty the urine bag regularly because urine is a good breeding ground for microorganisms.
- People with a catheter should drink more, preferably disinfectant herbal infusions, drinks rich in vitamin C, such as blackcurrant juice, cranberry juice. Low urine pH limits the growth of microbes.
Installing a dropper (part 2)
Choose a place for the dog.
- Place your dog on your lap or on a smooth, flat surface (table, washing machine or dryer). If your dog begins to fidget, consider asking someone to help.
- Make sure the animal is comfortable for 10-15 minutes.
- Talking calmly to your dog and stroking him will help him feel comfortable once he is in the position of receiving fluids.
Make a tent out of leather.
- Choose an area with a lot of loose skin, such as your shoulders or thighs. Using your thumb and finger, pull up some leather to create a leather tent.
- Do this with your left hand so that your right hand can guide the needle.
3.Prepare the needle.
- Remove the plastic sheath from the needle.
- Position the needle so that its sharp end is parallel to the back and facing the skin tent. Make sure the needle hole is facing up.
- Place the hand holding the needle on the dog's back.
Insert the needle.
- In one quick motion, pierce the skin so that most of the needle is in the tent. When the needle enters, release the skin tent.
- Since the needle is small and sharp, the animal will not feel this procedure.
- When you insert the needle, make sure it doesn't come out the back of the tent.
Call a veterinarian Moscow
+7(495)162-70-70
Preparing your pet for drug administration
Some animals hardly notice the injection, others behave restlessly or aggressively. In this case, it is worth calming the pet with conversation and stroking. In some cases, it is better to use a muzzle or a special restraint bag for miniature breeds.
Let your pet get used to the syringe. Fill it with a dose of medicine and give it a sniff. Be careful that the animal does not injure itself with the needle, keep the cap closed. You may not be able to smell the liquid, but trust me, your dog can!
Once you are sure that your pet is calm, it is time to give the injection.
If your dog has had injections before, he probably associates syringes with pain and discomfort. To combat this, give treats and use other forms of positive reinforcement such as praise and games.
Fluid administration (part 3)
Open the fluid supply tube.
- Monitor the fluid bag to ensure the correct amount is injected.
2. Be careful not to form a lump.
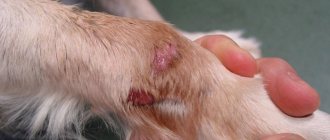
- With the subcutaneous method of fluid administration, the formation of a lump is normal. It will subside as the dog's body absorbs the liquid.
- If the lump is large and dense, and not the entire amount has entered the skin, you need to make a puncture with another needle in a different place.
Keep an eye on the drip chamber.
- If you notice that fluid is not flowing into the chamber, the needle may be pressed against the skin and blocking the flow. Gently move the needle under the skin without removing it from the tent.
- You may need to do this several times to ensure your dog receives the required amount of fluid.
Remove the needle.
- Once your dog has received the desired amount of fluid, close the roller clamp to stop the flow of fluids.
- Slowly remove the needle by backing it out of the tent and cap it.
- Pinch the skin for a few seconds to make sure no liquid leaks out of the tent (a few drops of liquid and blood are normal).
- Remove the used needle from the IV set and install a new sterile needle into the IV set.
Catheterization procedure
For most people, catheterization involves inserting a drain through the urethra into the bladder. If the procedure is carried out correctly, everything will be done without injury.
The catheter is coated with a gel with gliding and anesthetic properties. This substance also has a bactericidal effect, which prevents urinary tract infections. The tube itself is sterile, but may allow bacteria to migrate (such as E. coli that accumulate around the anus).
Catheterization is easier in women because they have a short urethra. In men, the urethra is long and naturally narrowed in three places, therefore, in order not to damage it, this procedure should be performed only in a good clinic with a urologist.
Removal of the catheter is also painless. But the first urination can be quite unpleasant (may be accompanied by a burning sensation, mild pain). Incompetent, too aggressive procedure causes pain and can even damage the urethra.
Painful urination
The cause of discomfort and inflammation of this sensitive part of the urinary tract can also be a drainage diameter that is too large.