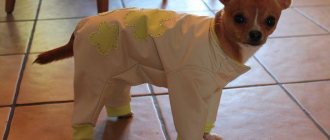
Autumn has come. Lately, people have often come to me asking me to show and tell them how to sew an insulated vest for a dog on their own. And today we will try to do this together.
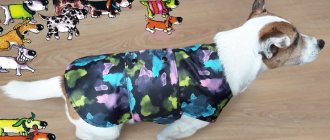
In general, a vest is one of the most versatile items in any pet’s wardrobe. Depending on what material you choose, it can be used both for winter wear and for cool, rainy weather.
Yes, there are many different clothing options for our pets: dog blankets, overalls, jackets, knitted sweaters and capes. Jack and I tried everything! Based on personal experience, I can note several advantages of a vest relative to other types of clothing for dogs.
Firstly, many Barbosik categorically refuse to wear clothes because they hinder their movements. For example, Jack really doesn’t like overalls, from the word “at all.” Just like it should be: with sleeves and pants. Having put on a suit, he becomes simply ridiculous: his paws practically do not bend, he walks as if on stilts, constantly “shaking himself off”, trying to throw off the “second skin” that binds him.
But wearing a vest is a completely different matter. All the paws are free, no elastic bands put pressure on the butt, movements are not constrained - jump and run as much as you like.
In addition, the vest gives the dog complete freedom of movement. It also performs the main function of any clothing for dogs - it protects the belly and back from dampness and cold. Yes, these are the parts of the animal’s body that are most vulnerable to hypothermia. After all, the paws of a four-legged animal need the least protection, since they freeze much less.
So, if there is not a mud flood outside, and the air temperature does not go beyond -30, then a vest for a dog is the most excellent and versatile option. And in terms of sewing it is very simple. Even a novice tailor can sew it without difficulty.
So, let's begin. I always advise: before purchasing fabric, make a pattern first. This will make it easier for you to decide how much fabric you will need to make a particular product.
When did dog clothes appear?
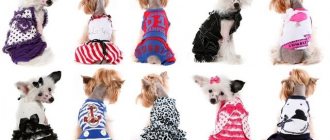
In modern pet stores you can see various types of clothing for dogs, but they were invented many centuries ago. Even the paintings of artists during the Renaissance depict pets in blankets. Protective vests for dogs were invented even earlier, when they were used as fighting animals. Since the 19th century, such clothes began to be produced en masse. This is due to the fact that in European countries there is a fashion for small short-haired dogs.
Now fashion designers are working on clothes for small dogs, developing entire sets for the owner and pet, which are made from the same fabric in the same style. Such models are exclusive and have a high price. However, even with a small budget, you can provide your dog with warm and fashionable clothes; you just need to study the instructions for sewing it yourself, create a pattern for a dog vest and choose the right fabric.
What kind of dogs need clothes?
Walks are very important for four-legged pets. Moreover, you need to walk your dog at least 2-3 times a day, regardless of the weather outside. If a dog has thick hair, then it is not afraid of frost, but pets with short hair, without special clothing that protects them from dampness and wind, are exposed to danger every day. Due to elevated body temperature, even a slight cold spell outside can lead to serious illness. The following breeds need a warm vest more than others:
- Russian and English toy terriers;
- Pekingese;
- Pomeranians;
- chihuahua;
- Prague rats;
- Yorkshire Terriers;
- miniature pinschers;
- Chinese Crested;
- short-haired rabbit dachshunds;
- papillons;
- toy fox terriers.
These dog breeds do not have a special mechanism for protecting against low temperatures; their bodies are the most sensitive to such changes. Without additional insulation, the joints, general immunity and digestive system suffer the most, so veterinarians recommend purchasing a warm vest for your dog or making one yourself.
Types of clothing for dogs
There are different types of clothing for autumn and winter walks. Among them there are sweaters, blankets, overalls, vests. Before sewing the first kit to insulate your pet, you need to decide on the type of clothing. Many dogs refuse to wear one type or another because of the restriction of movement at a time when they want to run and play. These clothes include insulated overalls, which are difficult to put on your pet alone.
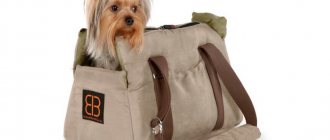
The most convenient variety are vests. They are universal, covering only half of the body, so they can be worn in both winter and autumn. There are also lightweight vests that are worn instead of a harness in the summer. In addition, dressing your pet is much easier - you just need to put the front paws into the sleeves and fasten the buttons or zipper.
We knit for dogs with our own hands. Spokes
Published Oct 8, 2015
Photos: 90
And I come to you with another warm selection for dogs. This time these are blankets, blouses, overalls, sleeveless vests, vests, ponchos, sweaters, dresses for small pets for knitting. Very interesting models will be useful for any weather and for all occasions. By measuring the size of your pet, you can customize clothing specifically for him, which is not possible with store-bought clothing.
For those who like to knit, I highly recommend starting your creativity with clothes for pets. It’s not big at all, it’s not complicated and you won’t get tired of knitting. And you can please your dog with new outfits every day.
Clothing is important not only for people, but also for animals. It will help your pets to be fully protected from bad weather, cold wind, rain and snow. Jumpsuits and sweaters can come in a variety of sizes and shapes, and bright accessories - bows, buttons, patterns - will help complete the set.
So, diagrams and descriptions are given for each model, and I wish you to quickly make your choice and start knitting.
Knitted blanket "Plant"
Jacket with buttons
Knitted blouse “Pestrushka”
Sleeveless vests
- Victoria
Source: https://lachat.ru/spokes/pet/dlya-sobak-spicy/2
How to make a dog vest pattern
When choosing a sample, you need to consider that this clothing may have a zipper on the stomach or on the back. Only a professional seamstress can construct the correct pattern on paper so that the finished item fits well. However, you can take a ready-made dog vest pattern with a comfortable fit on the Internet. It is recommended to measure the distance from the tail to the neck and divide the result by 10. This value will serve as a basis for further calculations.
Some patterns posted on the Internet are divided into squares. This is done to make it easier to transfer the pattern. 1/10 of the distance from the neck to the tail is the length of one side of the square. Now you can start drawing the pattern. A grid is applied to a large sheet of paper and the exact pattern is transferred across the cells. After cutting out the sample with scissors, you can draw it on the fabric that is chosen for sewing the vest. For dogs with long necks, you can make a stand-up collar. Its length is equal to the neckline. To secure it, a button is sewn onto the edge.
Knitting for small breed dogs with patterns
If you have a dog or cat in your home, then you already know what wonderful friendship is. Today's master class will help you quickly and easily make a colorful, bright and stylish sweater for your animal. Or a hat and blanket. Or a toy, or maybe even all together.
After all, knitting for your small dogs is an unreal, incomparable pleasure!
We have selected patterns for you with detailed descriptions, thanks to which even for beginner knitters it will not be difficult to knit their first projects and understand the principle of knitting clothes for small dogs. And then you can easily knit a sweater for a pug, or a small blouse for a Chihuahua, a vest for a poodle or a vest for a Spitz.
Sleeveless vest with fringe for dogs, diagram
For knitting we will need the following materials:
- Beige yarn 50 grams.
- Brown wool yarn 20 grams.
- Different knitting needles No. 2.5.
- Crochet hook or knitting needle.
Knitting density:
Rib stitch 2×2 30 stitches = ten centimeters, stockinette stitch 25 stitches = 10 centimeters, 40 rows = 10 centimeters.
Calculating loops.
Let's take measurements from the dog and calculate the number of loops.
Neck circumference - twenty-one centimeters 63 p. + 2 cr. p. = 65 p., rounded to 66 p., since their number should be a multiple of three; 1/3 of the girth is seven centimeters. (21 p. + 1 p. for a uniform elastic band 2 by 2 = 22 loops); 1/12 girth
1.8 cm x 2 = 3.6 cm (eleven loops - the width of our armholes at the beginning of work.
Chest circumference - 35 centimeters + 2 centimeters for a loose fit = 37 centimeters (111 loops); 1/2 girth (width of the back and belly) - 18.5 cm each (fifty-six loops) The distance from the withers to the center of the back is eleven centimeters.
Armhole height: distance from the base of the neck to the end of the front leg + one centimeter = seven centimeters (28 rows)
Armhole depth: for small breeds of dogs two centimeters (six loops). 1/2 chest circumference - 1/3 neck circumference - armhole depth = eighteen centimeters - seven centimeters - four centimeters (2 cm for each armhole) = 7.5 cm (18 loops). Eighteen stitches: 2 = nine loops; It turns out that when knitting armholes, you need to add nine loops from each edge of the belly and back.
To understand how many rows you need to add loops, divide the distance from the base of the neck to the tip of the front leg + one cm by the number of added loops: seven cm = twenty-eight p.; twenty-eight rows: 9 loops = 3 rows. It turns out that yarn overs must be made along the edges of every third row.
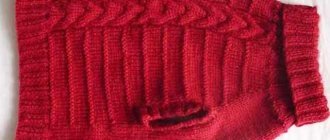
Back/stomach, description.
Using beige thread, crochet 66 stitches. Using a 2 by 2 elastic band, we will knit a collar twelve centimeters high, making strips of the same width with brown and terracotta yarn. Cast off eleven stitches, knit 22 (belly), cast off eleven stitches, knit 22 (back).
Let's turn the knitting over: crochet or knit 22 purl loops (back), then take the thread from the second ball and knit 22 purl loops (belly). You can start collecting the loops of one element onto a pin and tie everything together later.
Next, we crochet the back and belly 28 rows in satin stitch, creating yarn overs along the edges of every third row (nine times). The volume of the elements increases by eighteen stitches. We knit the first and last three stitches with garter stitch so that the edges do not curl.
After this, along the edges of each element we will dial seven air. p. (armhole depth = 6 loops + 1 red p.). Now each element has fifty-four stitches (22 stitches + 18 stitches + (2 for 7 stitches), and you need 56 loops (18.5 cm). We will add the missing two stitches when switching from satin stitch to elastic 2 by 2, creating two yarn overs at even intervals.Using a 2 by 2 rib, knit another four cm, creating colored stripes, like on a collar.
We sew together the elements of the sleeveless vest and use a crochet hook to make a fringe on the collar from dark brown or light yarn.
Gallery: knitted clothes for small breed dogs (25 photos)
Seamless clothes
Such clothes are knitted by adding and decreasing stitches in certain places. What do we need to measure?
- Measure your neck circumference.
- Chest circumference.
- Waist circumference
- Leg circumference.
- The distance from the “collar” to the pet’s paws.
Naturally, every small dog has its own personal size.
Let's calculate the loops. Yarn can be different.
Place stitches on knitting needles equal in circumference to the neck.
After the collar, we will divide the knitting into three particles. It all depends on where the fastener will be. If on the stomach, then about 15 loops on the sides and all the remaining loops on the back.
The number of loops will depend on the density of the yarn(s).
In every second row, add one loop to the middle from the sides.
Thus, we work until the paws. Before the beginning of the hole for our paws.
Next we knit the three particles separately. Approximately eight cm in the center and ten cm on the sides.
Next, we connect these three particles and knit them together. About three cm.
After this, we will begin to decrease the loops in the center from the hole for the paws. About two stitches in every fourth row.
And so on until the end of the work. We got 35-36 centimeters from the neck to the tail, including the elastic band.
We arrange everything to your liking.
We tie the armholes and straps with elastic stocking needles.
You can create holes for the tassels after knitting the collar and stretch the cord with the tassels, etc.
For girls, the tummy should be knitted to the end of the fabric; for boys, eight cm from the armholes should be knitted and the stitch should be closed. We continue the required distance only in the center of the back. Everything is individual for animals and needs to be measured. To fit well and comfortably!
The hood can be knitted as a heel for a sock . Let's make it removable with buttons or ties.
The principle of knitting sweaters and the basic pattern
We knit these sweaters from the collar . Let's calculate the number of items for the gate. If it turns out to be high with a lapel, we will increase its length by four cm so that after sewing the item together, the collar does not squeeze the neck. We will also add loops for symmetry, for example, when sewing the edge of a collar knitted with a 1 by 1 elastic band, one front and one back loop must be joined, otherwise the seam will be very noticeable.
So that the sweater can be put on over the collar and at the same time easily fasten the leash, we will make a hole in the collar for the collar ring . To do this, when knitting the penultimate row of the gate in the place where the middle of the back will be, we will close five loops in a row, and in the new row we will pick up the same number of air loops. When the collar is completed, divide the knitting into 2 unequal particles: 1/3 stitches for the belly, 2/3 stitches for the back. They can be knitted together from two balls or you can collect the belly loops on our pin and tie it later.
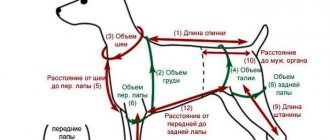
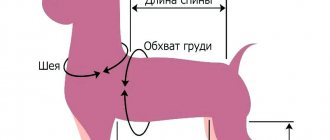
How to take measurements for a vest
To do this, you need to take the following measurements from your pet - the length of the back, the circumference of the neck, chest, abdomen, and paws. If the zipper is located on the back, then the distance between the paws is also measured. All measurements must be taken while the dog is standing on a flat surface, for example, on a table or hard sofa. The neck circumference is taken with the head raised. It is most convenient to measure a dog together, when one person holds it in the desired position and the other takes measurements.
How to sew clothes for a toy terrier with your own hands.
It only seems at first glance that sewing stylish, fashionable dog clothes requires material and time costs. Once you start, you will understand how easy it is to turn your toy terrier into a fashionista or fashionista.
Feel free to use your imagination and... your old out-of-fashion items. Or buy fabric.
What fabric to make clothes for toy terriers from.
The choice of fabric should be based on the rational use of the item. After all, you wouldn’t wear a robe made of raincoat fabric with padding polyester insulation at home, and before and in winter you wouldn’t go outside in cotton overalls.
The material for the future item should be exclusively natural, the fabric is soft and comfortable. The synthetic thread in the fabric will magnetize and electrify the toy terrier’s fur and, naturally, cause discomfort in the animal.
For evening walks in the summer, cotton or knitted T-shirts or T-shirts are enough for the toy terrier. You can dress up a Toy girl in a light skirt.
Rainy weather in spring/autumn dictates that your dog wear clothes made of waterproof bologna or raincoat fabric. Under the bottom you can wear a sweater, which must contain at least 40% wool or cotton.
A coat for a small terrier is made of drape, cashmere or wool. Materials such as fleece, padding polyester and fur, both artificial and natural, are suitable for winter.
How to correctly take measurements of a toy terrier.
To correctly take measurements from your pet, we arm ourselves with a measuring tape. We write down all measurements in a notebook (they may still be useful to you). What are we measuring? neck girth.
- length from withers to tail.
- the distance from the dog's front to rear legs in a standing position.
- length from the collar to the edge of the intended sleeve.
- chest circumference (measure behind the front legs at the widest part).
- the circumference of the back and front legs at the widest part.
- girth of the muzzle.
These standard measurements are suitable for absolutely any item.
Tools and materials
Before you start sewing, you need to prepare all the materials and tools. For insulated clothing you will need:
- bolognese fabric;
- lining material;
- zipper or fasteners.
To make a vest for a dog with your own hands, you will need a sewing machine that has the function of processing fabric with a zigzag. Without this tool, it will be difficult to sew clothes that will withstand active walks. Sewing by hand without using a machine will take much longer, but this option will also work.
The lining fabric intended for a warm vest for a dog should be quilted with padding polyester, then sewing will be easier. Instead of simple buttons or rivets, it is recommended to use a zipper to make the dressing process faster. It is better to choose metal, it will last much longer than plastic. The clasp on the back will be longer than the one on the stomach. If you plan to make this type of clothing, then you should also measure the distance from the neck to the tail.
Knitting for small breed dogs: preparing a wardrobe for a pet
To prevent your four-legged pet from catching a cold during a walk, he needs clothes. We offer basic knitting patterns for small breed dogs. And how to decorate them, your imagination will tell you.
A walk for pleasure - we knit a vest for a dog
The easiest way to start knitting for small breed dogs is a blanket or vest. The product is knitted with a simple pattern - garter stitch. Before you begin, measure your pet's parameters.
Necessary materials:
- multi-colored brown batik yarn (it consists of 50% wool and the same amount is acrylic) - 100 g;
- straight knitting needles No. 2.5;
- buttons - 5 pieces;
- needle with a large eye.
On a note! The description is given based on the following knitting density: garter stitch - 10 cm = 25 loops, elastic 10 cm = 26 loops.
Step-by-step description of the process:
- The length of our vest is 25 centimeters. The chest circumference is 53 cm, which is 136 loops. From the neck to the front paw - 7 centimeters = 20 rows. The opening for the front paw is 3 cm = 8 stitches. (paw circumference - 20 cm). The length of the armhole is 7 cm, which is 20 rows. Plank - 25 cm or 62 stitches. All this can be seen in the diagram.
- Cast on 136 stitches on the needles. Knit 30 rows (approximately 11 cm) with a regular 2 x 2 rib - knit 2, purl 2.
- Next use garter stitch.
- In the 31st row, knit 40 stitches, and close the next 8 (to make an armhole), again knit 40 stitches. and 8 close (second armhole). Knit the remaining 40 stitches. (this will be the second shelf).
- Turn the job around. Knit 40 stitches. shelves.
- Take another ball. Knit the tummy (40 stitches).
- Using the third ball, knit the first front.
- Knit 20 rows using this method.
- In the 21st row above the closed loops, to form slits for the paws, cast on 8 chain loops (twisted yo).
- Knit 3 rows (about 1 cm).
- Then decrease in 3 steps, decreasing 18 stitches at a time: 1st row - with an elastic band, every 7 stitches. - 2 pets. together; from 2 to 4 - according to the picture. Fifth row - 2 stitches together. in increments of 6 loops. From 6 to 8 rows - according to the drawing. Ninth - two together every 5 pets.
- Knit the remaining 8 rows with an elastic band.
- Close the loops.
- To make planks, cast on 62 stitches. Knit 2.5 cm in garter stitch pattern. Make 5 buttonholes on one placket.
- Sew the strips to the clothing shelves. Sew buttons on one of them.
How to knit a warm overall for a pet without any hassle?
A striped snowsuit is a little more difficult to knit as it consists of several pieces. Its style will suit any small dog weighing up to 3.5 kg, and you can choose the color at your discretion.
Necessary materials:
- dark blue yarn - 1 skein;
- blue yarn - 1 skein;
- knitting needles on a fishing line 4 mm thick (size 6 US);
- circular knitting needles 4.5 mm (7 US);
- darning needle.
Step-by-step description of the process:
- You should cast on 46 stitches on 4mm needles.
- Knit 8 rows of dark blue threads using a 2x2 rib.
- Now change the knitting needles to a larger size (4.5 mm) and take blue yarn. From the edge loop on one side and the other, knit 4 loops in garter stitch, and the central part (38 loops) in stocking stitch. Knit 8 rows in this order.
- Change the threads to blue ones. And knit the next eight rows in the same way.
- Continue working until you have knitted 3 strips of one and the other color.
- Switch to size 6 needles. Knit 8 rows with an elastic band. Close the loops.
- Now you need to knit the front part, which will cover the tummy. Start working with dark blue yarn. Cast on 18 stitches on 4.5 mm needles. Work three rows in garter stitch. After 5 rows - stockinette, but knit the first and last two loops in each row with a scarf stitch.
- This part needs to be narrowed down. Switch to blue wool, knit according to the same pattern (2 garter stitches each, with stocking stitches between them). In row 5, knit the first 2 and last 2 together. Make 8 rows.
- Knit two more stripes (blue and light blue) 8 rows each, decreasing the stitches in the fifth row. This way you will have three “shortenings”.
- When you have knitted 2 stripes of each color, change to size 6 needles and finish this piece with a two-by-two rib, knitting 8 rows.
- You now have two parts - one will cover the back, and the other (the smaller one) will cover the tummy.
- Take a needle with a wide eye. Sew these pieces together, leaving holes for the front legs (as shown in the photo).
Keep your paws warm - knitted boots for a decorative dog
While walking, snow gets stuck between the dog’s toes, it melts and turns into ice, which causes great suffering to the animal. To avoid this, we suggest knitting shoes for him. Here is a simple model with a foot size along the sole of 4 x 5 cm, a toe height - 1.5 cm or 4 rows, a shaft - 4 cm (12 rows), a foot girth - 12 cm (36 stitches).
Necessary materials:
- plain yarn (wool or wool mixture) - 30 g;
- threads of the same thickness in black for the sole - 10 g;
- sock knitting needles No. 2.5 cm.
On a note! Knitting density in one thread is 32 rows = 10 cm in height, 24 stitches. = 10 cm in width.
Step-by-step description of the process:
- To knit the sole, use black yarn folded into two strands. Cast on 7 stitches. Work the first two rows in stockinette stitch. The third according to this pattern: 1 chrome, from 1 pet. make 2, 3 - knit., from 1 pet. - 2, edge.
- From rows 4 to 15, knit everything.
- For the 16th row (there will be 7 stitches), use the following pattern: edge, 2 and 3 - together, 3-knit, 4 and 5 - together, 1 edge.
- Close the loops (17th row).
- For the boot, cast on a colored thread onto four needles: 1 (heel) - 6 stitches, 2 and 4 - 8 each, 3 - 6 stitches. (sock). Knit like this: 1 row - stocking, 2 - heel and toe evenly add 3 stitches, on the sides - add 4 stitches. From 3 to 6 - rib 1 x 1 purl.
- Knit the front part of the shoe on 3 knitting needles - 6 rows, knit the last loop in each, grabbing the first from the adjacent knitting needle.
- Knit the boot on 4 knitting needles - 9 stitches each. stocking stitch.
Which fabric to choose
When choosing material for sewing a vest for a dog, you need to consider the conditions under which the walks will take place. For the southern regions of our country, fleece that is not blown by the wind is perfect. However, this fabric is hygroscopic and with frequent walks in damp conditions it will get wet, endangering your pet. The knitted fabric is very warm and also looks stylish. But, unfortunately, it is too easily soiled, so it can only be worn in dry, windless weather. In more northern areas it is necessary to use an additional layer of insulation. A padding polyester of 4-6 mm is suitable.
The top layer is usually made of bologna or stain-resistant fabric. You just need to make sure that the vest for the dog is not too warm, otherwise the pet may overheat and get heatstroke, which is just as dangerous as hypothermia.
Sewing tips
After transferring the pattern onto the fabric, you can start sewing a vest for the dog with your own hands. When cutting out parts, 1-1.5 cm is added on all sides. If a lining is provided, then you can pin together 2 layers with safety pins and cut them out at the same time. Another trick for quickly transferring to fabric is to fold the pattern and fabric in the middle, line up all the pieces, trace and cut. Then both halves of the product will be symmetrical. In this case, the top and lining are outlined and cut separately. All work on sewing a vest for a dog is carried out according to the instructions:
- Cut out pieces from fabric.
- Sew shoulder and side seams.
- Sew the zipper first to the top, and then to the lining from the inside.
- Turn it right side out and stitch, leaving 2 mm from the edge of the fabric.
- Finish the edges with a zigzag stitch.
- On the front side of the sleeves, fold the edges of the fabric inward, sew by hand, and then sew on a machine.
- Treat the bottom of the dog vest in the same way.
- Iron finished seams.
After the shoulder and side stitches are sewn, you can perform a preliminary fitting - put the vest on your pet and see how it sits. If the armholes are too narrow or the collar does not fit tightly to the neck, you can widen or shorten the pattern. Wide armholes can be easily corrected by sewing wide bias tape.
Pattern of clothes for a toy terrier.
In order to sew clothes for a toy terrier with your own hands, we make patterns based on measurements.
- draw a rectangle in which one of the sides should be equal to the length of the future item.
- We set aside the points that correspond to the measurements along the chest line.
- We mark the width of the back by extending the pattern line.
- then we divide the width of the back in half and from the intersection point we measure the third part of the circumference of the toy’s neck.
- We connect the points with a semicircular line. This is the neck line.
- we build a cut along the shoulder.
- We draw armholes for the paws based on the distance between the paws and the circumference of the pet’s legs in the widest part.
- make a cutout for the ponytail.
The sleeve pattern for a toy is based on the length and girth of the paw.
Vest for toy terrier.
Let's start with the simplest. Let's try to sew a vest. Let's train on an old sweater:
- cut off the sleeves of the sweater.
- You can already see from the sleeve itself that the upper part of the sleeve will become the back of the product, and the lower part will become the belly.
- onto the upper part (back) we transfer the measured length from the withers to the tail, and cut off all excess with sharp scissors, leaving a couple of centimeters for the stitching.
- We make holes for the front and rear legs, also leaving a reserve.
- To prevent the edges from fraying, we overcast the edges, tucking the remaining margin inward.
- decorate the vest (optional).
That's it, the vest is ready, call Toy to try it on.
Blanket for toy terrier.
Now you can start making blankets. For a toy terrier, the pattern with dimensions is very simple.
- use the measurements taken of the length of the product (from withers to tail) and chest volume.
- To fasten the finished blanket you will need two buttons, or you can make a blanket with Velcro.
- We make the lining from padding polyester.
- Sew the two sides inside out, but be sure to leave room to turn the blanket inside out later.
- turning the product inside out, process the front side.
- Sew on the tab and buttons or Velcro.
- measure the blanket on the toy.
Overalls pattern for a toy terrier.
After you've got your hands on simple things, let's move on to the most popular dog thing - we'll sew overalls for that terrier.
- The overalls pattern comes in two types: one-piece, when the fastener is located on the back or tummy, and two-piece with a zipper or buttons.
- We transfer the selected pattern option to the fabric, leaving two centimeters at the edges for allowances.
- sew the top and bottom parts. Just don't forget about the cutouts for the paws. The correct connection of all components will be achieved if you focus on the reference points of the pattern.
- sew together the details of the legs. But we must do this in a mirror way. We sew the sleeves for the front legs at an angle of forty-five degrees to the back line.
- sew the sleeves to the body.
- We make an incision on the back along the line of the spine. We sew in a lock at a distance of two centimeters from the neck.
- If the back according to the pattern consists of two parts, then we connect them with a zipper.
- we make cuffs for the sleeves and neck.
- we sew them into the sleeves.
The pattern of overalls for a boy toy terrier differs from the pattern of overalls for a girl toy terrier with a cutout to meet the natural needs..
You can sew a overall for a toy from... colored children's tights. Ordinary warm tights for a height of 104-116 centimeters, with a cotton content of at least 80% and the mandatory presence of spandex and elastane.
- step back from the crotch of the tights by five centimeters and cut both tights. We overlock the resulting shorts.
- on tights, cut off the socks and get two suspenders or harnesses (call it what you want). We turn each one inside out, sew the edge, turn it back right side out and sew the edges together too.
- The finished harnesses need to be sewn to the shorts. The harness is sewn on the larger side.
- from decorative cord, regular lace, elastic, etc. make loops. You can use a different type of fastener.
- Sew the loops between the harnesses on the unsewn side.
- We try on the overalls on Toya and mark the place in the chest area and on the back where we will sew the harnesses together.
- don't forget to decorate the thing.
Shoes for toy terrier.
Dress like this completely. Let's sew shoes for that terrier. It won't take much time.
- on leather, leatherette, thick fabric that you are going to use for shoes, draw and cut out a circle whose diameter is equal to the diameter of the foot. Don't forget to add seam allowance.
- draw and cut out a rectangle. The width of which is equal to the diameter of the foot, and the length is the height of the boot top (whichever you want). Usually the height of the boot is made equal to the distance from the floor to the first movable tendon of the toy terrier.
- bend and sew the rectangle at the top so that in the finished product you can pull the lace into the fold.
- connect the boot (rectangle) and the circle. Sew the boot lengthwise.
- Turn the product inside out and trim off any excess allowances.
- we thread the lace through the top.
- We try on the boot for the toy terrier and adjust the lace so that the paw is not pinched, but the boot does not dangle.
You can use this pattern as the basis for any type of shoe for a toy terrier. You have the basic patterns, so start creating an exclusive wardrobe for your toy terrier.
Additional devices and accessories
Even if you use a standard pattern taken from the Internet, you can create a beautiful individual item. More experienced craftswomen can experiment with different colors of fabrics, combining them into a product. However, in this case it will be much more difficult to adjust the parts.
An easier way is to use multi-colored buttons with letters or numbers for decoration, and make original embroidery with the pet’s name on clothes for a small dog. Nowadays special rhinestones are sold that are glued with an iron. These and other thermal stickers will help make the product exclusive. And if you add protective elements and military attributes, you can create a tactical vest for a dog, similar to what is used for police animals.
If you attach a durable material with a ring in the middle to the collar, you can use the clothing instead of a harness by attaching a leash to it. Owners of especially active dogs that have already run away several times attach a moisture-resistant capsule to the vest. It contains the dog's data written down on paper - phone number, address or other information.
Recommendations for caring for clothing
As a rule, small dogs are very active. A walk with them often turns into an obstacle course, so outerwear often gets dirty. Constantly washing after every walk will cause the vest to wear out quickly. For autumn, it is recommended to make 2-3 vests so that you can walk several times a day. Dog clothes made from bolognese fabric can be easily cleaned of dirt using a sponge. After that, all that remains is to dry it on the battery.
If after a walk you need to wash a dog vest in a machine, then it is better to use baby or laundry soap, pre-grated or finely chopped. This detergent will not cause allergies in your pet and will perfectly remove any dirt.